WooCommerce Guide
Author - Constantin Nacul
WooCommerce is a popular plugin that adds... WordPress online store functionality. Since 2017, it was bought by the company that developed the WordPress engine, and is now personally involved in the support and development of the plugin.
In this article, we will look at the main nuances of working with WooCommerce: how to set up the plugin and add products, connect payment and delivery. And at the end of the article there will be a selection of useful plugins that may be useful to you.
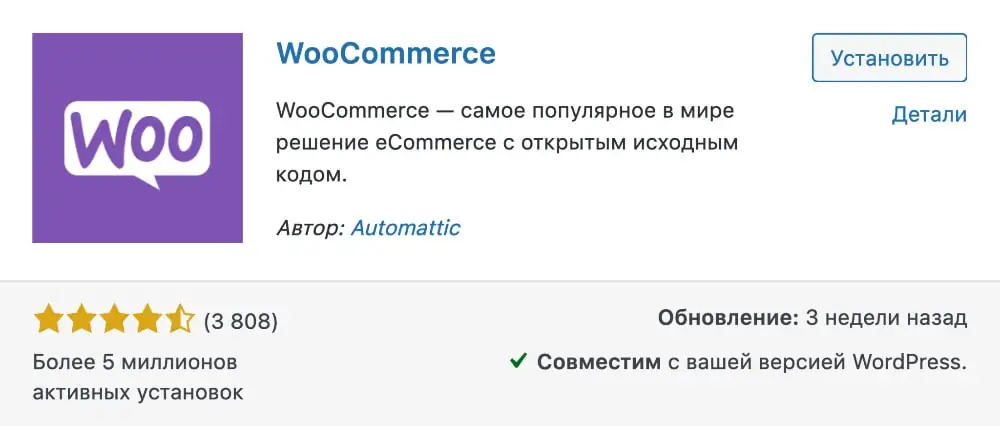
WooCommerce in the WordPress Plugin Library
Installation and basic setup of WooCommerce
In your WordPress console, go to Plugins – Add New, search for “WooCommerce”, then install and activate the plugin.
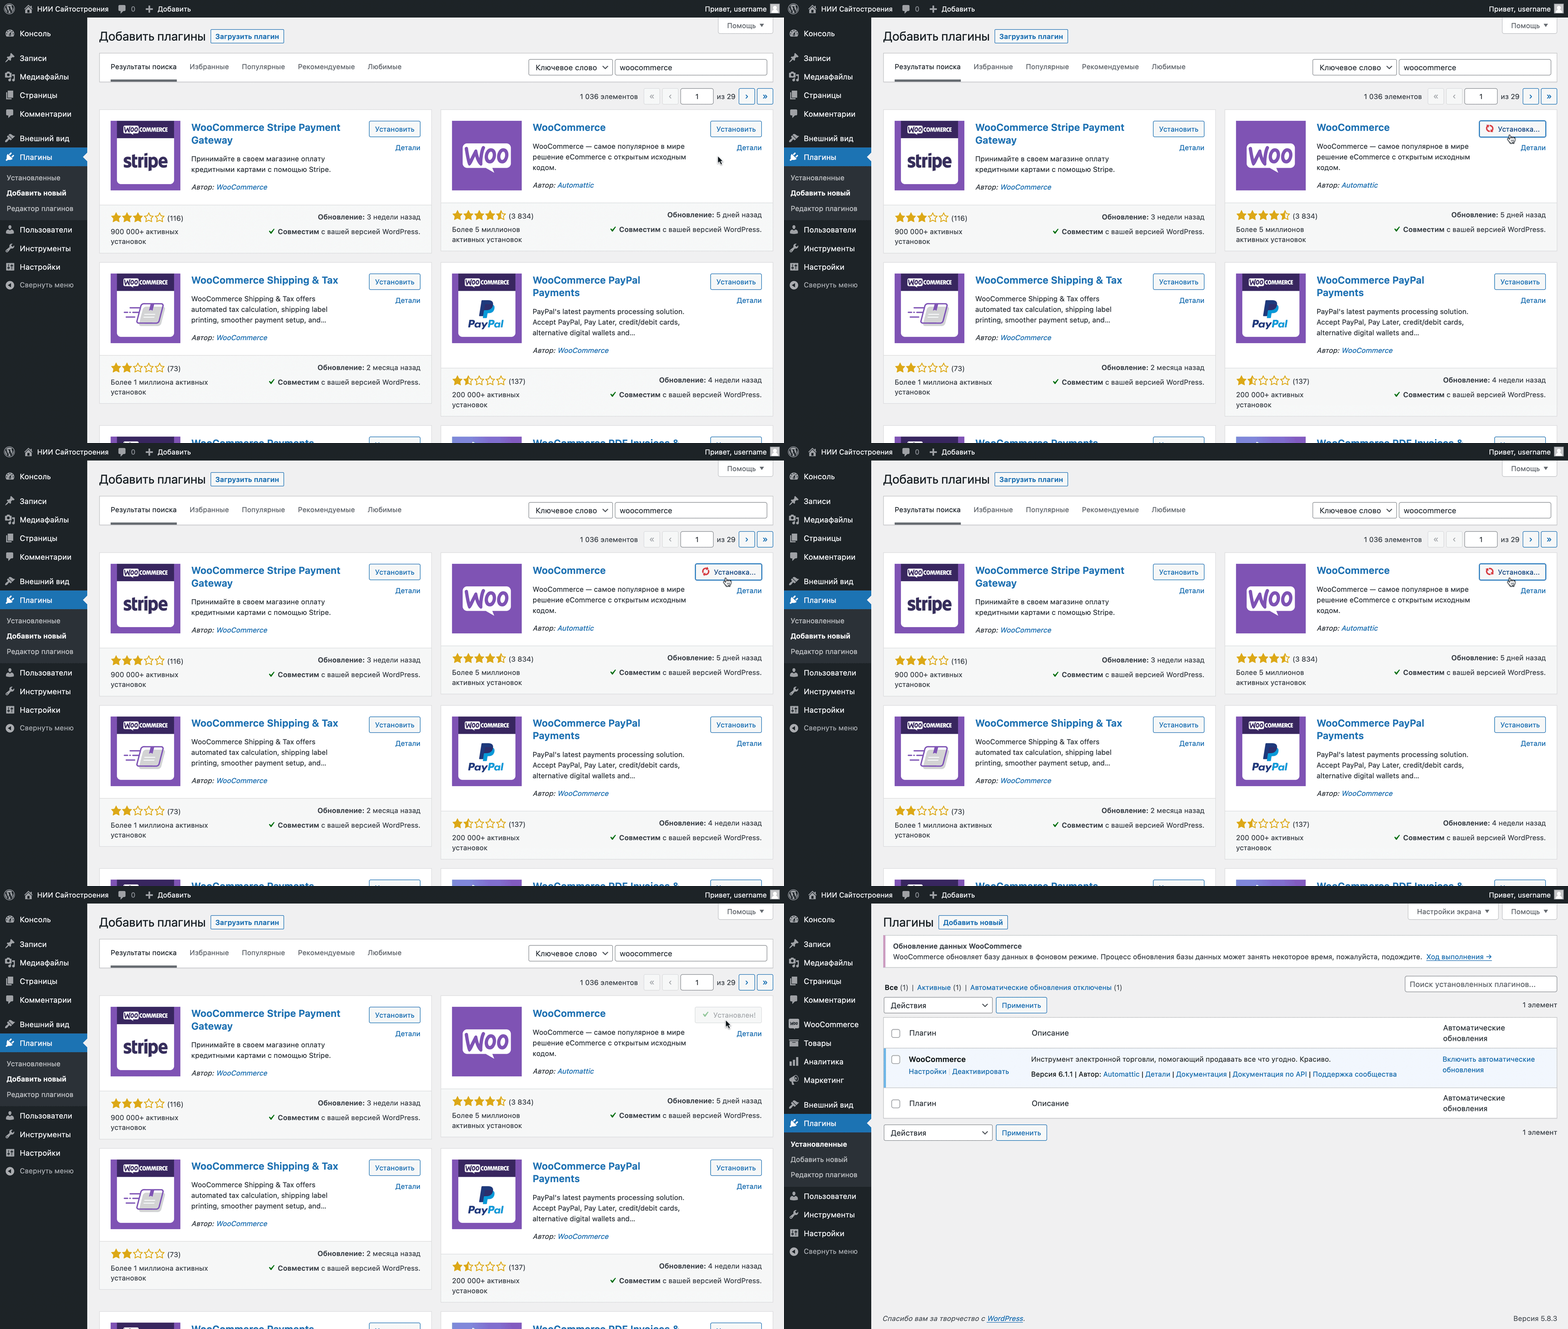
After activating the plugin, the Bookomers setup assistant will open, where you will need to fill out information about your online store on five screens. Here's what will be on each of them.
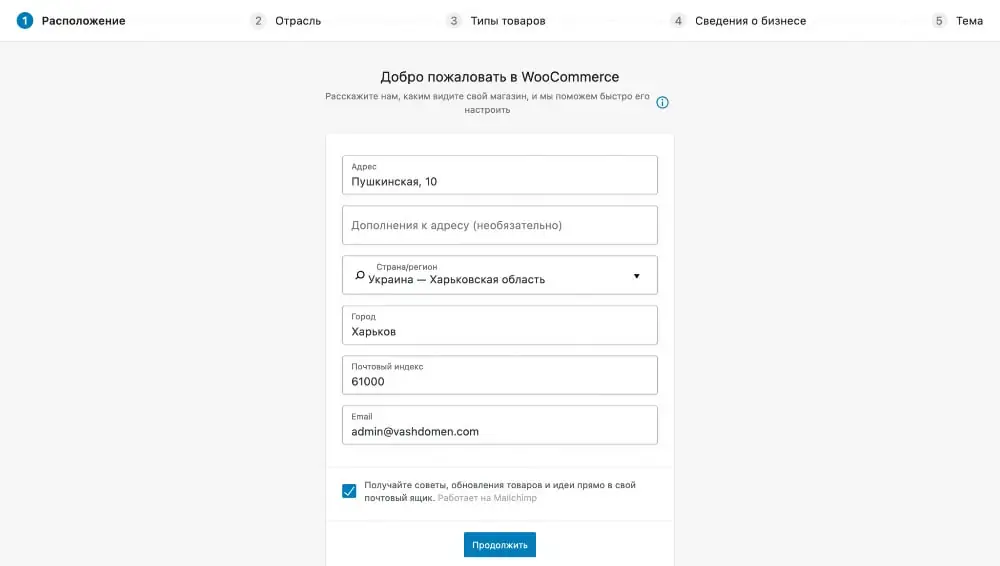
Step #1: Location
Here you need to enter your business address and email for important emails from WooCommerce.
The address is needed to automatically set up the store currency. And the shipping cost will be calculated from it by default.
Important emails from WooCommerce are, for example, notifications about new orders or emails with a link to reset your password.
Also, WooCommerce newsletters will be sent to the specified email unless you uncheck the box at the bottom of the card.
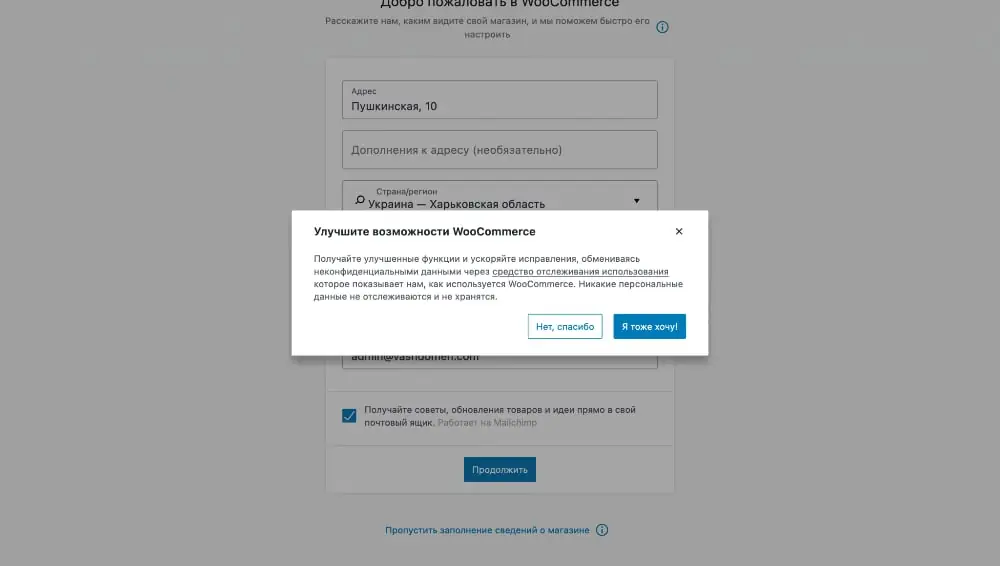
Once you click Continue, a pop-up window will appear asking you to share non-sensitive data with WooCommerce developers so they can better understand how to improve the plugin's performance.
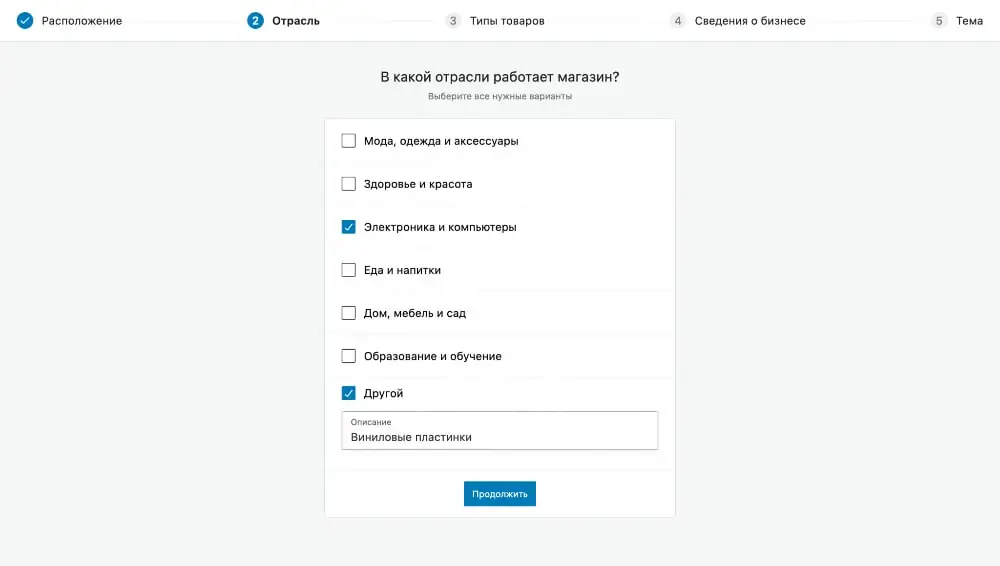
Step #2: Industry
Here you need to indicate the industry to which your store belongs. You can select several industries at once or indicate your own in the “Other” option if none of the proposed ones are suitable.
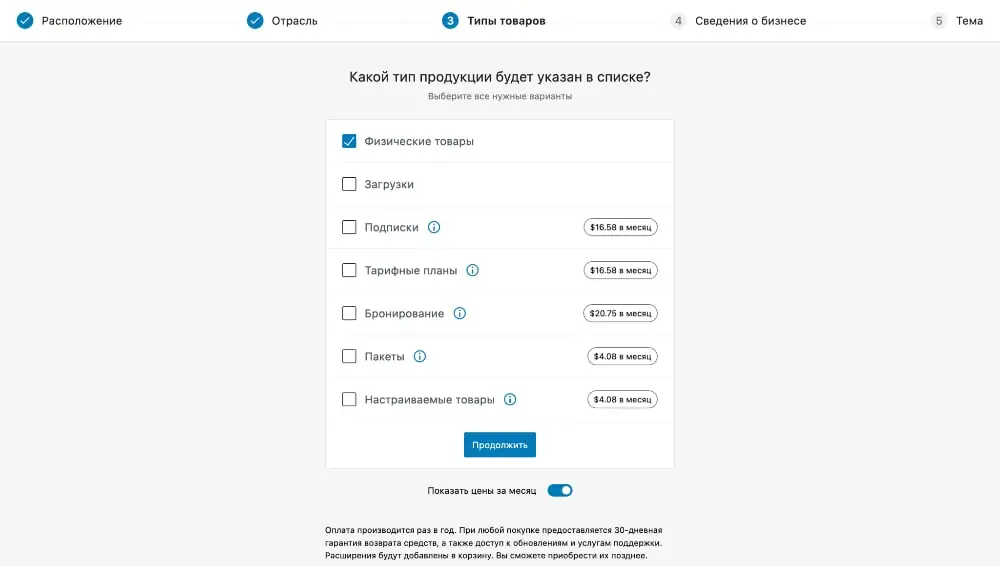
Step #3: Product Types
Here you need to indicate the type of goods you will sell. Two of them are available for free, five others can be purchased separately.
By purchasing a product type we mean purchasing additional functionality in the WooCommerce settings, which, according to the plugin developers, is usually used for such products.
If you are selling a product that belongs to one of the paid types, you do not have to buy it. It is likely that the standard functionality will be enough for you, or you will find a suitable free plugin. As a last resort, you can always purchase more after the fact. To read about each paid type of product and its additional functionality, click on the ⓘ icon next to the name of the type you are interested in.
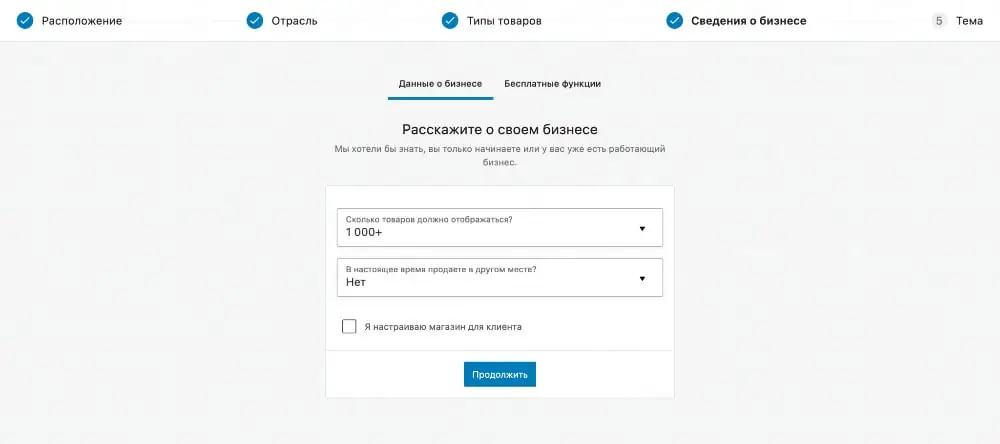
Step #4: Business Information
Here you will be asked to share information about how many products you have, whether you own the store, and whether you sell somewhere else - online or offline. If yes, what is your annual income?
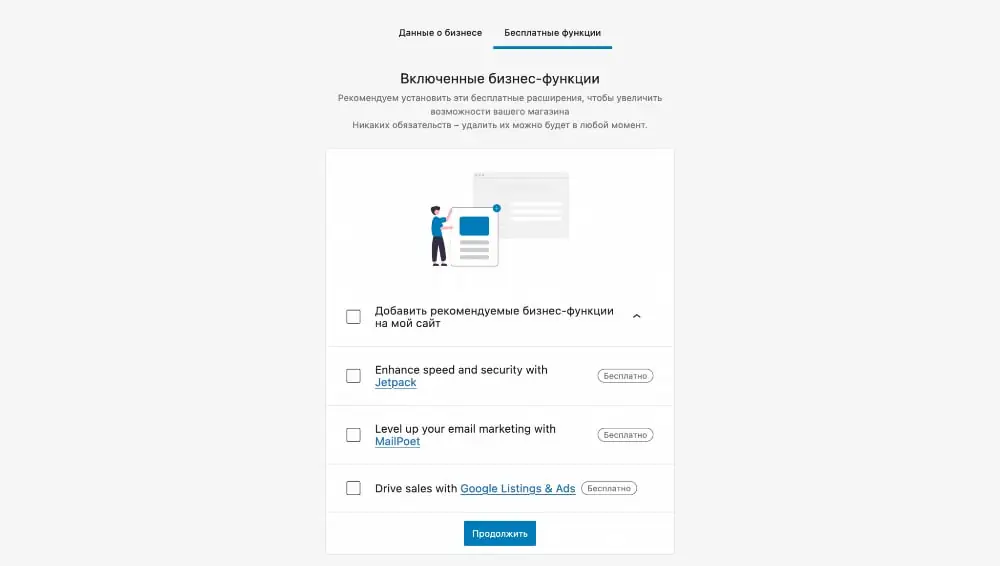
After clicking Continue, the Free Features tab will open, which will prompt you to install a few additional free plugins once you're done setting up WooCommerce: Jetpack, MailPoet, and Google Listings & Ads.
To see the plugins, expand the drop-down list in the “Add recommended business features to my site” option. If you don't want to install anything, uncheck the "Add recommended business features to my site" checkbox.
These plugins are not needed for normal operation of Bookomers. Plus, you can always install the same products in the future if you really need them. Otherwise, they will simply take up space on the hosting and waste web server resources.
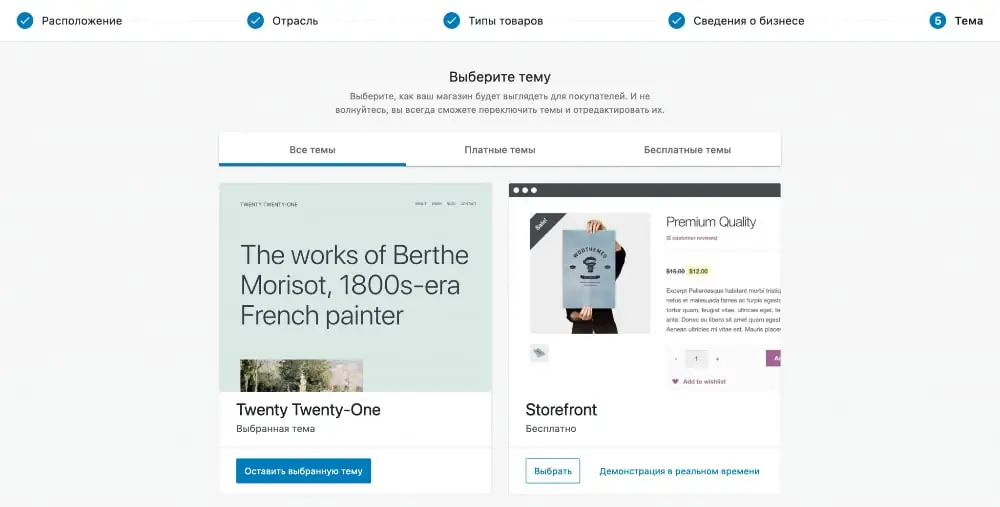
Step #5: Themes
Here you can select a theme for your future store, if you have not already done so before installing WooCommerce. There will be several free and paid options to choose from.
These are not all the themes that support WooCommerce, and it is not necessary to choose anything at this stage. To complete the installation, click “Keep selected theme” in the first block.
Processing orders in WooCommerce
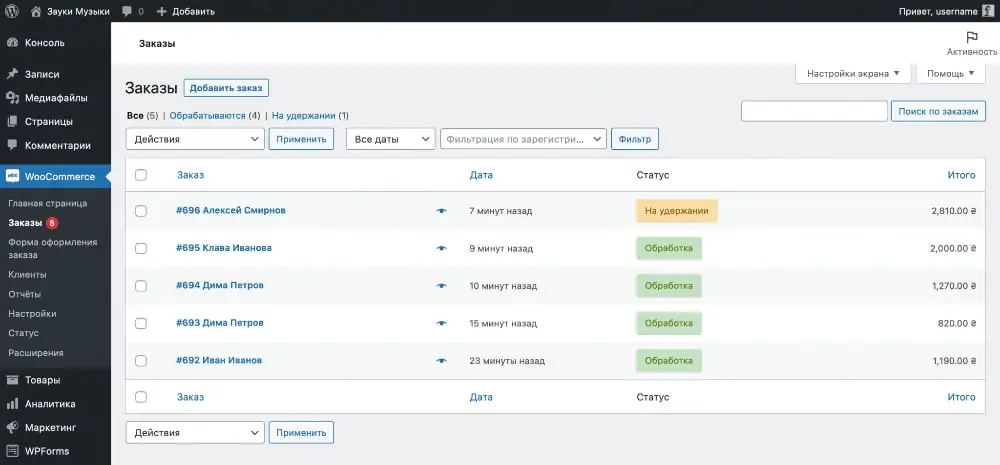
After a customer places an order on your website, it will appear in the WordPress console in the “WooCommerce – Orders” section.
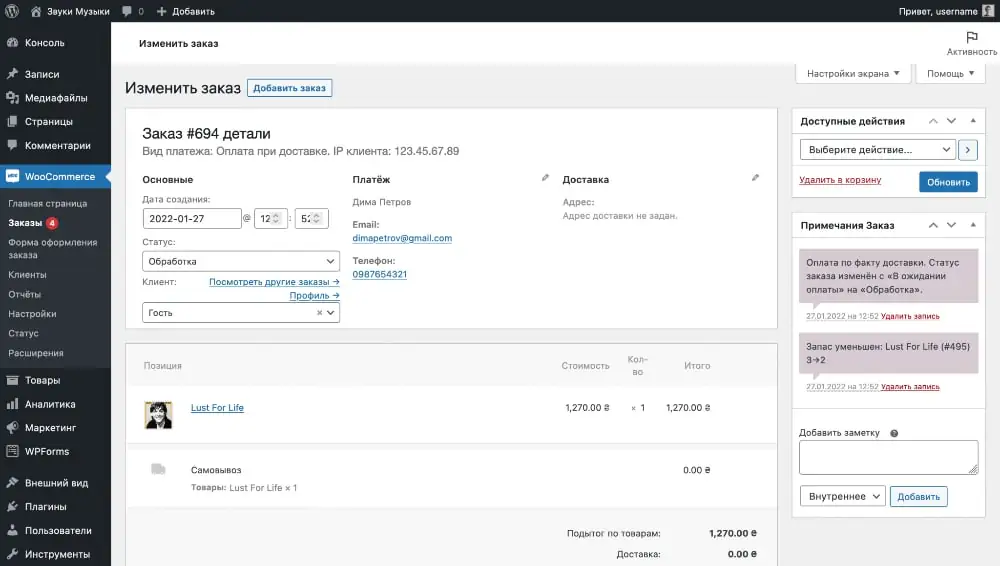
Click on an order to open its details. At the very top of the page that opens there will be general information about the order: type of payment, address and contact information of the client, date of creation of the order, as well as its status. Just below will be the contents of the order, and on the side there will be notes and several actions that can be done with it.
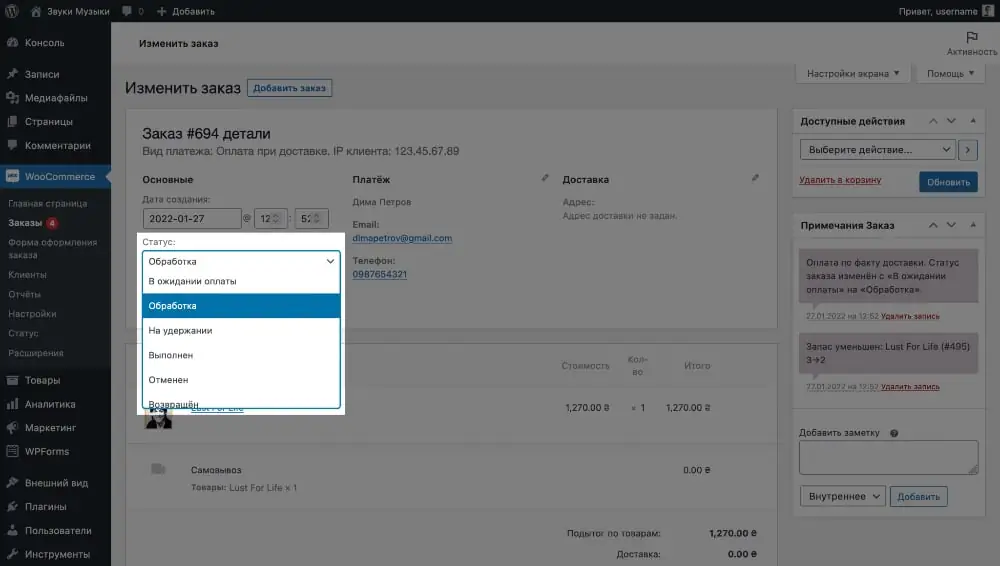
There are only seven order statuses: “Pending payment”, “Processing”, “On hold”, “Completed”, “Canceled”, “Returned” and “Failed”. They must be changed manually once you receive payment and are ready to submit your order for delivery. Each time the status changes, the client will receive a notification by email.
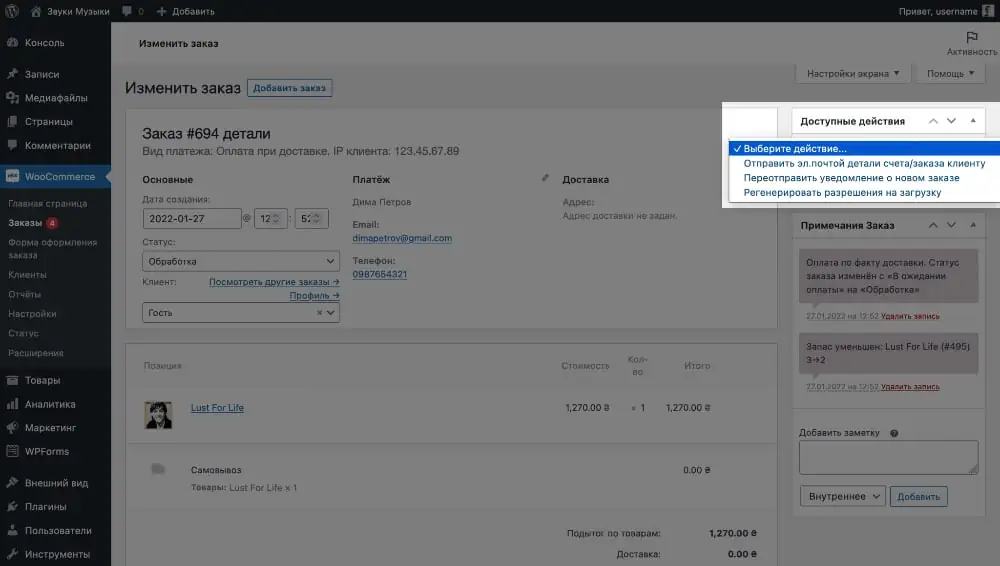
The “Available Actions” block in the sidebar on the right contains options that allow you to regenerate permission for the client to download a virtual product, as well as re-send an order notification to the client or to yourself.
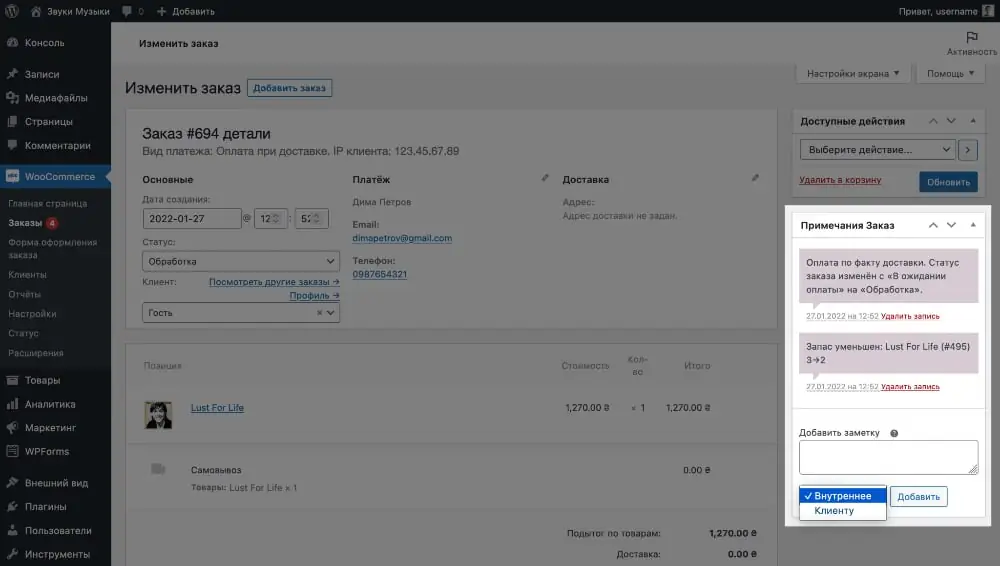
The “Order Notes” block on the sidebar on the right contains notes about changes in order status, and also allows you to leave a note for yourself or for the client. For example, tell him some additional information like the invoice number from the delivery service.
In addition to the “Orders” subsection, the “WooCommerce” section will have six other subsections:
- Clients — a table with all clients, their registration date, contact information, as well as the number of orders and income from each of them.
- Reports — an outdated department with reports on orders, customers and inventory. With the release of WooCommerce 4.0, these reports are no longer provided and WordPress users have access to a new, improved Analytics section.
- Settings — eight tabs with the parameters of your store. After installing some plugins, additional tabs may appear here.
- Status — system information about the status of the WooCommerce plugin, as well as tools for returning to standard settings. The subsection may be useful for restoring the site in case of failures or errors.
- Catalog — a library of plugins that will help expand the functionality of the online store. Not all plugins that are compatible with WooCommerce will be listed here; there will be more in the “Plugins” section.
- My subscriptions — a list of plugins from your account on the WooCommerce website. This subsection is similar to the previous one, but you need to search and add plugins not in the WordPress console, but on the WooCommerce.com website. There are also not yet many popular plugins for the Ukrainian market, which are available in the console in the “Plugins” section.
Setting up products in WooCommerce
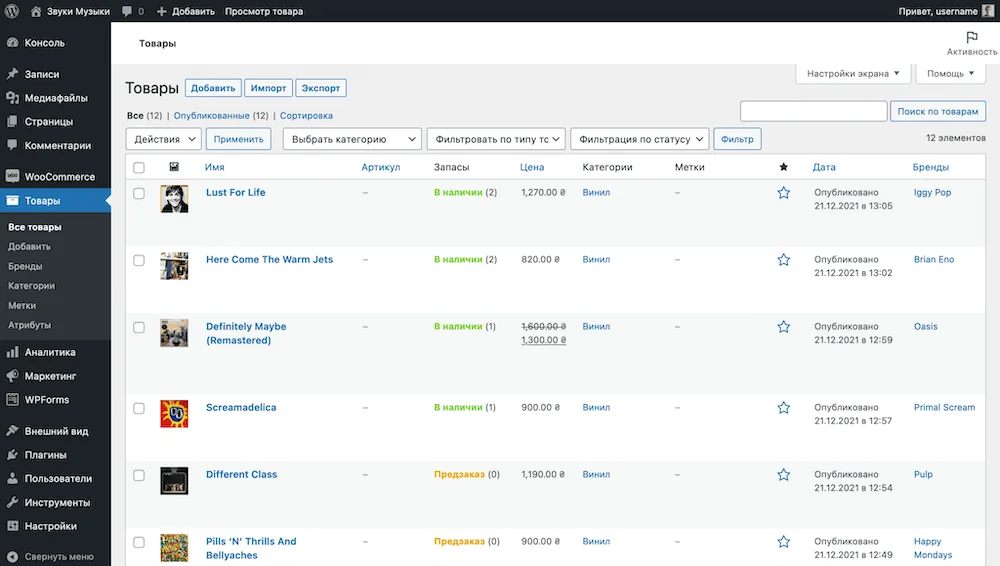
In your WordPress console, go to the Products section. Here you will add new products and edit existing ones, as well as create categories and variations for products, such as sizes or colors.
How to add a new product
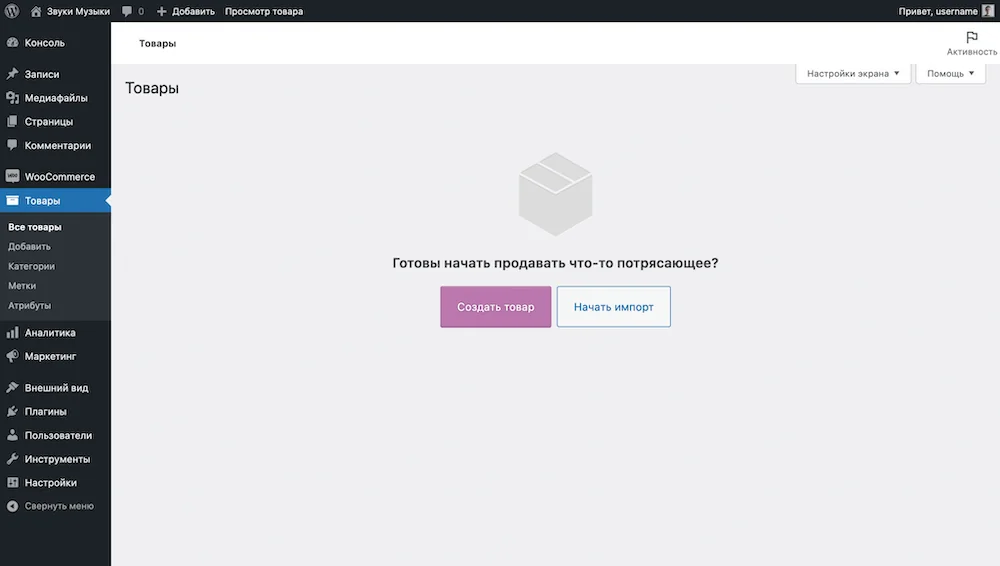
Immediately after installing WooCommerce, the “Products” section will be empty and there will be a purple “Create Product” button in the center of the screen. Otherwise, to create a product, go to the “Products – Add” section in the WordPress sidebar.
An empty product card will open. Visually, it is divided into several parts: the name of the product, its usual and brief description, product data and a sidebar.
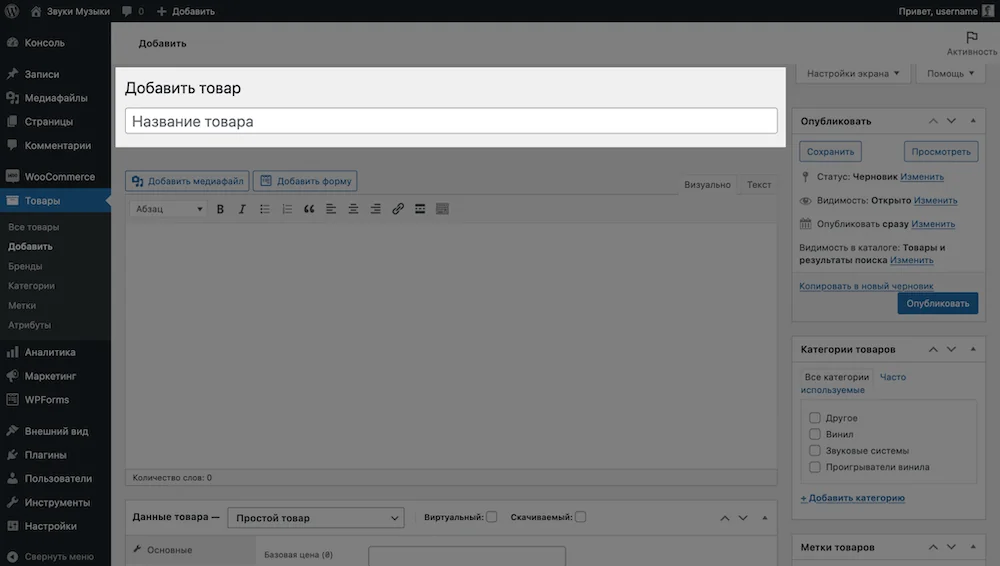
Product Name. At the very top there will be the name of the product - what visitors to your site will see on the store pages.
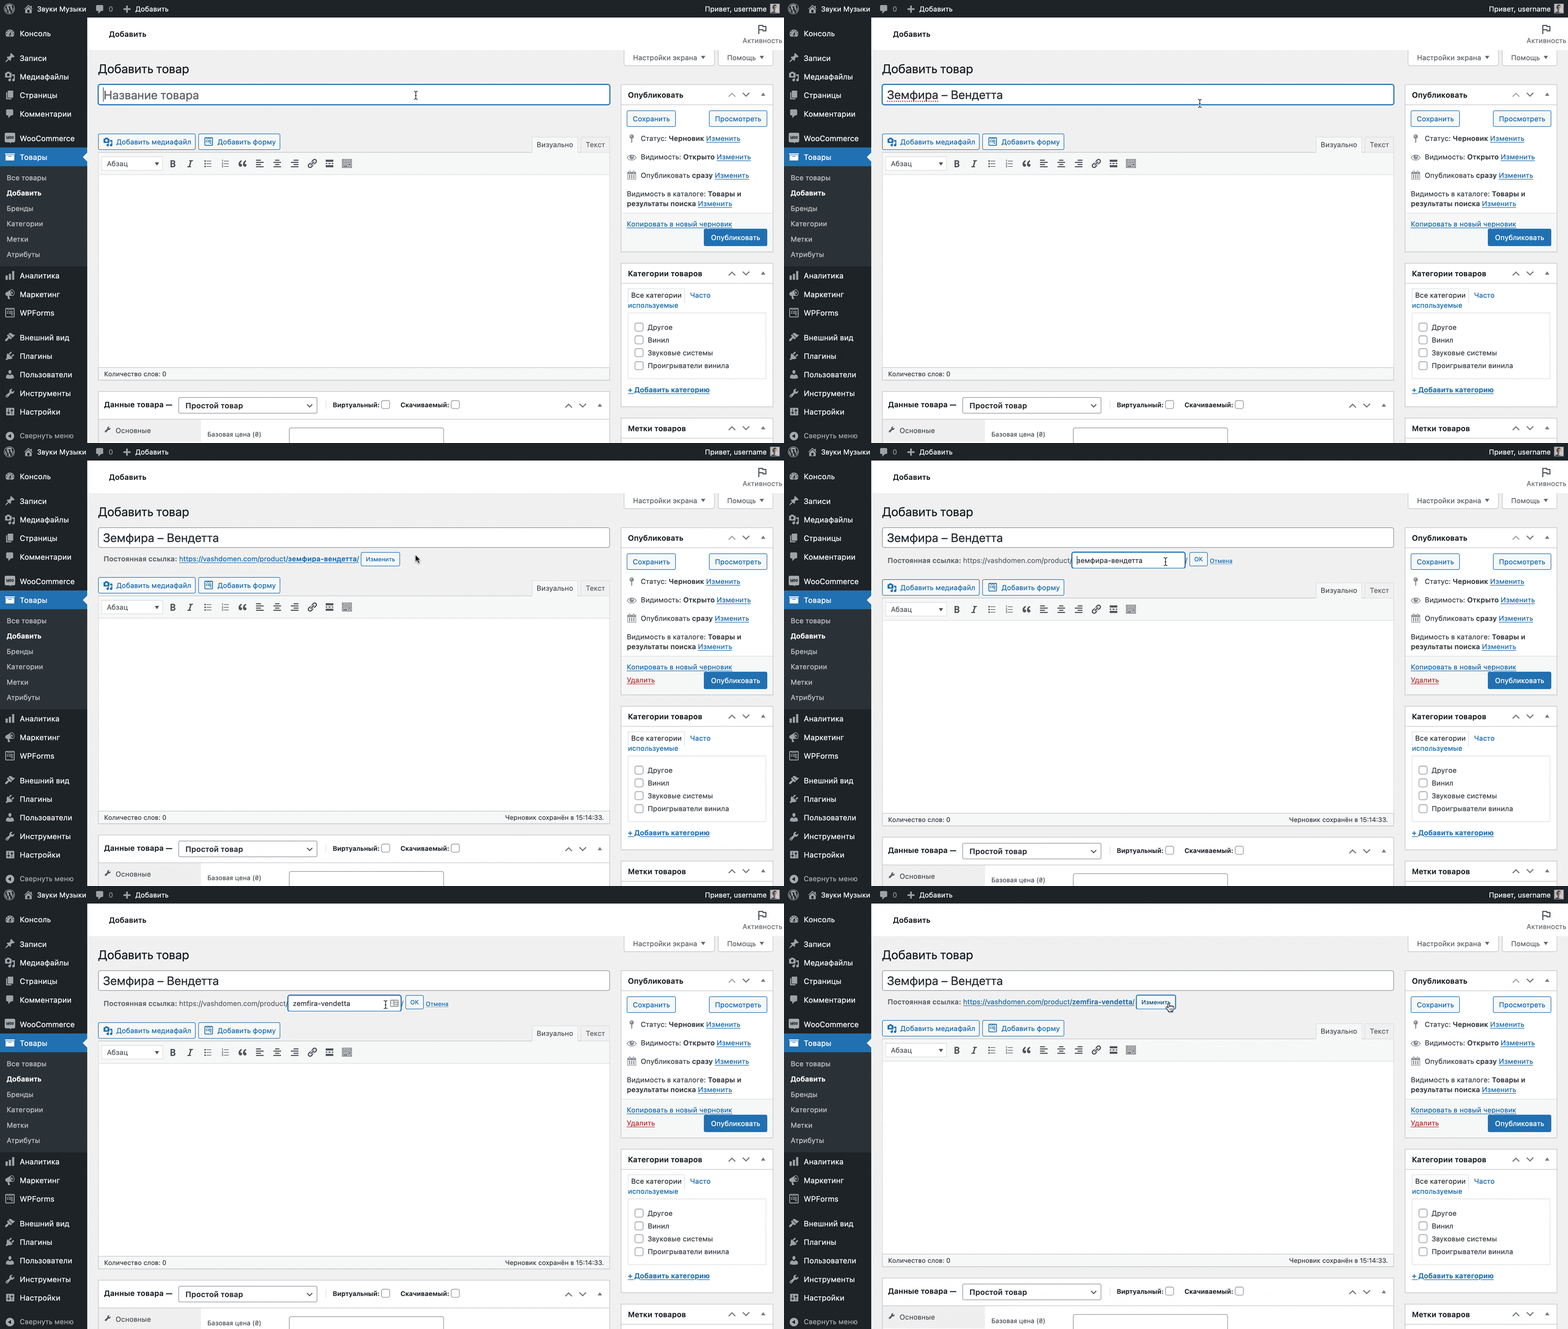
Once you enter the name, a Permalink option will appear below the field - the product's URL. The address consists of a domain, product category and label.
The label matches the product name. If the product has a Russian name, the label will also be in Russian. To avoid mixing two alphabets in the URL, be sure to manually update the letters in the label to Latin.
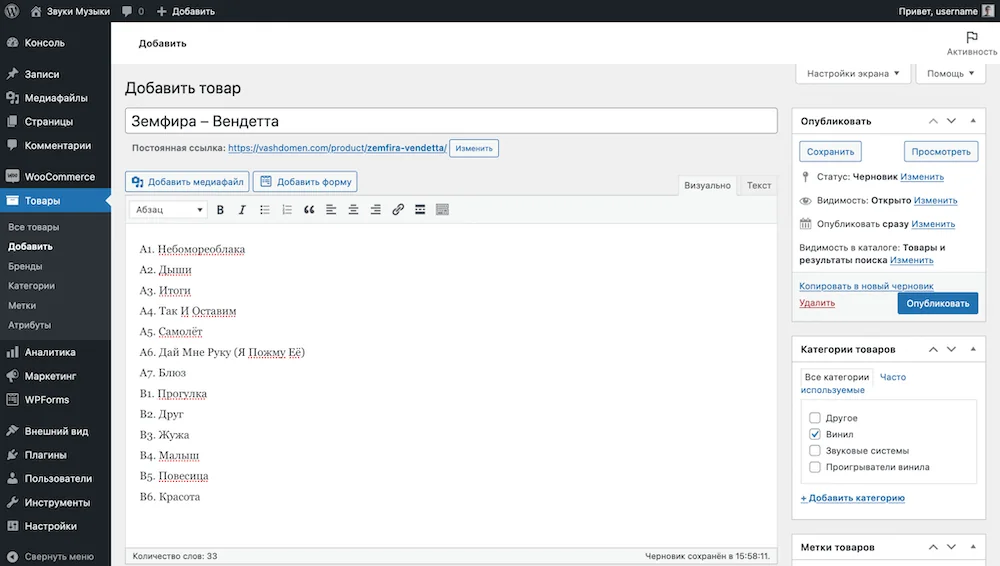
Product description. Under the title field there will be a text editor to describe the product. You can add not only text, but also additional images. Images added this way will not be included in the product photo gallery.
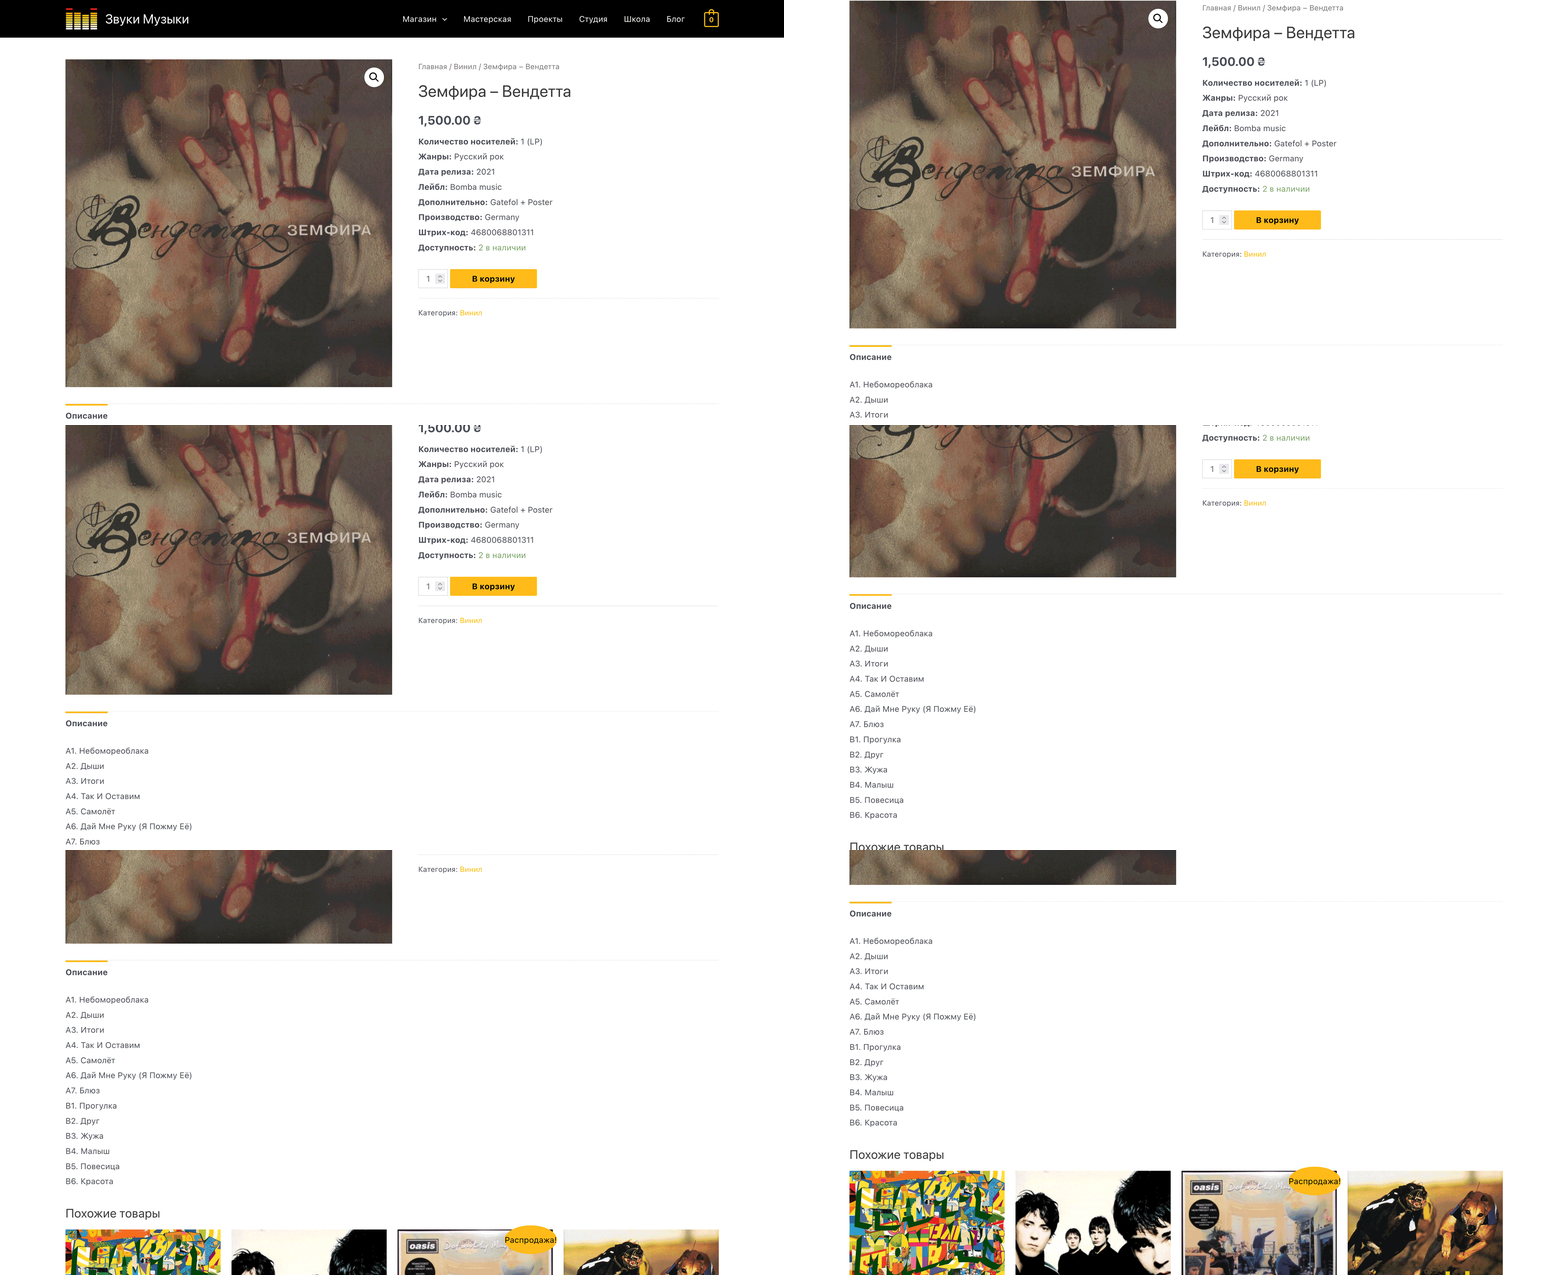
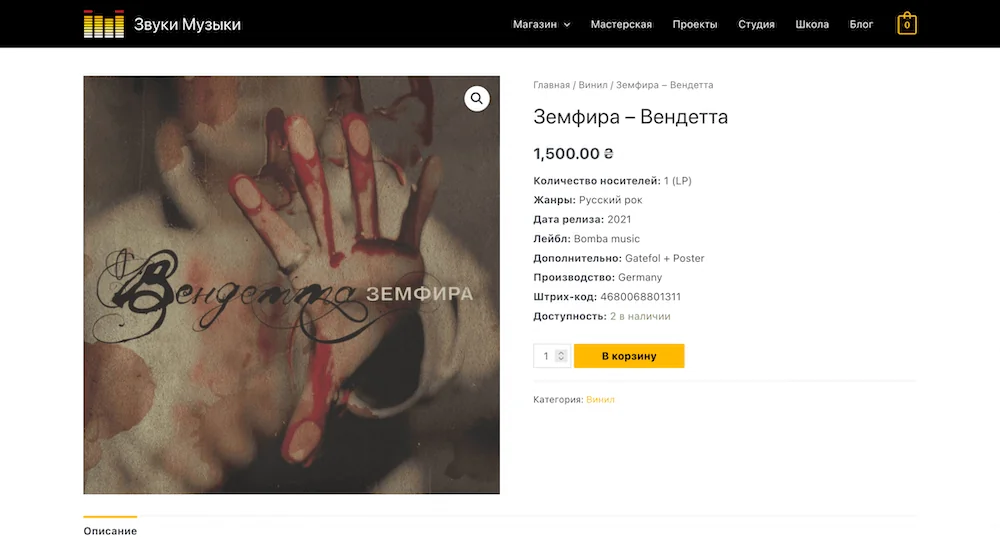
When viewing a product on the website, the description will appear at the bottom of the page under the product image.
Brief description of the product. At the very bottom of the product card in the WordPress console there will be a “Brief Product Description” field. If you plan to engage in SEO promotion of your store, it is better to add unique text here rather than copy the main description.
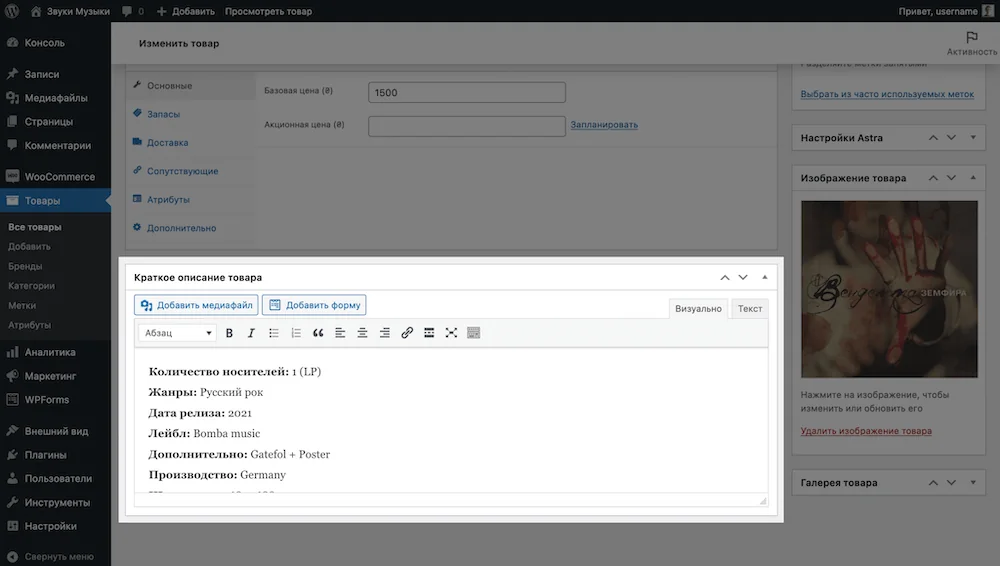
A brief description of the client will be before the main one on the side of the product gallery. It would be appropriate to tell only the basic things about the product in the form of a list, and provide detailed text in the main description.
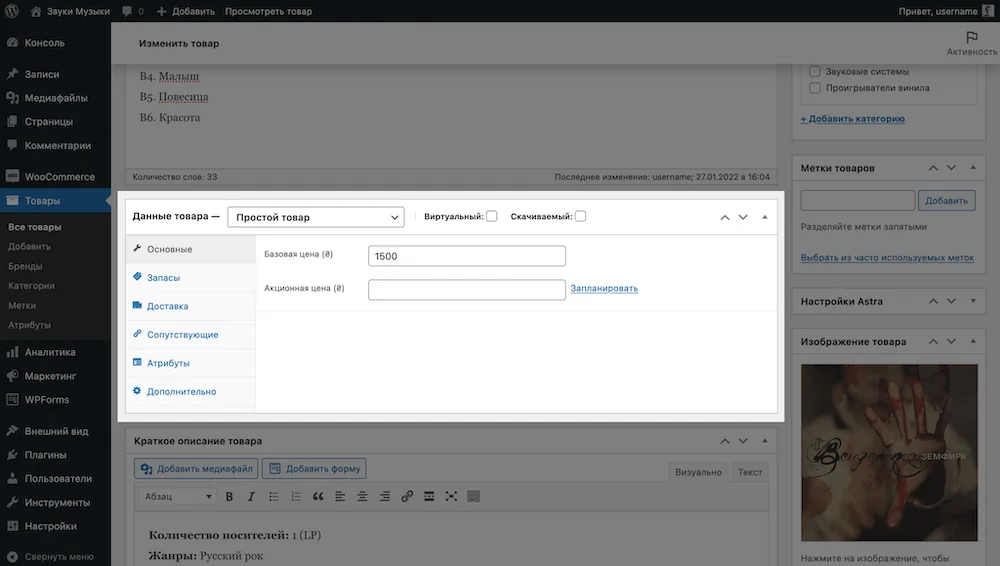
Product data. Between the description and product summary in the WordPress console there will be a “Product Details” block. It allows you to configure the basic parameters of the product: price, inventory, dimensions, attributes (sizes and colors), notes, and the ability to leave reviews.
The settings in the “Product Data” block are divided into six sections: “Basic”, “Inventory”, “Delivery”, “Related”, “Attributes”, “Additional”.
In the "Basic" section There will be only the standard cost of the item and the cost when it is on sale.
The sale price can be set for a limited period of time by clicking on the link with the text “Schedule” next to the price field.
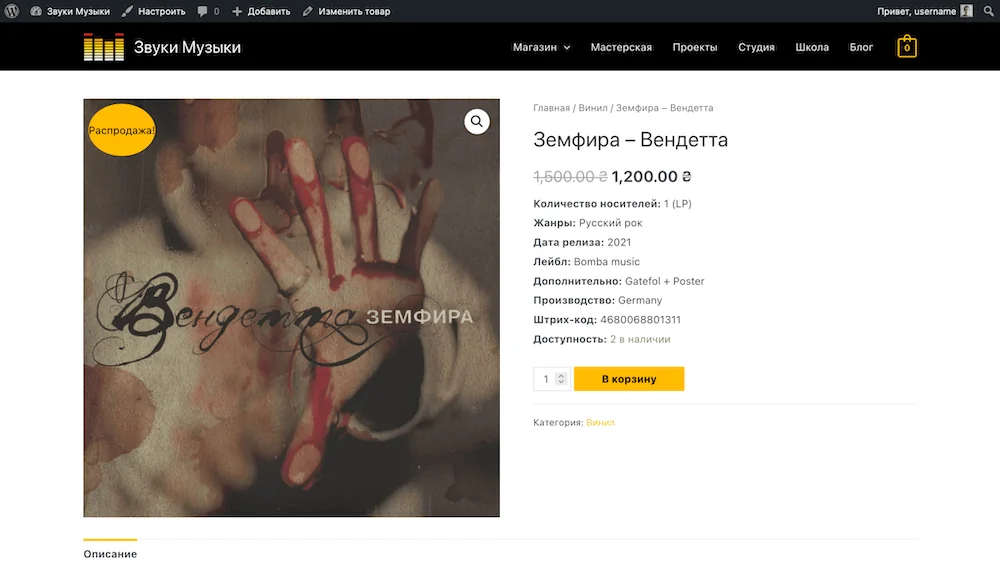
When an item is on sale, there will be a “Sale!” icon in the upper right corner of its image on the site. The regular price will be crossed out and the sale price will be next to it.
To change the text on the sale icon to “Promotion”, add the following code to the end of the functions.php file in your theme folder on your hosting:

To change the color of the sale icon to red, add the following CSS code to the Appearance - Customize - Additional Styles section:

To change the size of the sale icon, add the following CSS code to the end of the same section (the number 5 corresponds to the size, it can be changed):

To increase the price size in the product card, add the following code to the “Appearance – Customize – Additional styles” section:

In the “Inventory” section you will find warehouse settings: product article, availability and inventory management, as well as a ban on purchasing more than one item within one order.
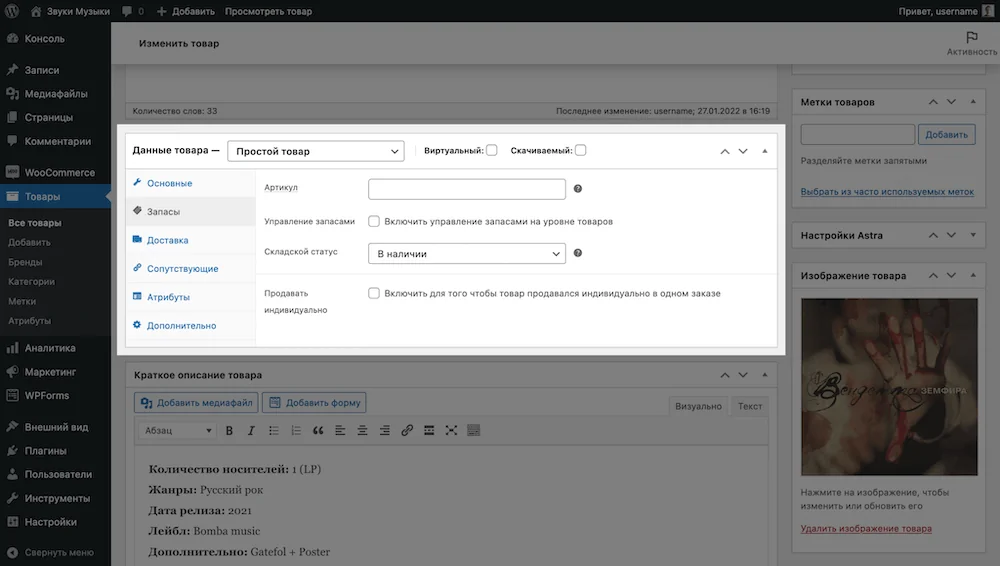
By default, inventory management at the item level will be turned off, items will have no quantity, only three warehouse statuses to choose from: In Stock, Out of Stock, and Pre-Order. You will have to manually monitor the relevance of these statuses.
While inventory management is turned off, people can order the same item as much as they want. This may be acceptable, for example, if you order goods directly from the manufacturer and are not limited in quantity.
If you keep track of goods in stock, the “Manage Inventory” option will be useful to you. It allows you to specify the specific quantity of goods that you have in stock and set up notifications when inventory drops below the selected value.
Check the “Manage Inventory” option, after which the “Warehouse status” option will disappear and three other options will appear in its place:
- Quantity in stock — how many products are in stock;
- Allow pre-orders — is it possible to place pre-orders if the product is out of stock;
- Small inventory limit — the number of products in stock, after which you will receive a notification that the product is running out and you need to order more.
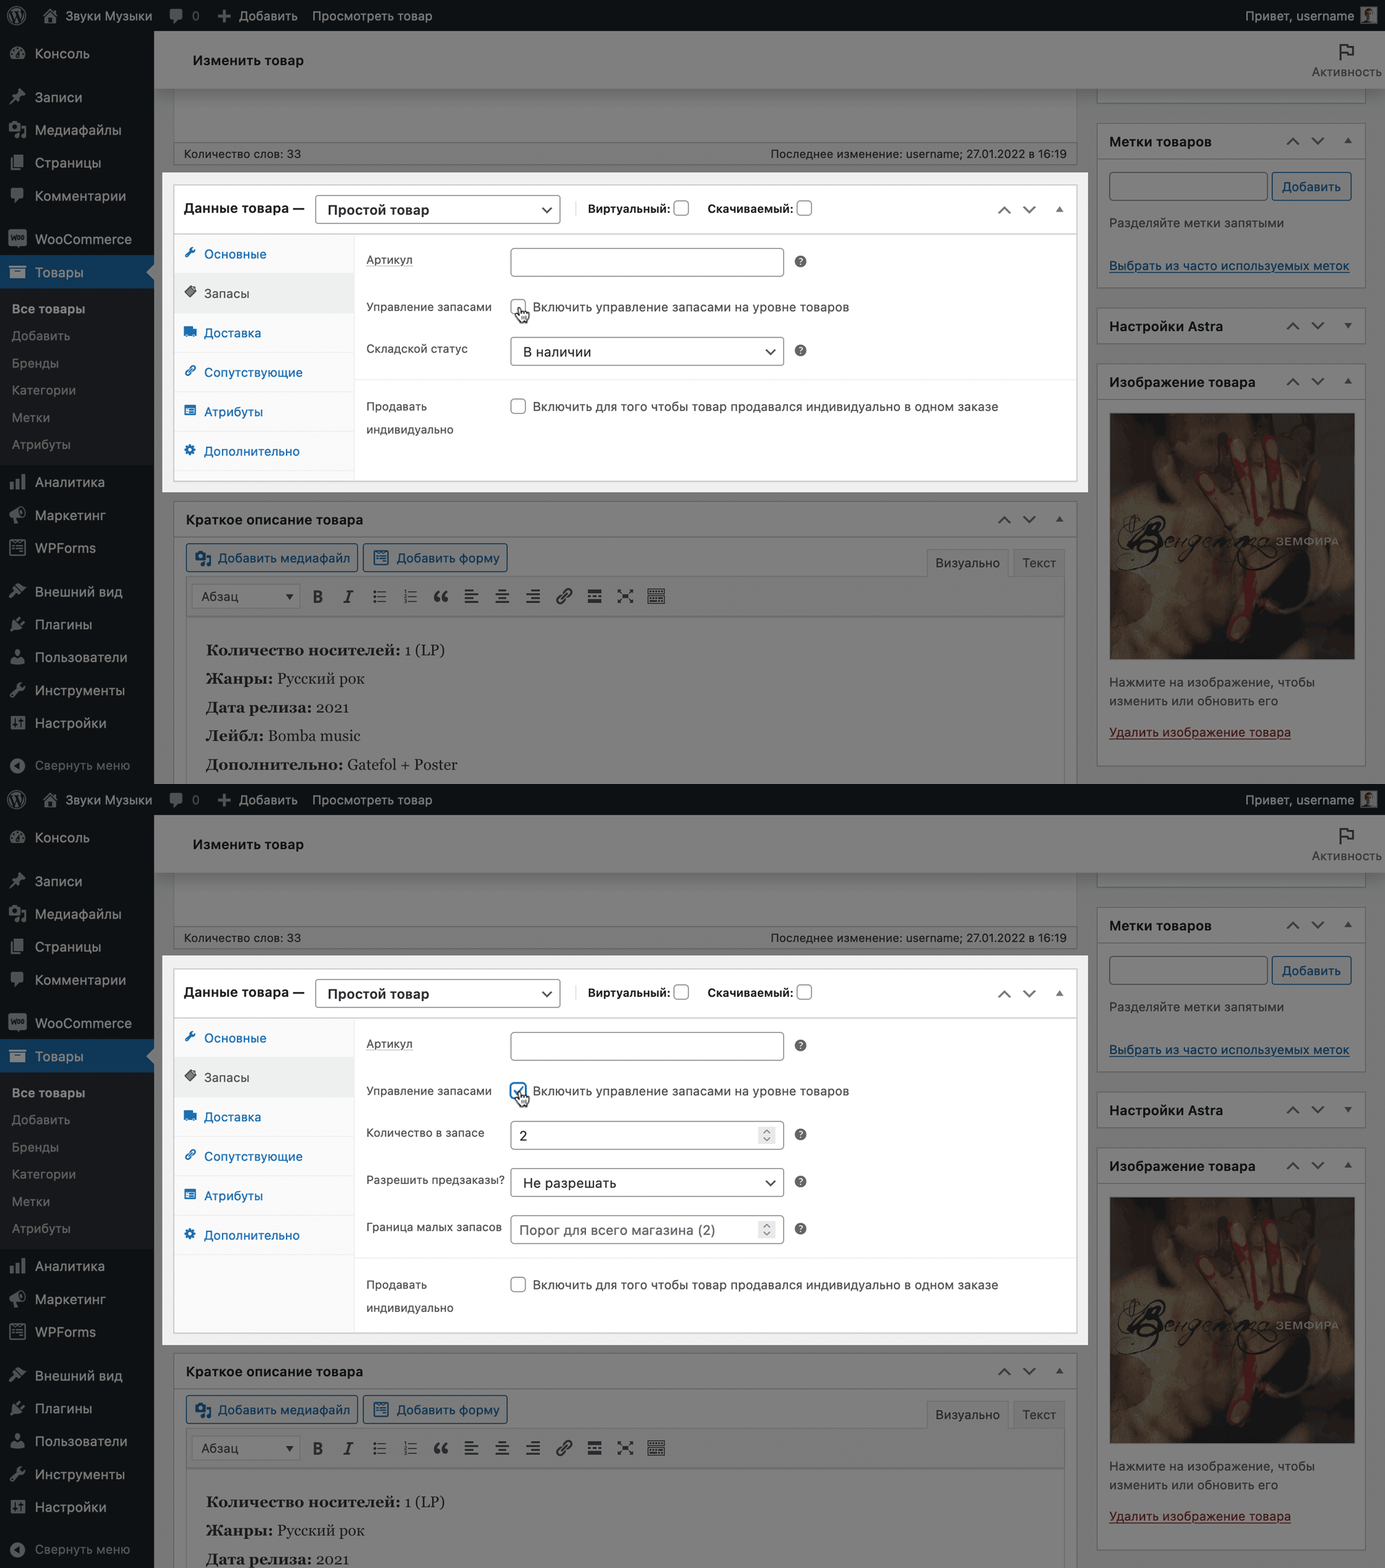
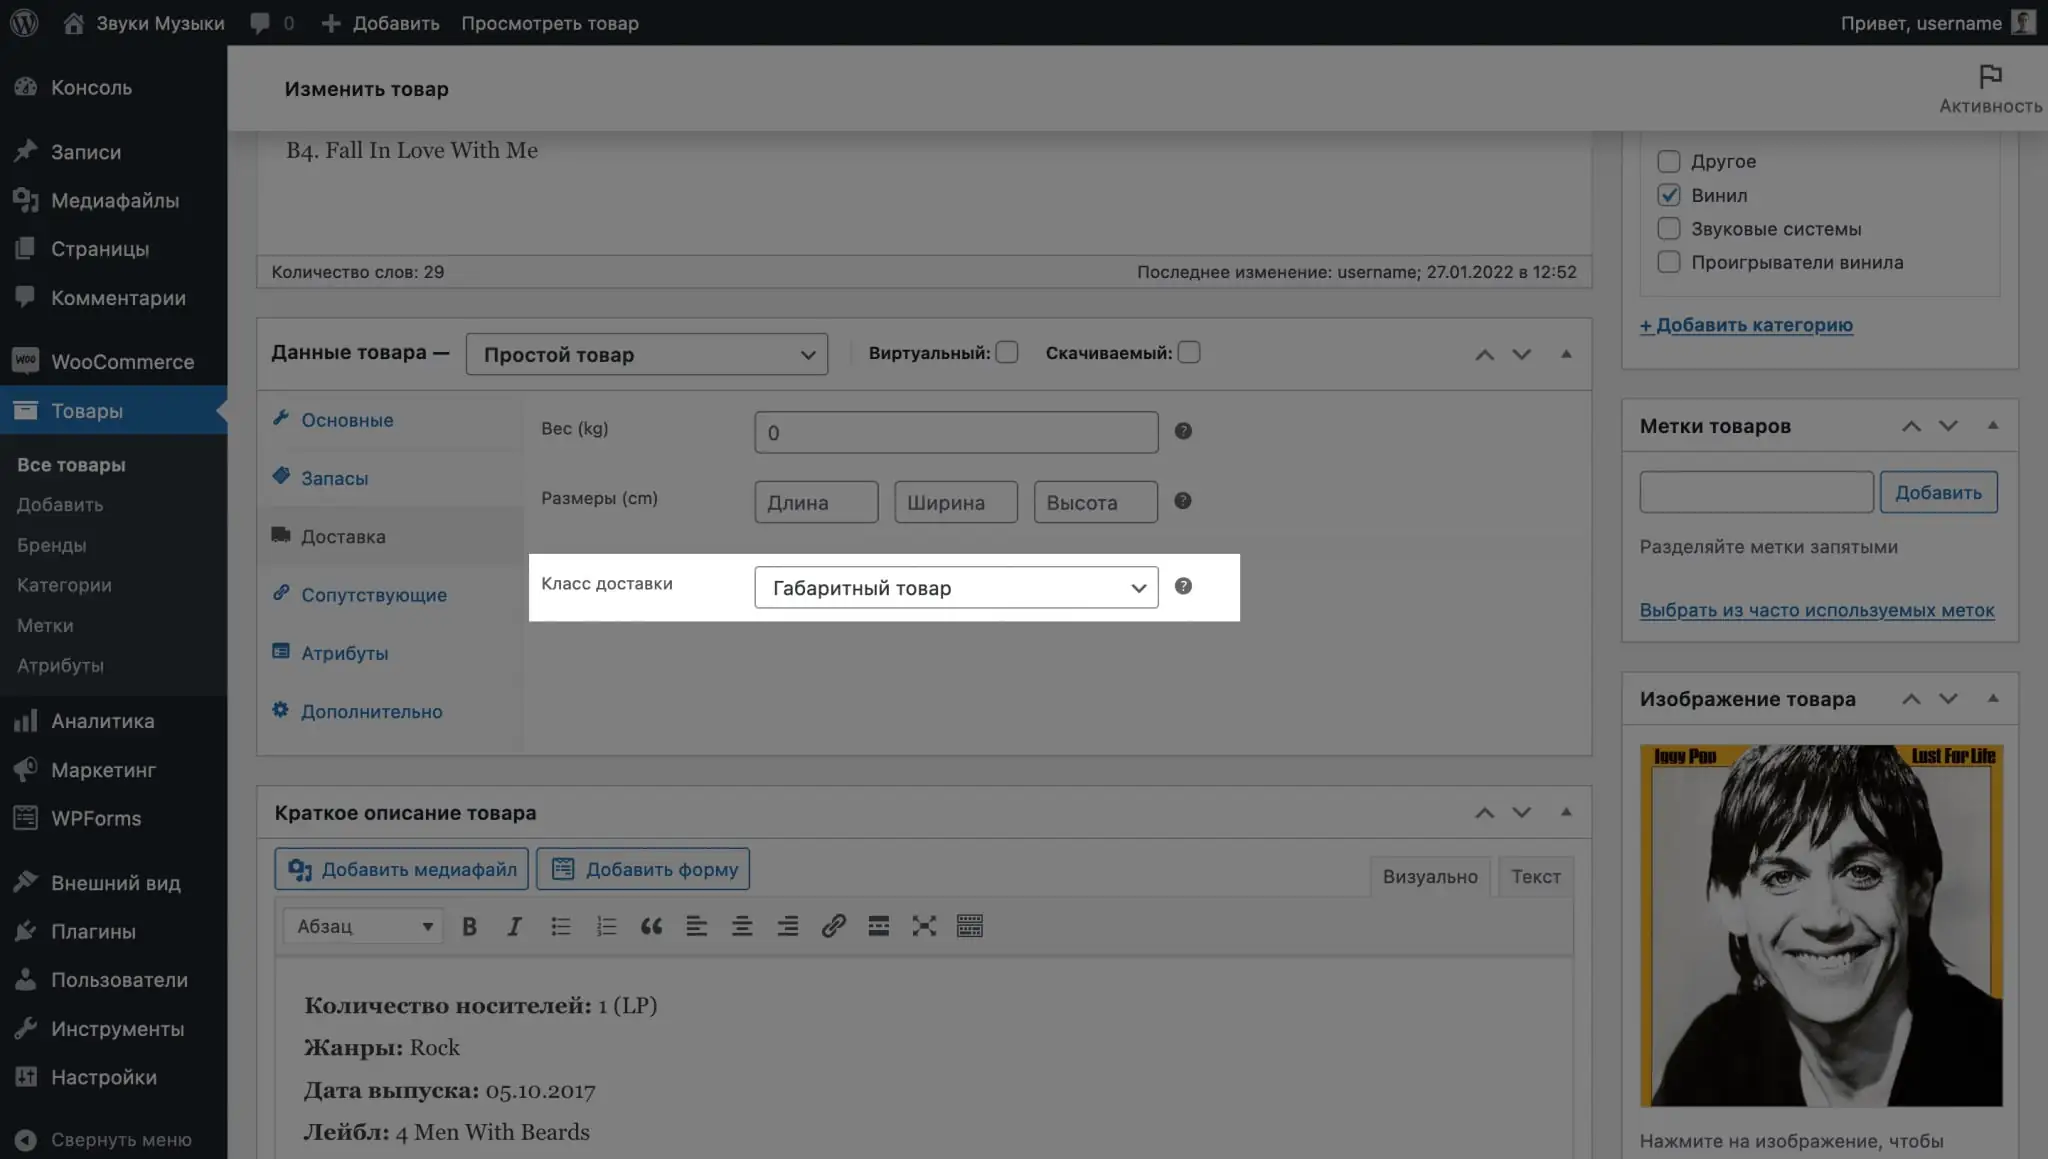
In the “Delivery” section you will find fields for indicating the dimensions of the goods, as well as the delivery class. A shipping class is an entity that assigns special shipping conditions to a product that are different from other products.
For example, using a class, you can make delivery of this product free or, on the contrary, increase its cost because the product is too large. You can read more about delivery classes below in the section about setting up delivery.
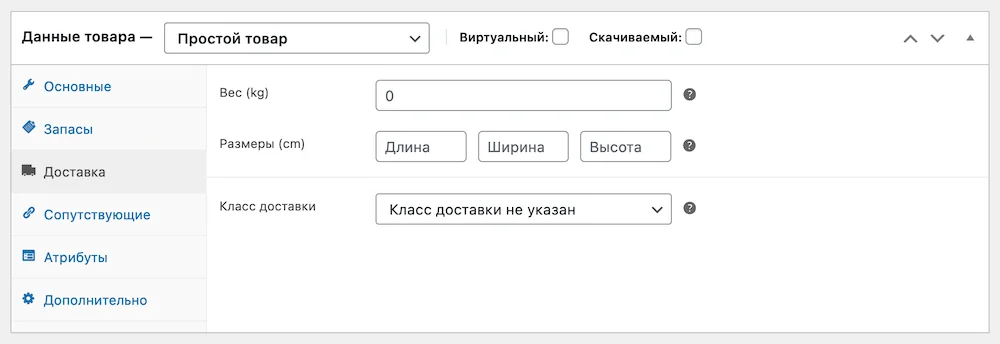
In the “Related” section there will be two options that will help you upsell products in the store:
- Upsell - products that will be displayed below in the card of this product.
- Crossels are products that will be displayed in the cart.
Using these options, you can recommend products instead of the current one or in addition to it. Just start entering the product name in the required field, then select it from the drop-down list.
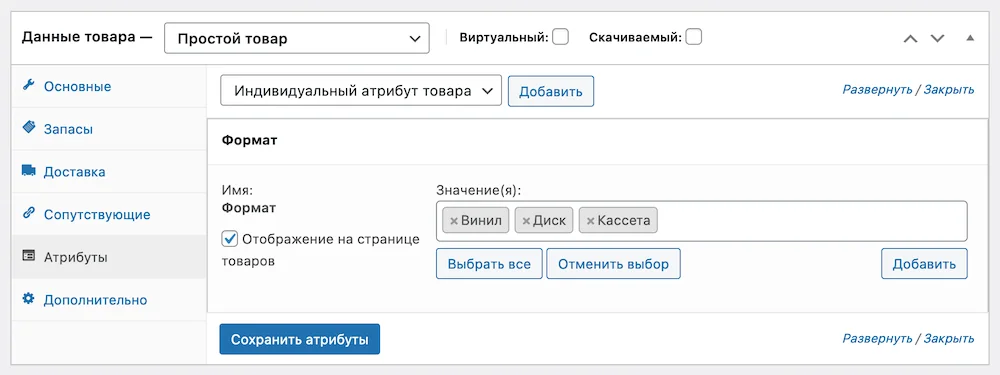
In the “Attributes” section, additional parameters are assigned to the product, for example, colors or sizes. But first, these parameters need to be created. We’ll tell you how to do this in the next subsection (about product variations).
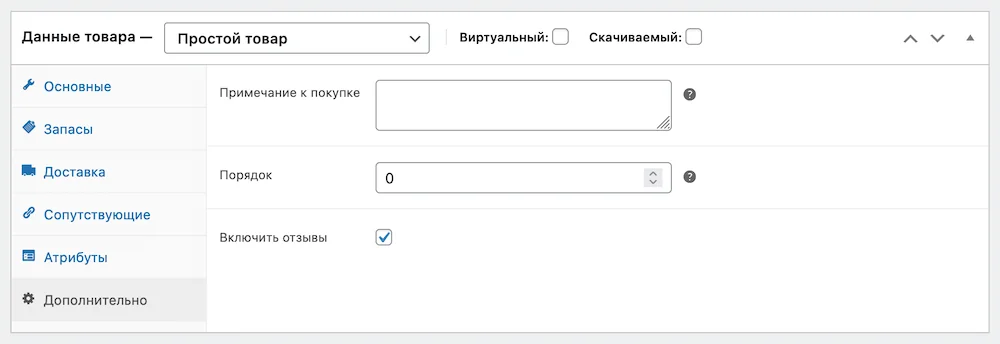
In the “Advanced” section there will be three independent options that do not fit in any other section:
- Purchase Note — The text that needs to be sent to the client after the purchase in a letter about a successful order. This text will not appear on the product page.
- Order — the position at which this product should be displayed in the catalog. If two products have the same value, they will be sorted alphabetically.
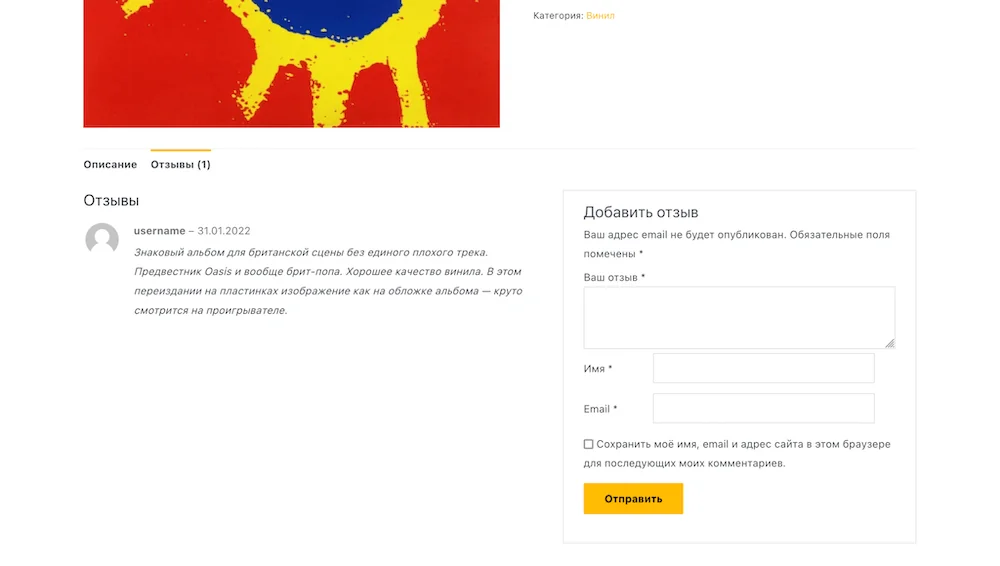
- Include reviews — Is it possible to leave reviews for this product in the form of comments and star ratings? If you don't have this option, first enable reviews globally on your site in the Products tab under WooCommerce - Settings.
This is what the review will look like in the product card below. By default, each new review will only be seen by its author until you manually approve the review in the Comments section.
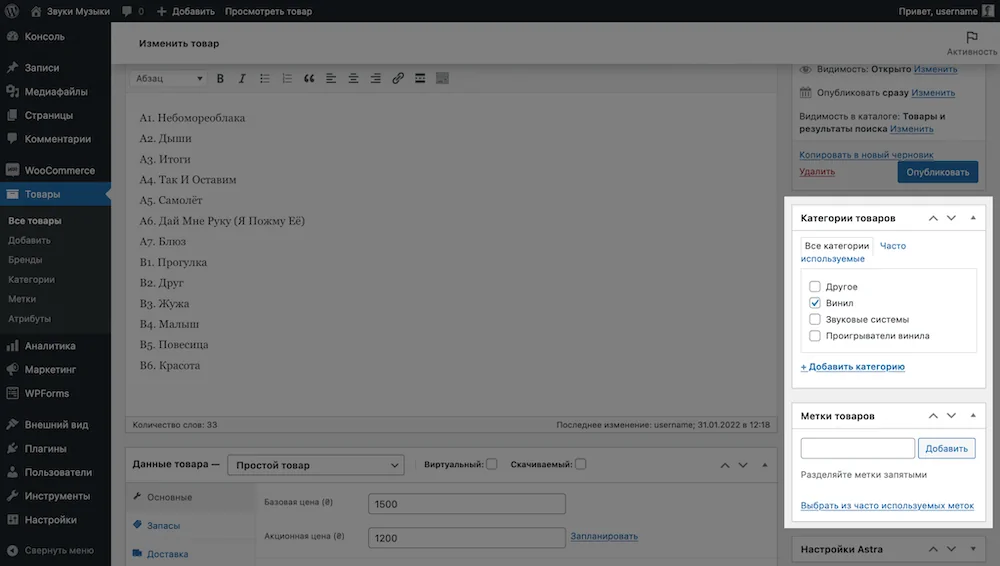
Side panel. It contains several blocks: “Publish”, “Product Categories”, “Product Tags”, “Product Image” and “Product Gallery”.
Publish. Here is the button to publish and update the product. In addition, here you can change the publication time of the product, its visibility (for everyone, only for you, or for those who know the password), as well as its display in the catalog and search results.
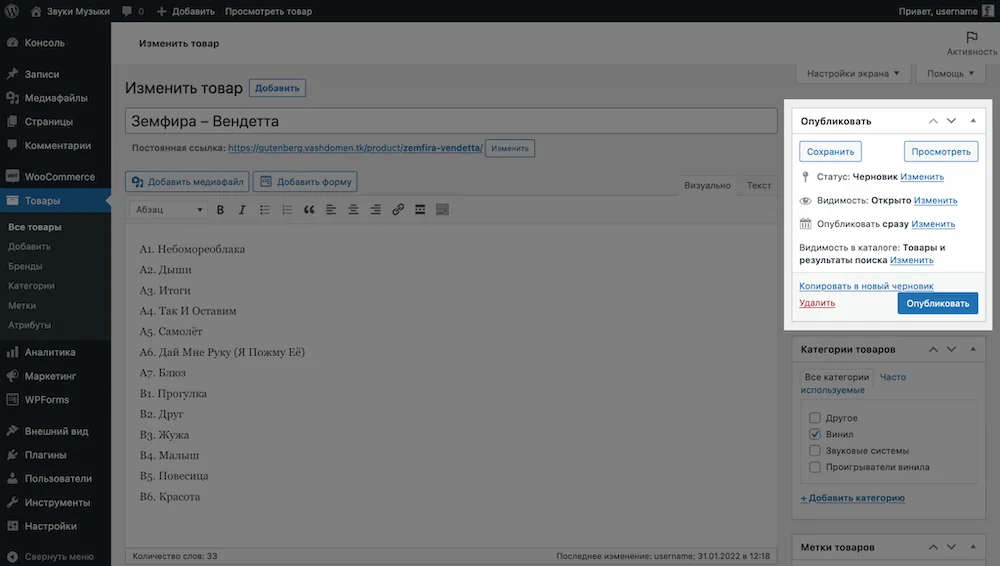
Product categories and tags. Here you can assign a category or tag to the product. We'll tell you how to create them a little lower in this section.
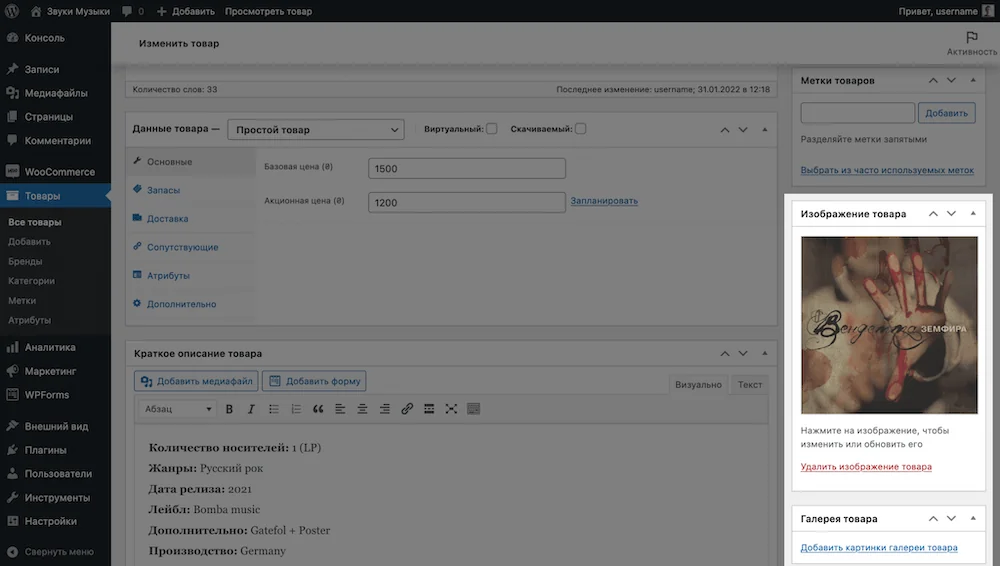
Product image and gallery. Here you can specify the title image of the product, as well as additional images that will be displayed as thumbnails below the title image.
How to create product attributes
Attributes are additional parameters that are used to create product variations in WooCommerce. For example, sizes or colors. They are created in the “Products - Attributes” section and then assigned to the required products individually in the “Product Data - Attributes” block.
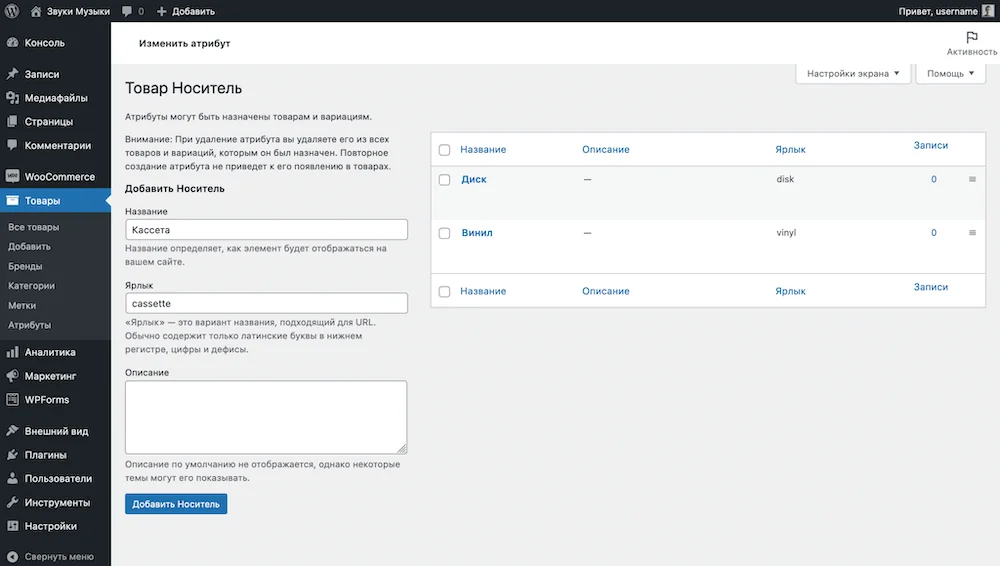
After installing WooCommerce, there will be no attributes in the WordPress console. To create it, fill in the fields to the left of the empty table and click the “Add attribute” button at the bottom. Fill in the “Label” field with Latin characters, because this text will be displayed in the product URL.
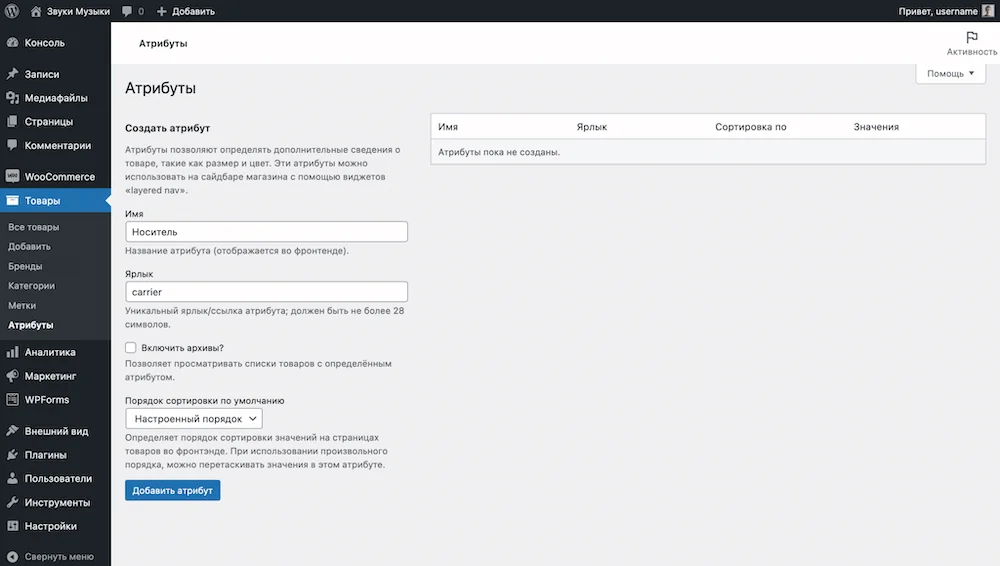
After creating an attribute, you need to configure its values, in our example - media for audio recordings. To do this, in the table with the newly created attribute, click the “Setting values” button in the “Values” column.
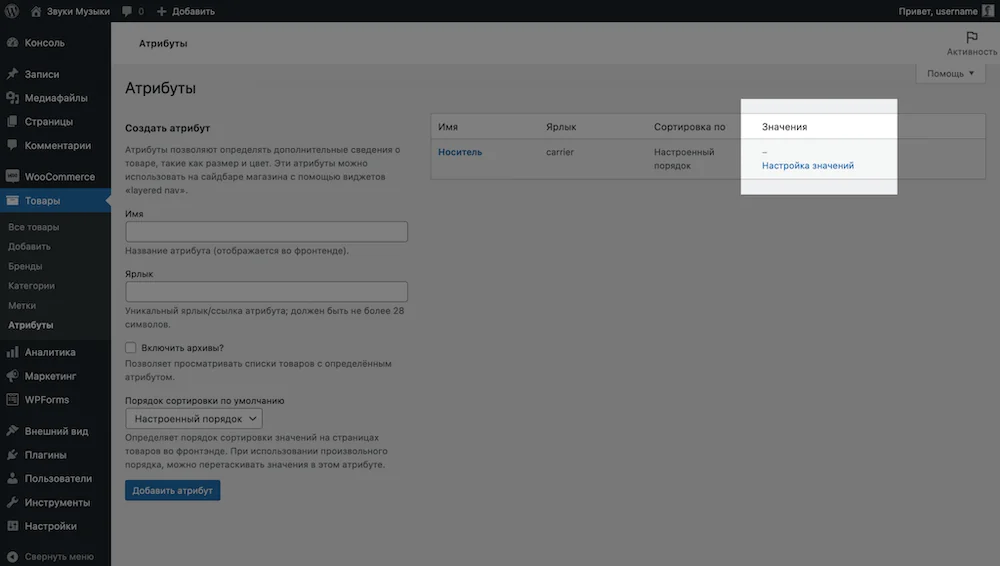
A page with attribute values opens. Everything on it is arranged in the same way as on the previous page: on the left are fields for new values, on the right is a table with values.
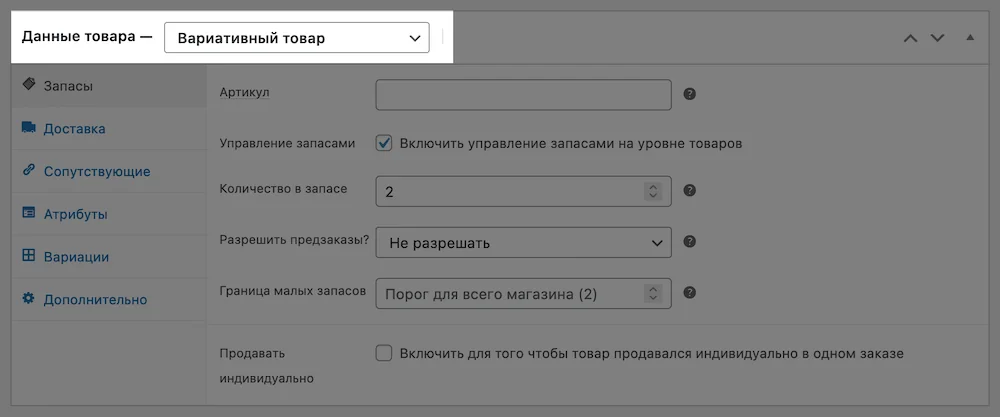
After creating the values for the attribute, you need to assign the values to the desired products. This is done in the “Products” section. Open a product for editing and find the “Product Data” block. At the very top of the block there will be a drop-down list with the “Simple Product” option selected. Change it to “Variable Product”.
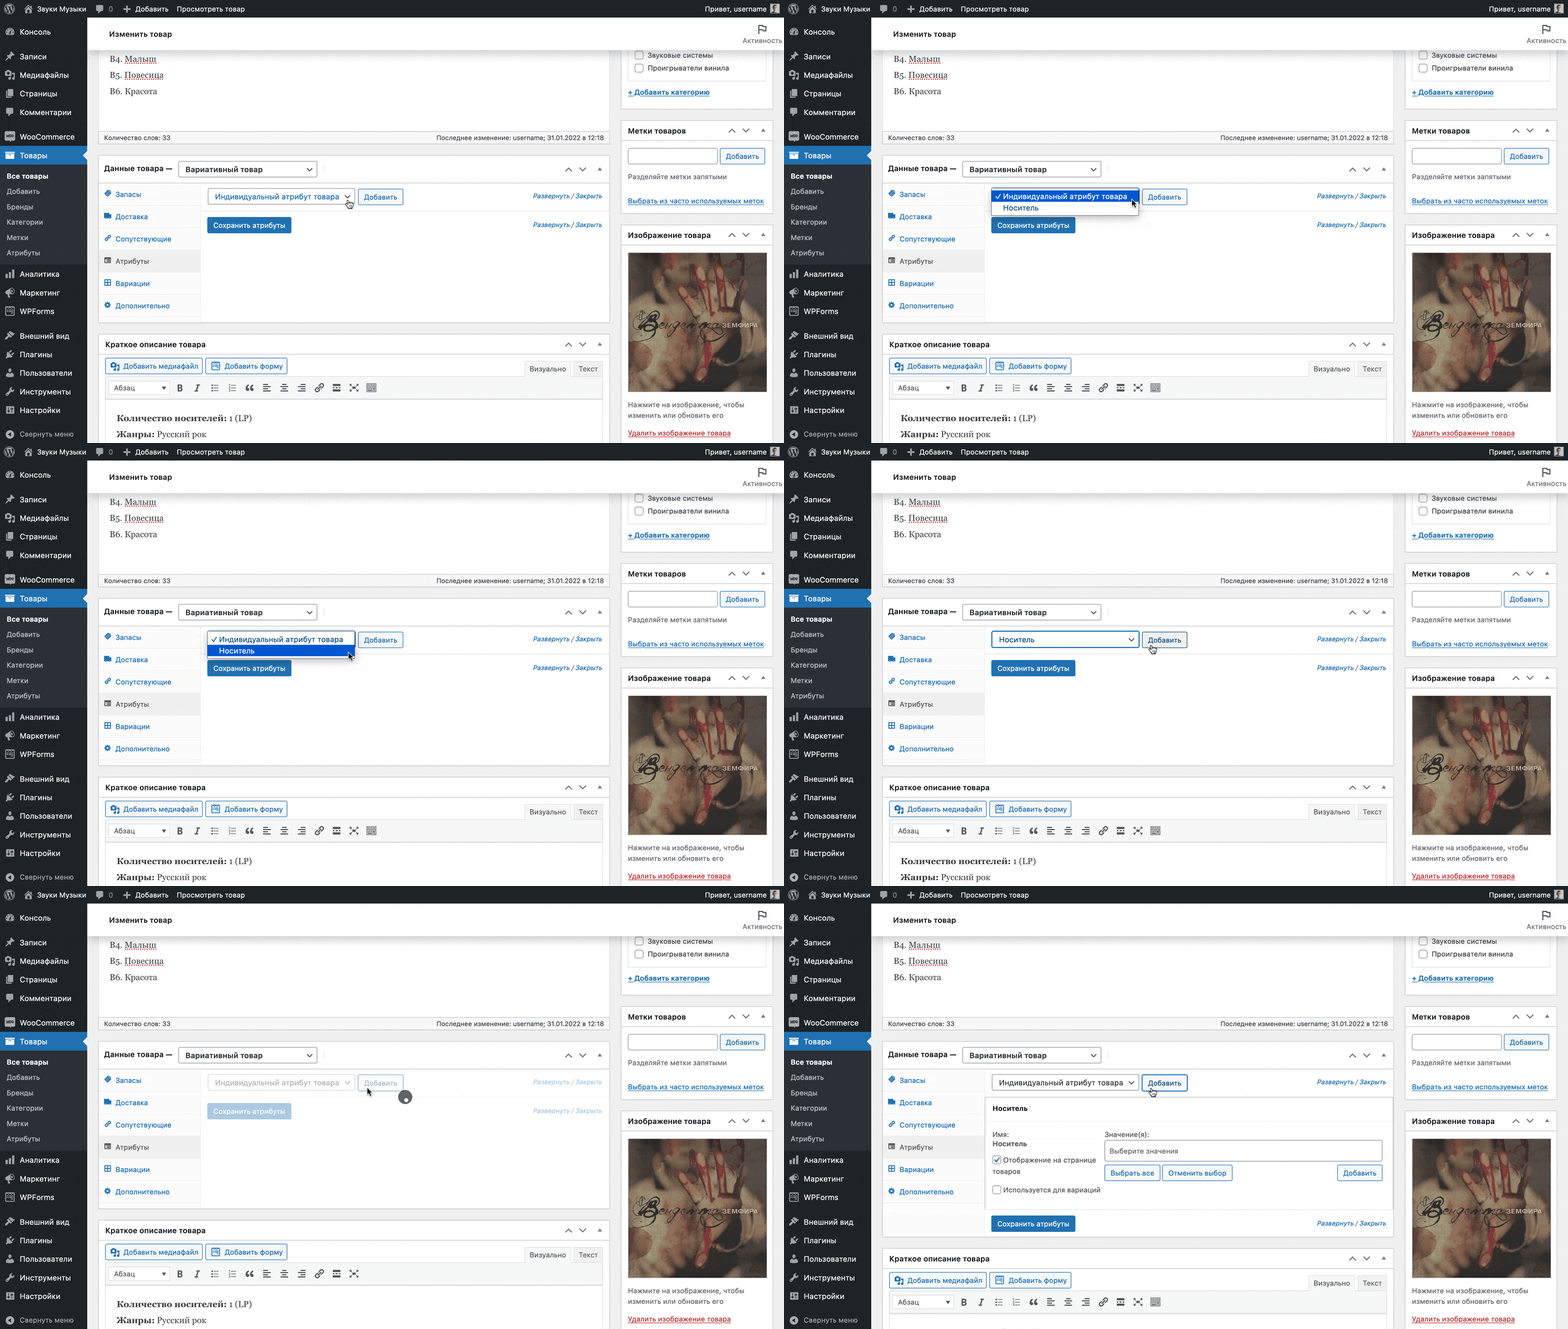
After changing the product type from simple to variable, go to the “Attributes” section in the same block, select the desired attribute from the drop-down list, click “Add”.
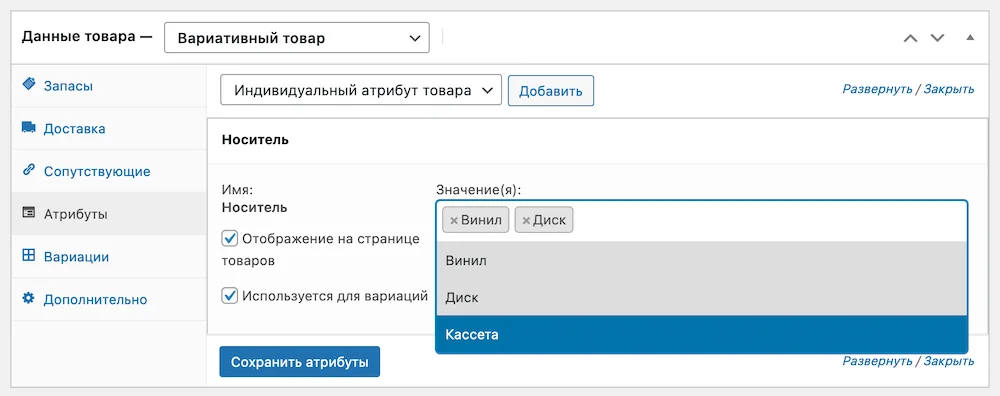
The attribute will appear and you will see a field where you can select the appropriate values for a specific product. Also check the “Used for variations” checkbox, then click “Save attributes” and go to the “Variations” section.
In the “Variations” section, select the “Create variations from all attributes” option from the drop-down list and click “Apply”.
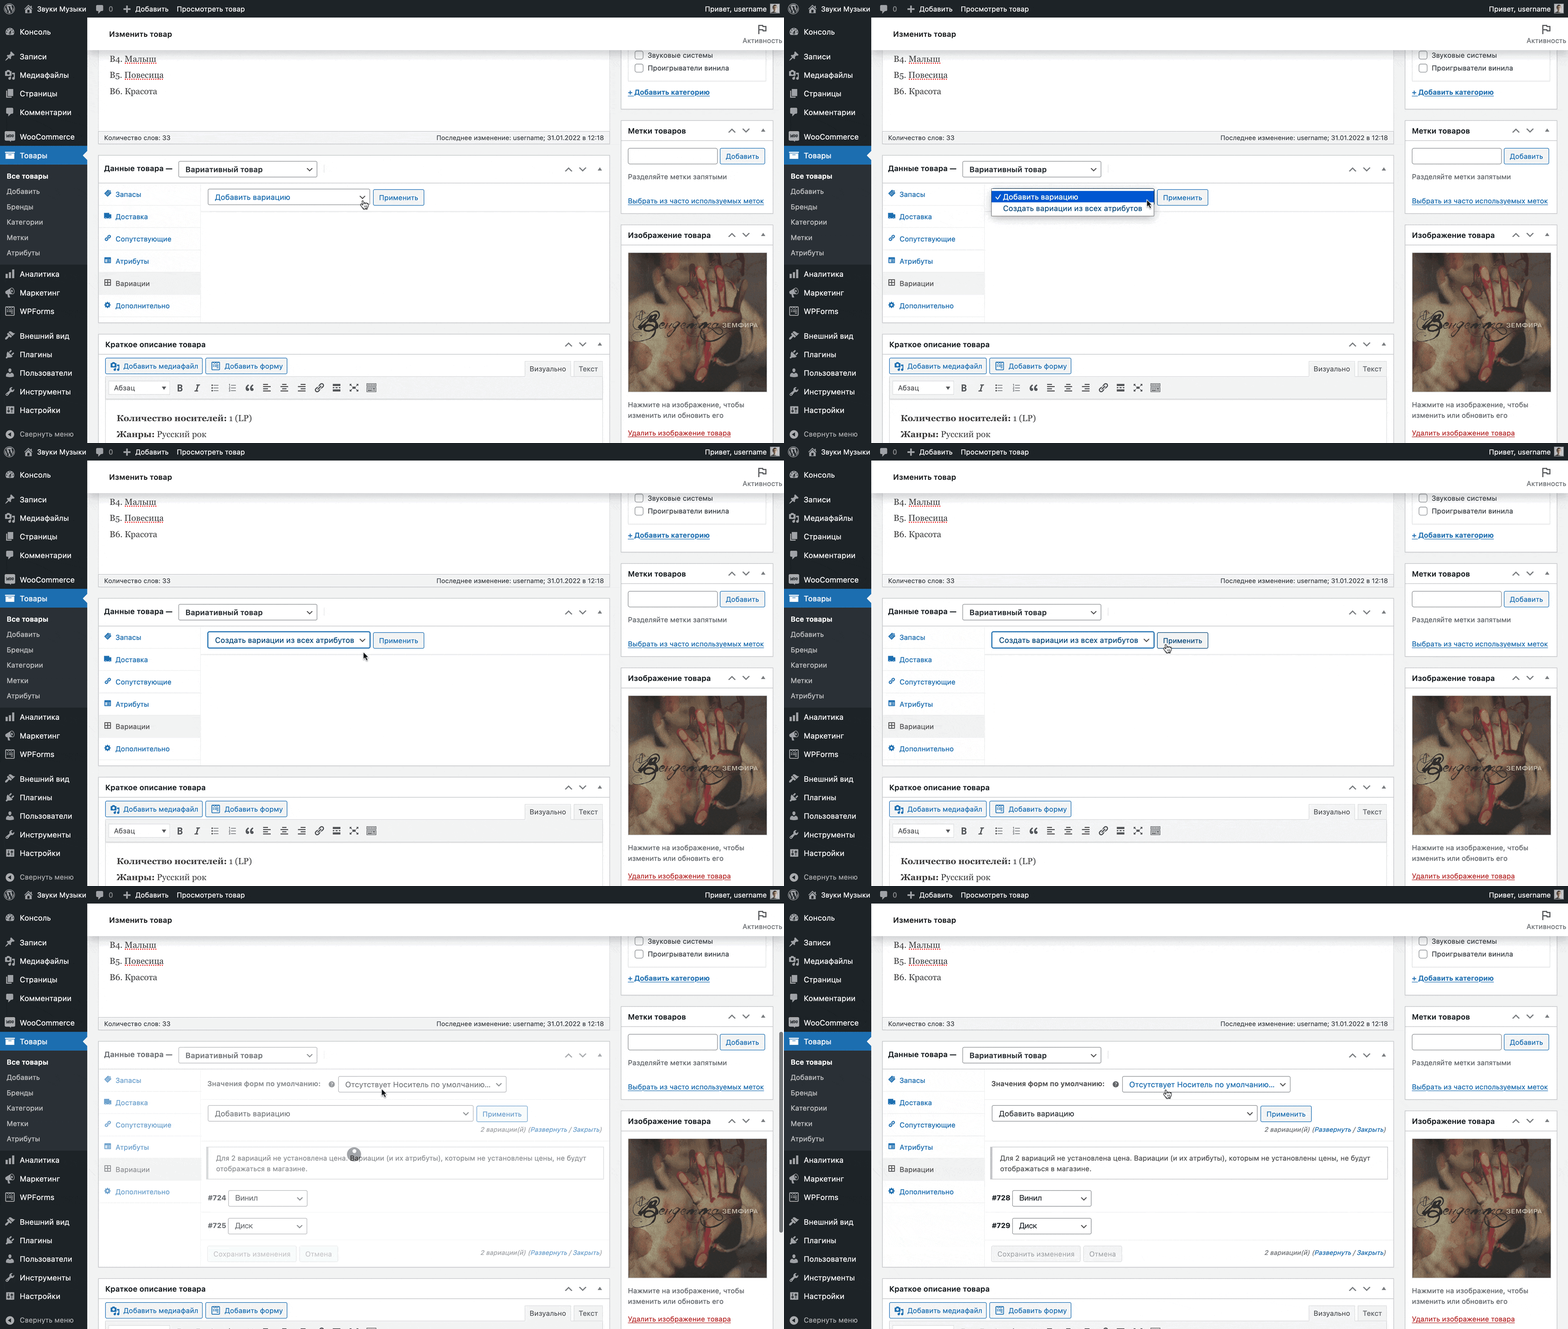
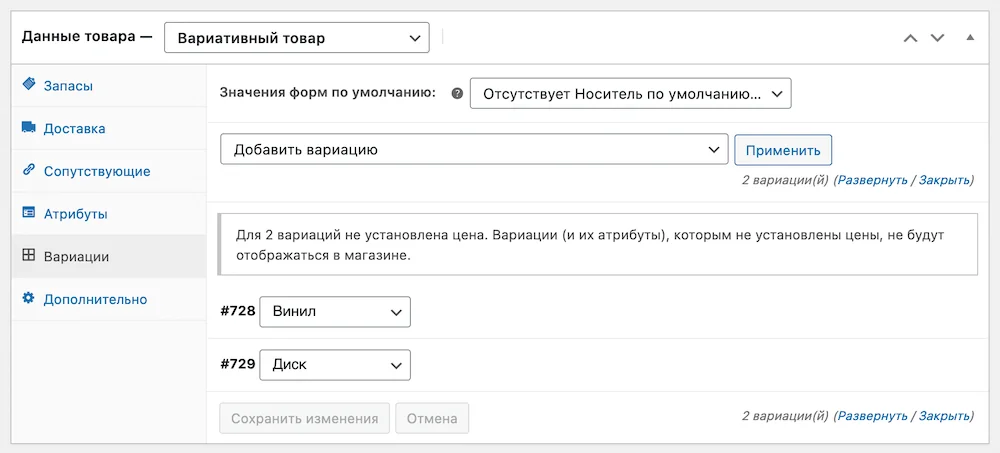
WooCommerce will create variations for the product from all assigned values in the Attributes section and display them in a custom row. By clicking on any of the lines, the variation parameters will open: article, price, warehouse status, dimensions, individual image, delivery class.
Once variations are created, the product no longer has a single price; it must be specified separately for each variation, as if it were a separate entity. As long as the price for variations is not indicated, the status “Out of stock” will appear on the product card on the website.
How to create product categories
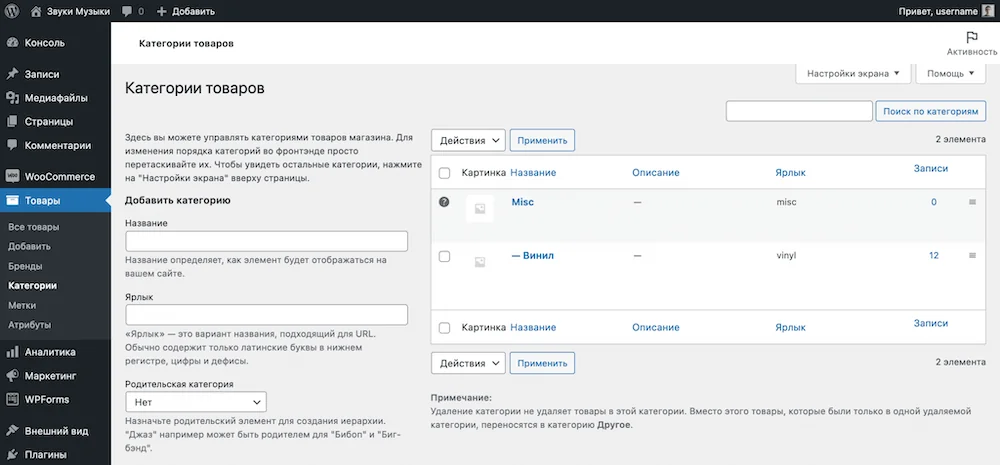
Go to the “Products – Categories” section in your WordPress console. There will already be one category - “Misc”. To add another one, fill out its parameters on the left side of the screen and click “Add category” at the bottom.
Links to categories can be added to the site header, plus they will be in the “List of Product Categories” widget, which is usually added to the sidebar on store pages for more convenient navigation through the catalog. Read more about widgets in the next section.
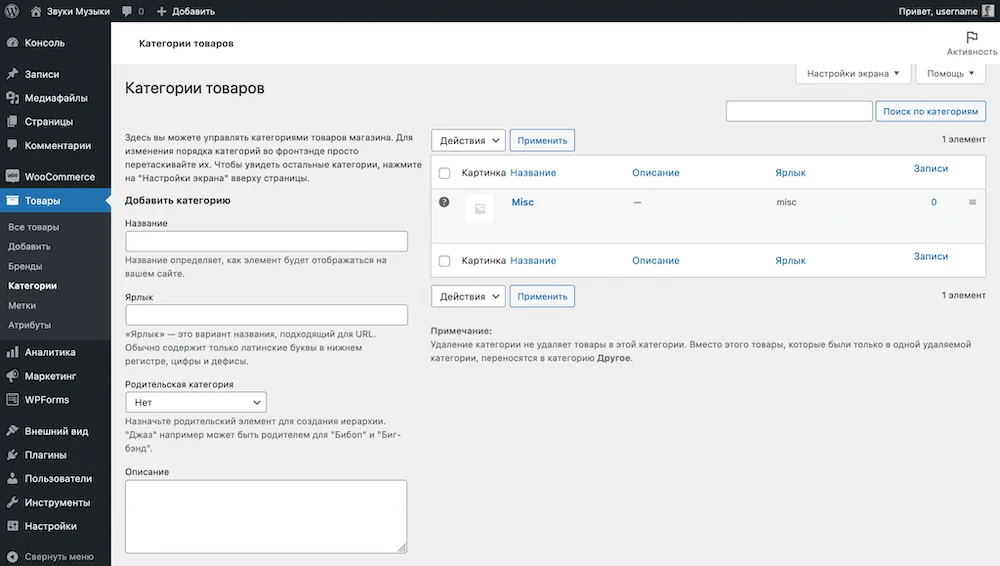
Initially, the “Misc” category will be selected as the default category, so to the left of it in the table there will be a question mark in a circle.
The default category is the category that products fall into if you do not manually select a category for them.
To change the default category, hover over the desired category and click the link that says “Set as default.”
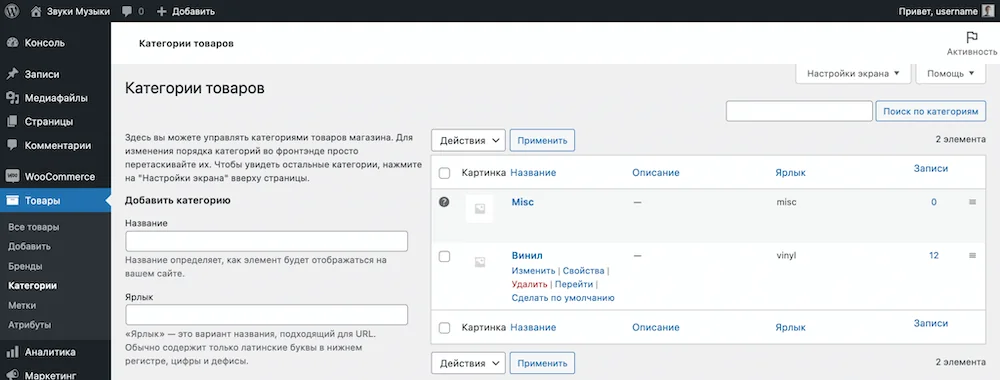
If you select a parent category for a new one, the new category will be displayed in the table and in the Product Category List widget as a child category, slightly to the right of the parent category.
How to create tags
Tags are an option used in WooCommerce as an alternative for product categories. For example, to collect products on a separate page, but create a new category because it does not fit into the existing structure of the store.
The section’s interface is exactly the same as that of the “Categories” section: on the left are fields for new tags, on the right is a table with already created tags.
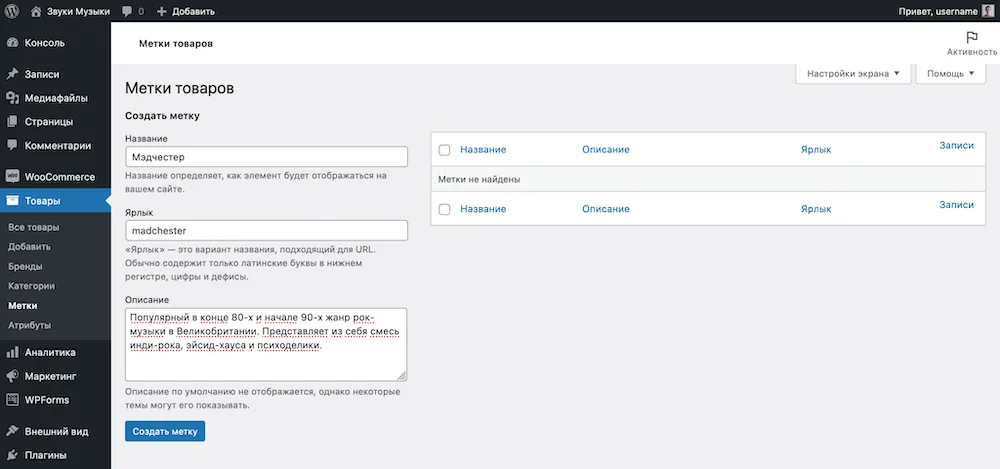
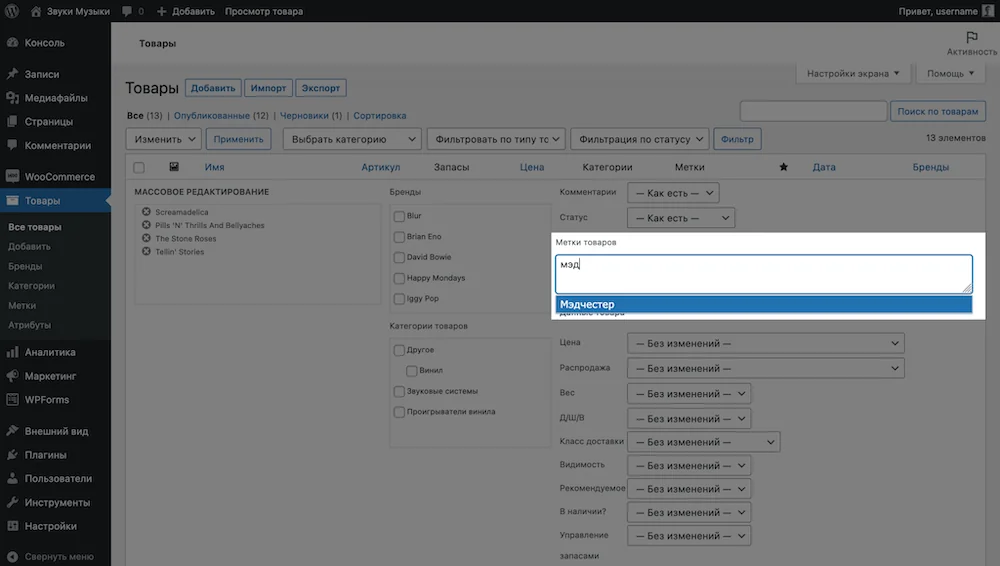
After creating a tag, you need to assign it to the desired products. This is done either in the individual product settings in the “Tags on the sidebar” block, or in the “Product Tags” block in the mass editing menu for products.
Just start typing the name of the tag in any of these places, then select the desired tag from the drop-down list and save your changes. After that, when someone clicks on the tag on the site pages, they will be taken to a page with all the products that have the same tag.
How to set up reviews
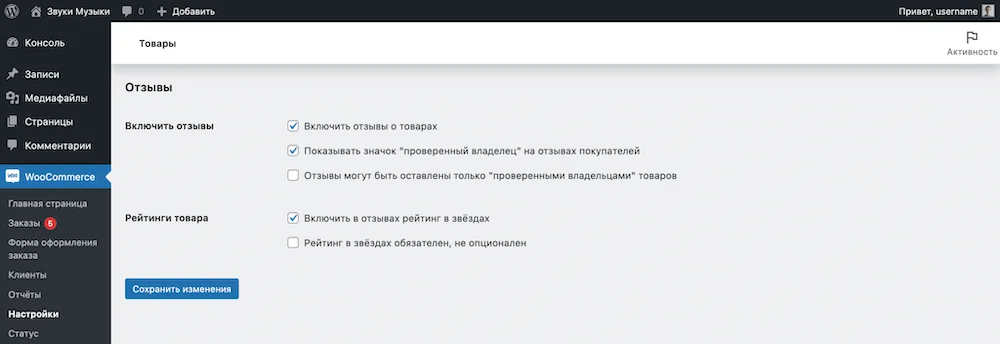
Go to the section “WooCommerce – Settings – Products”. At the bottom of the screen you will find the “Reviews” block, where there will be several settings.
You can, in principle, disable product reviews globally on the entire site, or allow them to be left only by “verified owners”—registered people who have purchased the selected product. Separately, you can disable the star rating or make it optional.
How to set up inventory globally
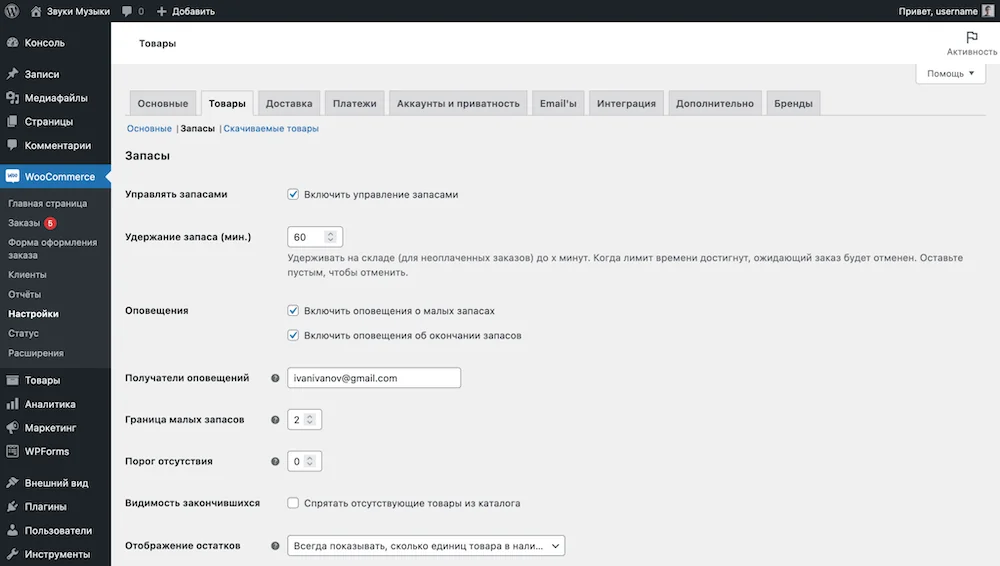
Go to the "Products" tab in the "WooCommerce - Settings" section. Under it you will see three subsections: “Main”, “Inventory” and “Downloadable products”. Go to the "Inventory" section.
Here you can basically disable inventory management on the site, set the time for unpaid orders during which the goods will be held in stock, turn off alerts and select the mail to which they should arrive, set the limits of small stocks and the out-of-stock threshold - the number of goods after which the product status is set to “Out of stock”.
Also, using the “Out of stock visibility” option, you can hide missing products from the catalog. By default, they will still appear in the store, but in gray and with the text “Out of Stock”.
The “Display balances” option controls whether inventory should be displayed on the product card. You can choose to show the full number of units, hide this information altogether, or show inventory only when the product runs out.
Setting up filters for a store in WooCommerce
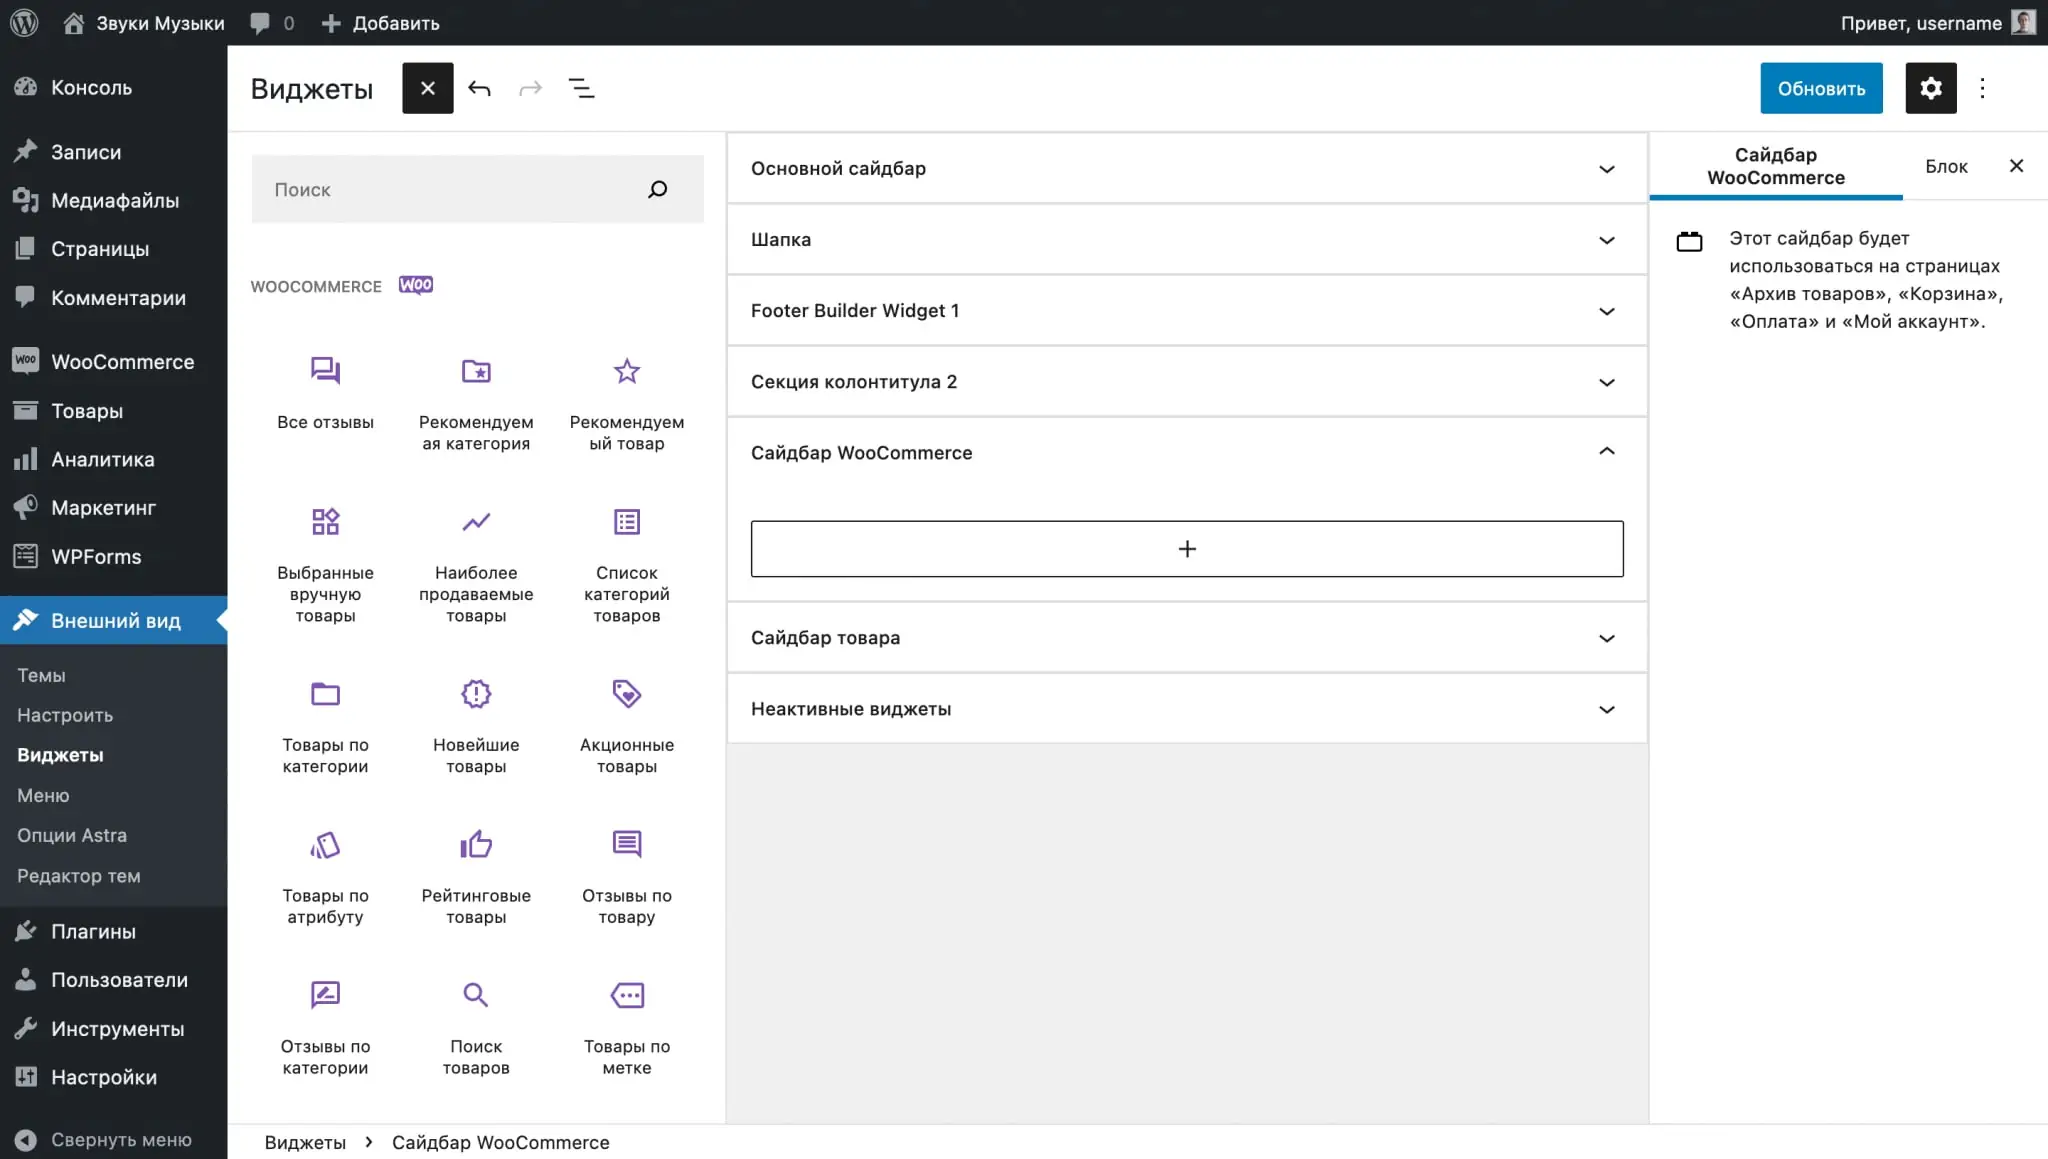
Filters are configured in the “Appearance – Widgets” section. In it you will find different areas for widgets, one of which relates to the store. Depending on the topic, the number of zones and their names will differ. For example, in the Astra theme, the zone you need is called “WooCommerce Sidebar”, and in OceanWP it is called “Default Sidebar”.
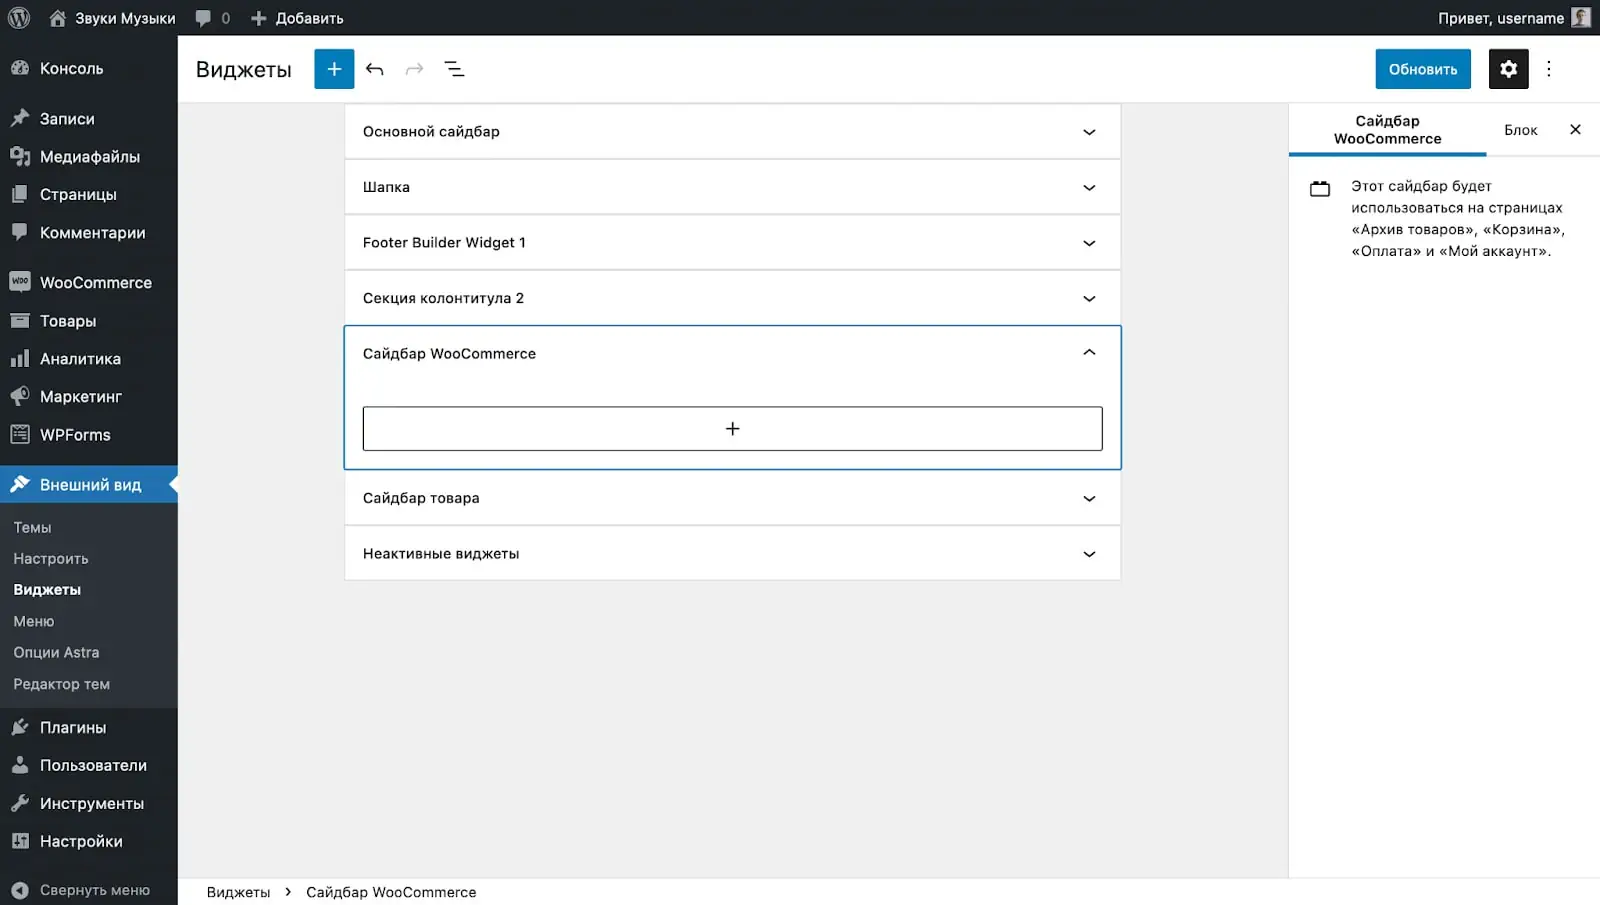
Just drag the widgets you like into the sidebar and assemble filters this way, just like in the constructor. And to make filters look more attractive, you can also use standard blocks like headings or plain text.
If suddenly the filters are not displayed when you go to the store, there may be several reasons:
- You have selected the wrong widget area. In this case, the widgets will appear as soon as you place them in the correct zone.
- The widget area is correct, but it is not in the current page layout. Open your store page in the Gutenberg editor and look for Page Layout Settings in the sidebar. Make sure they have a sidebar layout selected.

Setting up shipping in WooCommerce
On the Shipping tab in the WooCommerce - Settings section, you will find three subsections: Shipping Zones, Shipping Options, and Shipping Classes.
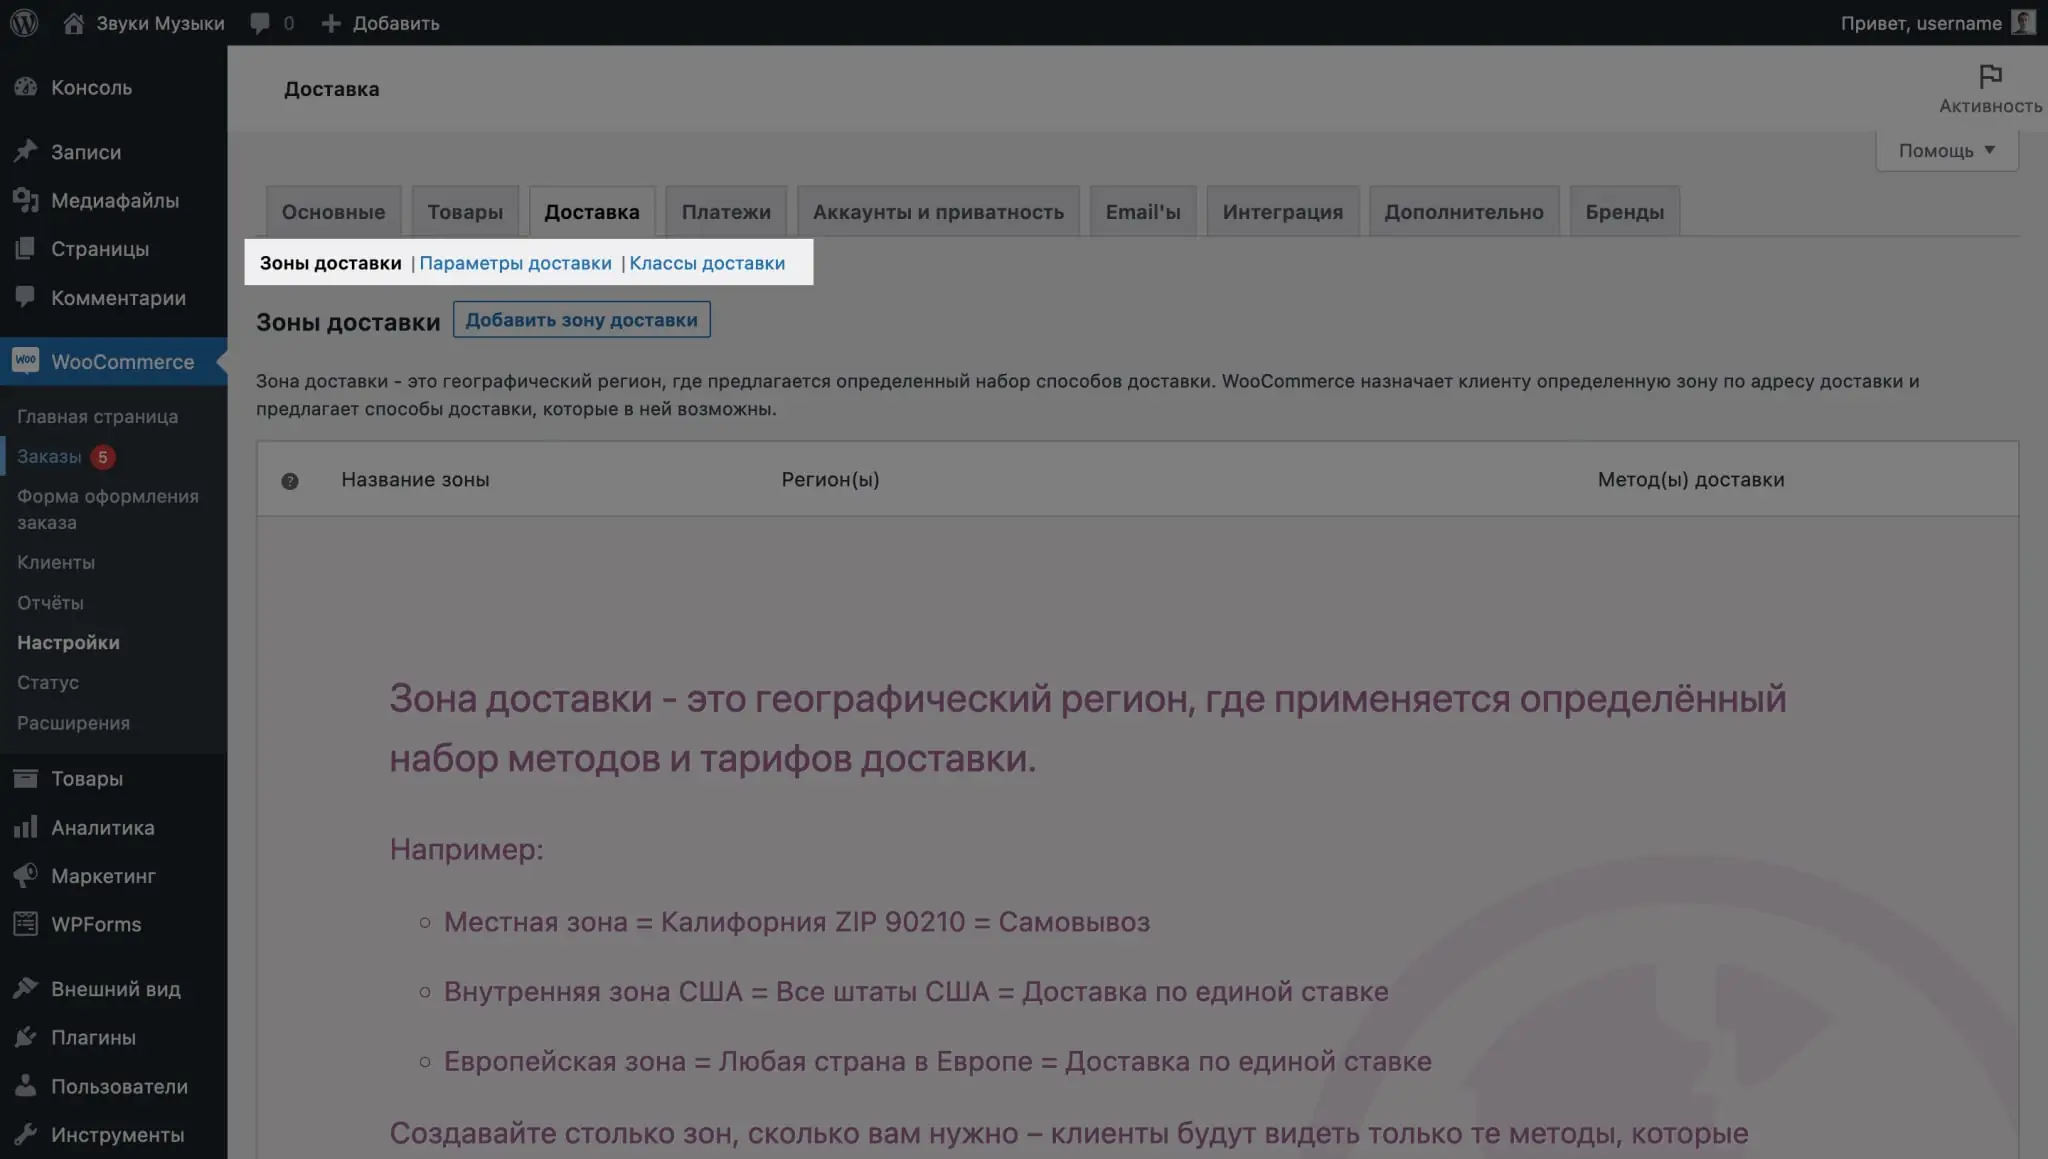
Delivery zones
Here you can configure the regions in which delivery operates. You can create one zone for everyone, or several, so that customers from the same country have one delivery method, and another for foreign customers.
Initially, after installing WooCommerce, there will be no delivery zones in the plugin settings. To add it, go to the “Delivery” tab and click the “Add delivery zone” button.
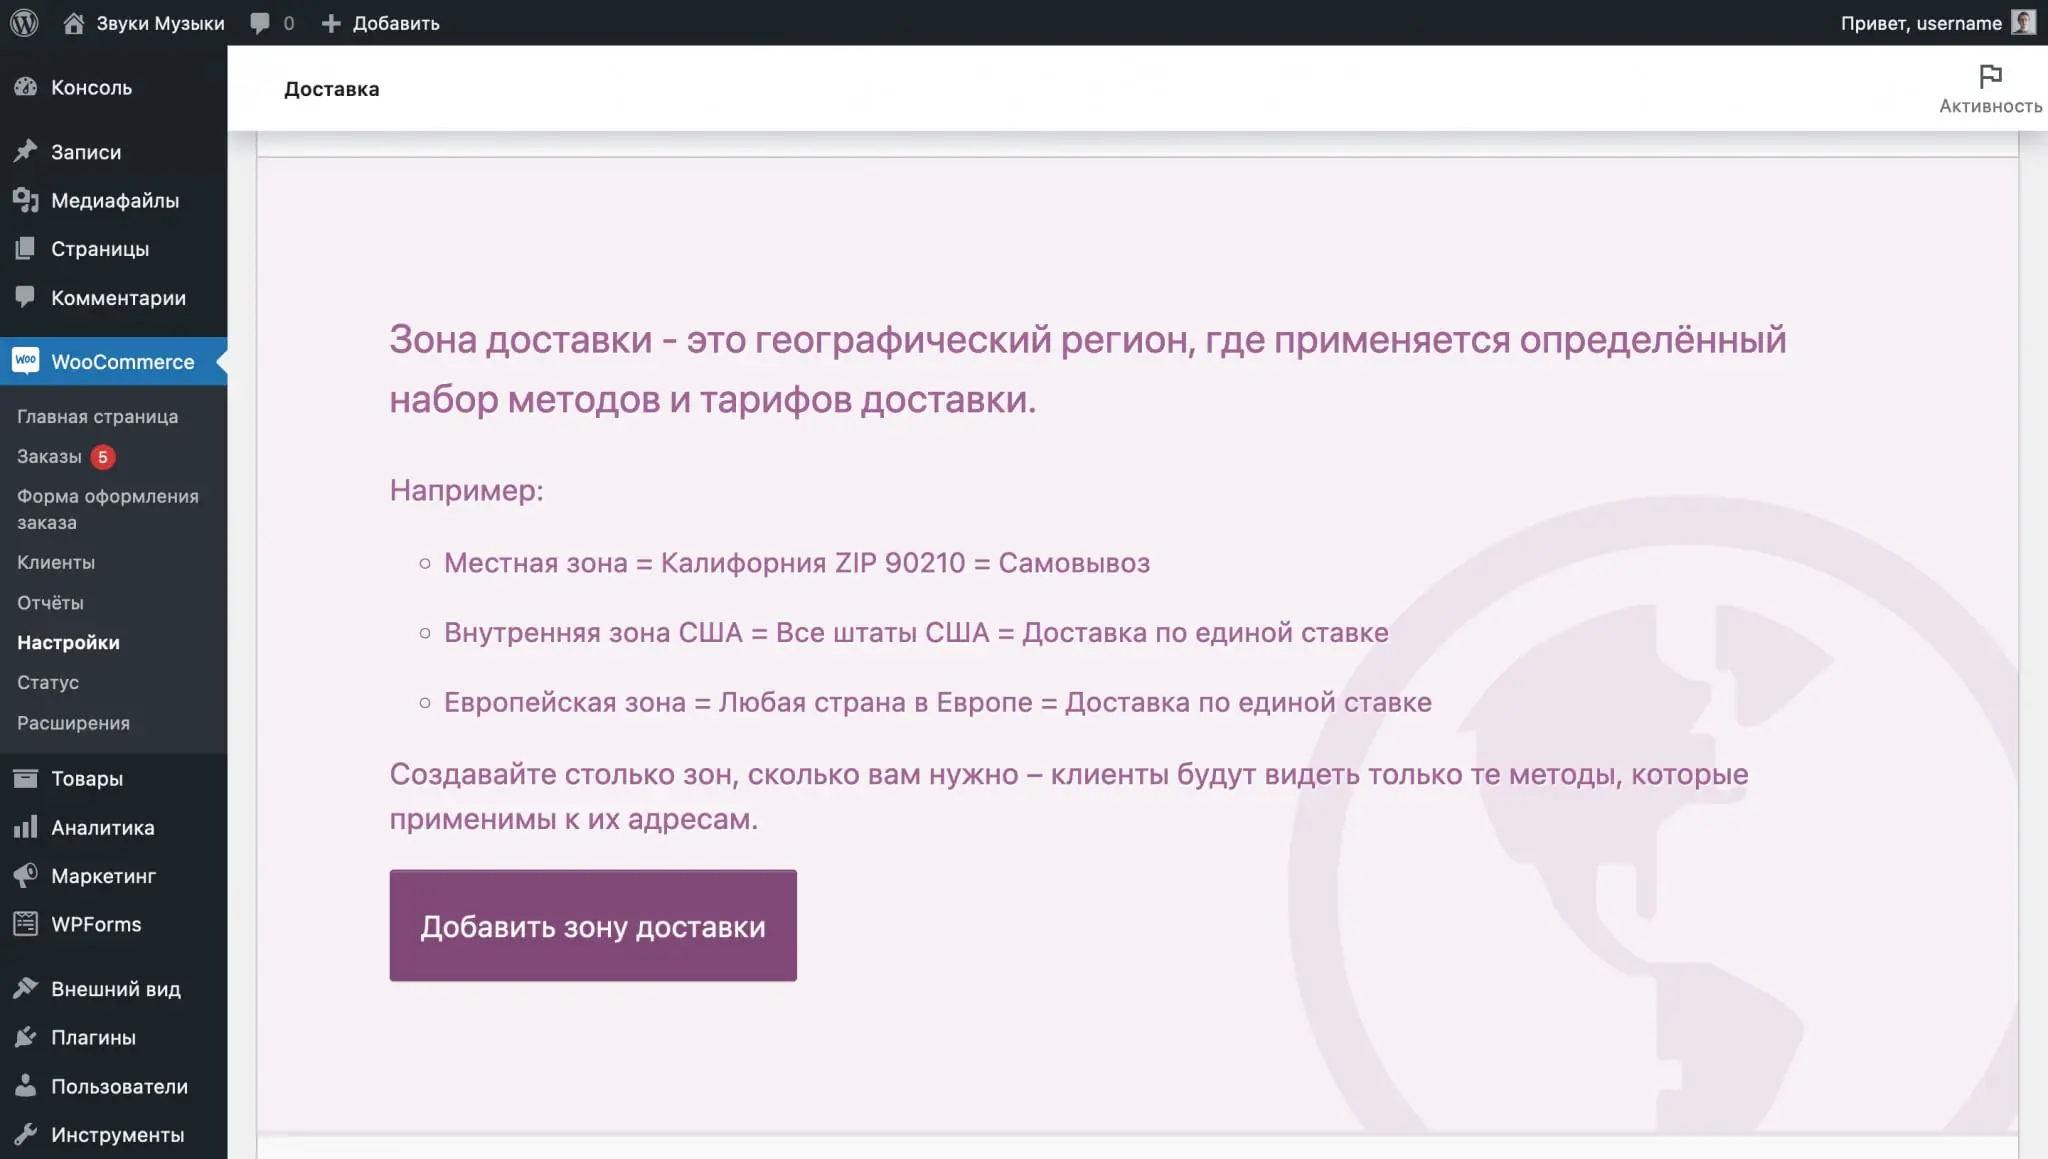
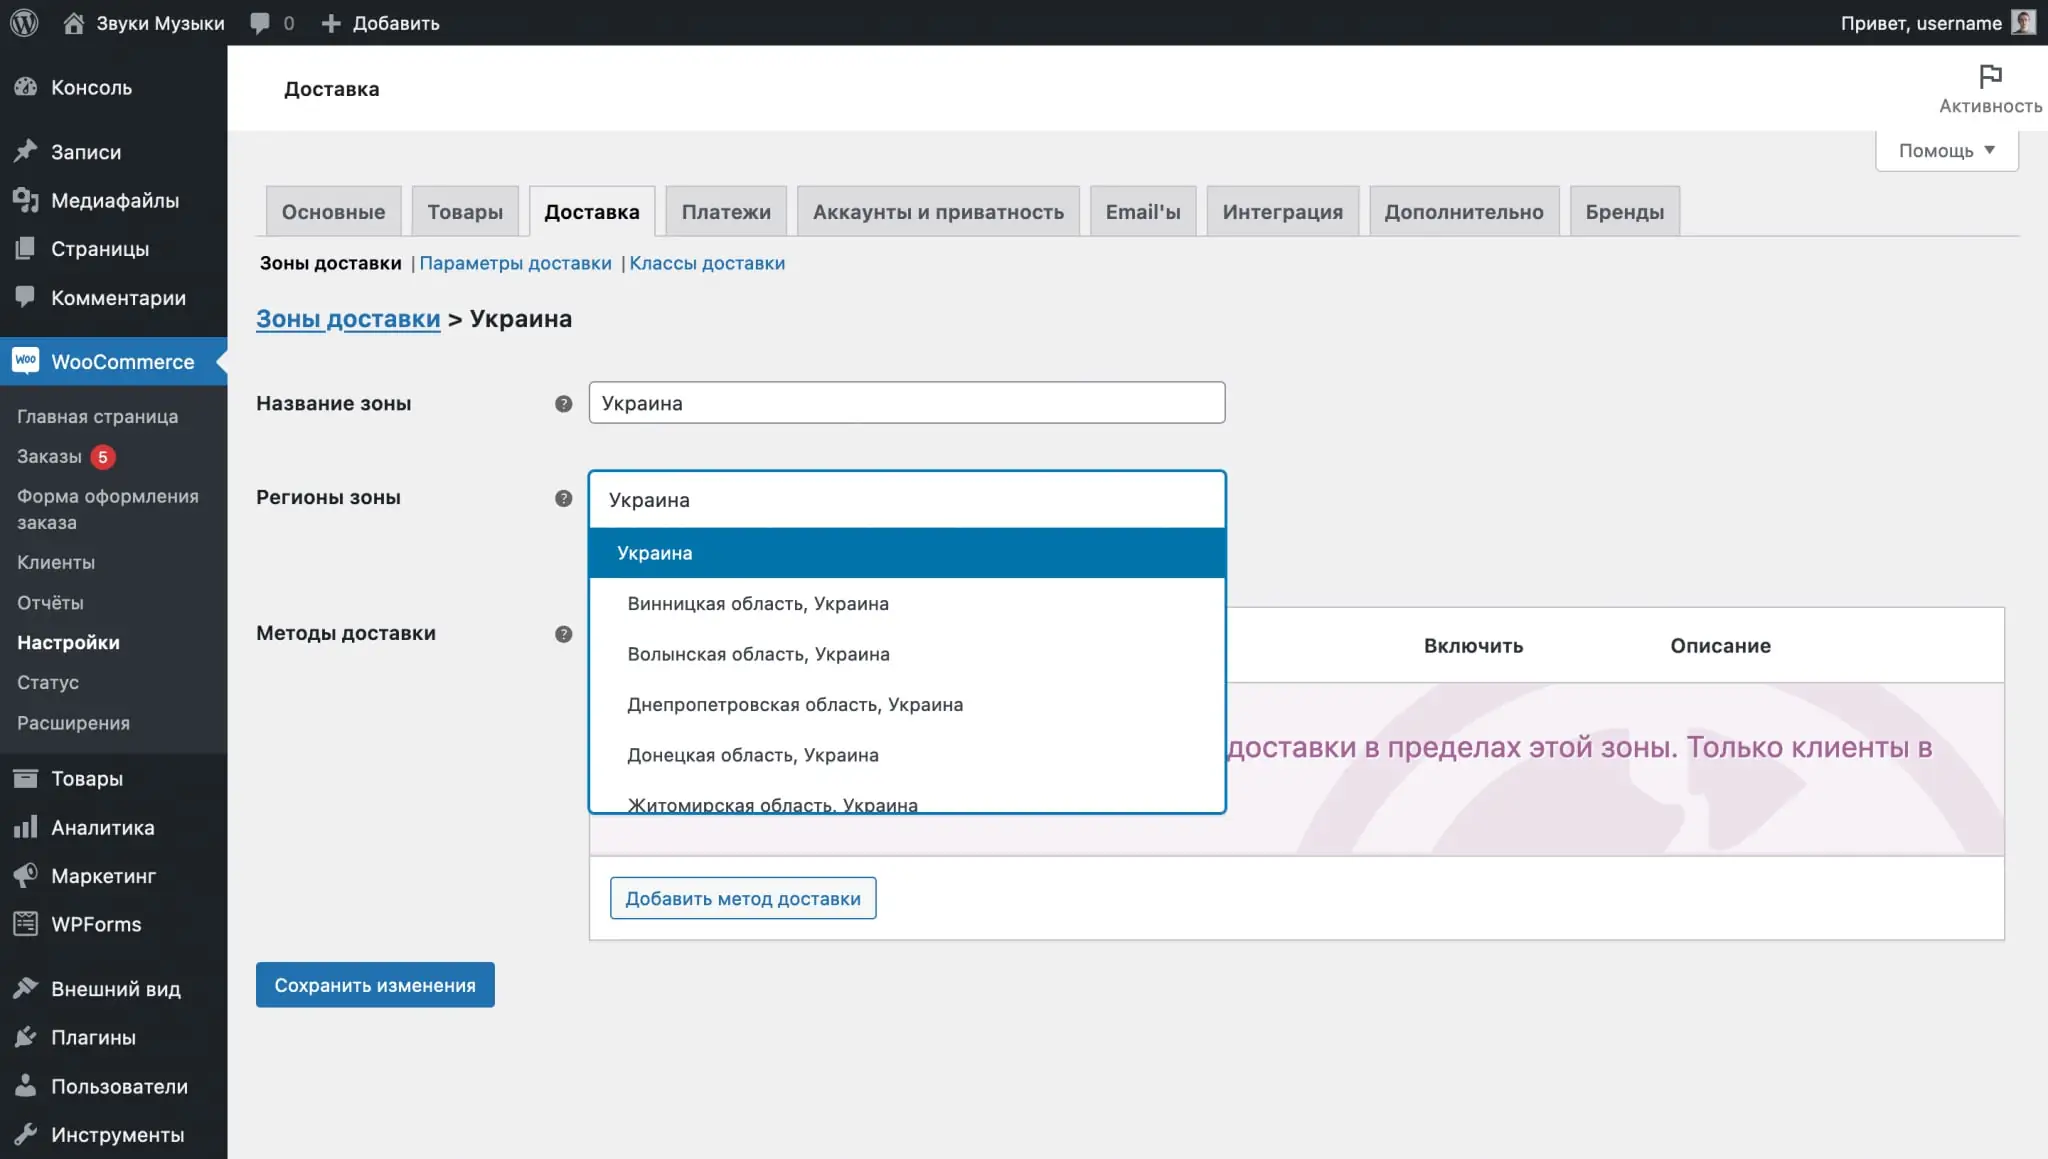
On the next page, come up with a name for your delivery zone and select regions from the drop-down list. You can select several countries at once or individual areas within a country.
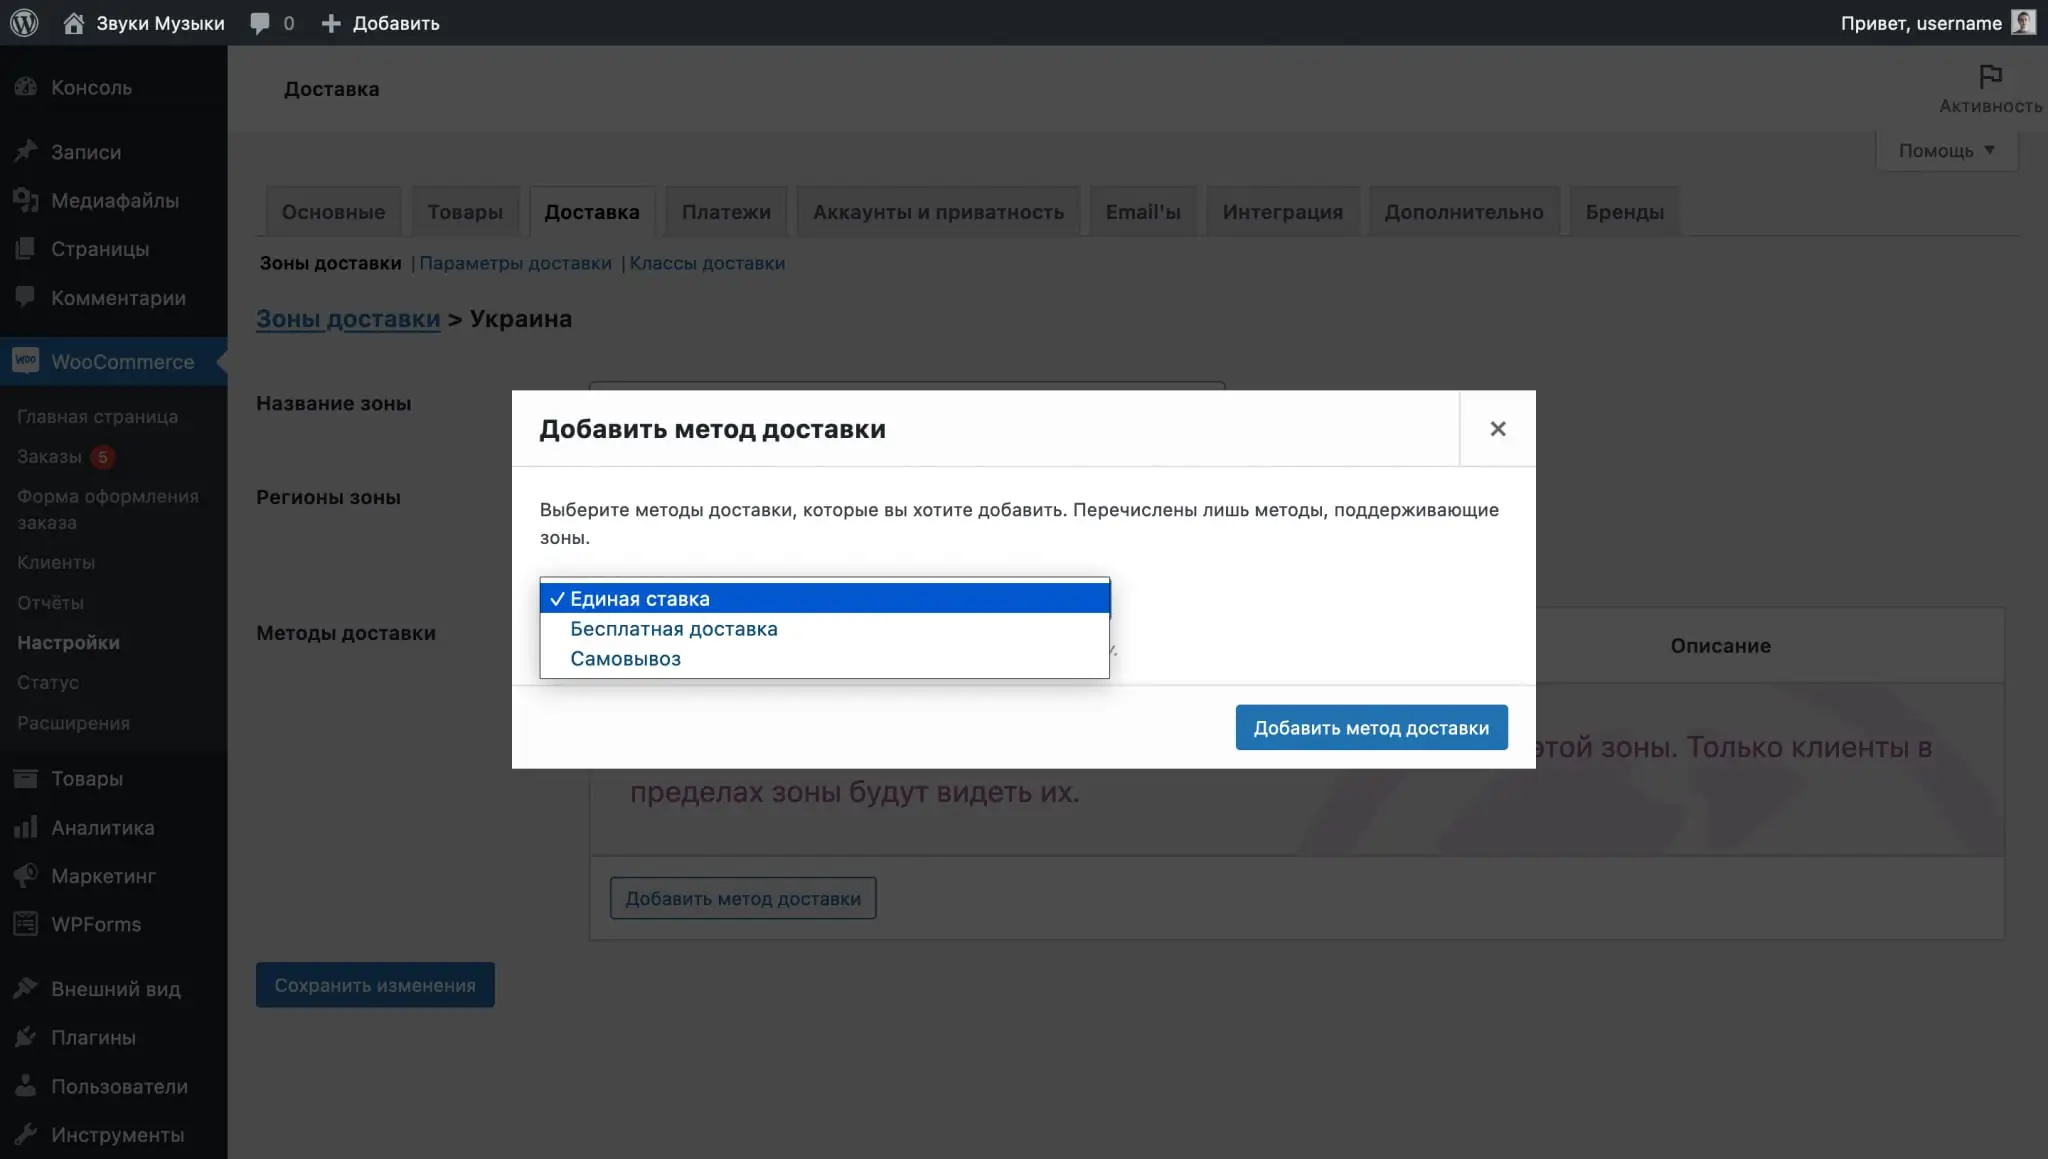
After specifying the name of the zone and the regions associated with it, click “Add Shipping Method” in the “Shipping Methods” section. You will have three methods to choose from: Flat Rate, Free Shipping and Local Pickup. For one zone, you can select several methods at once.
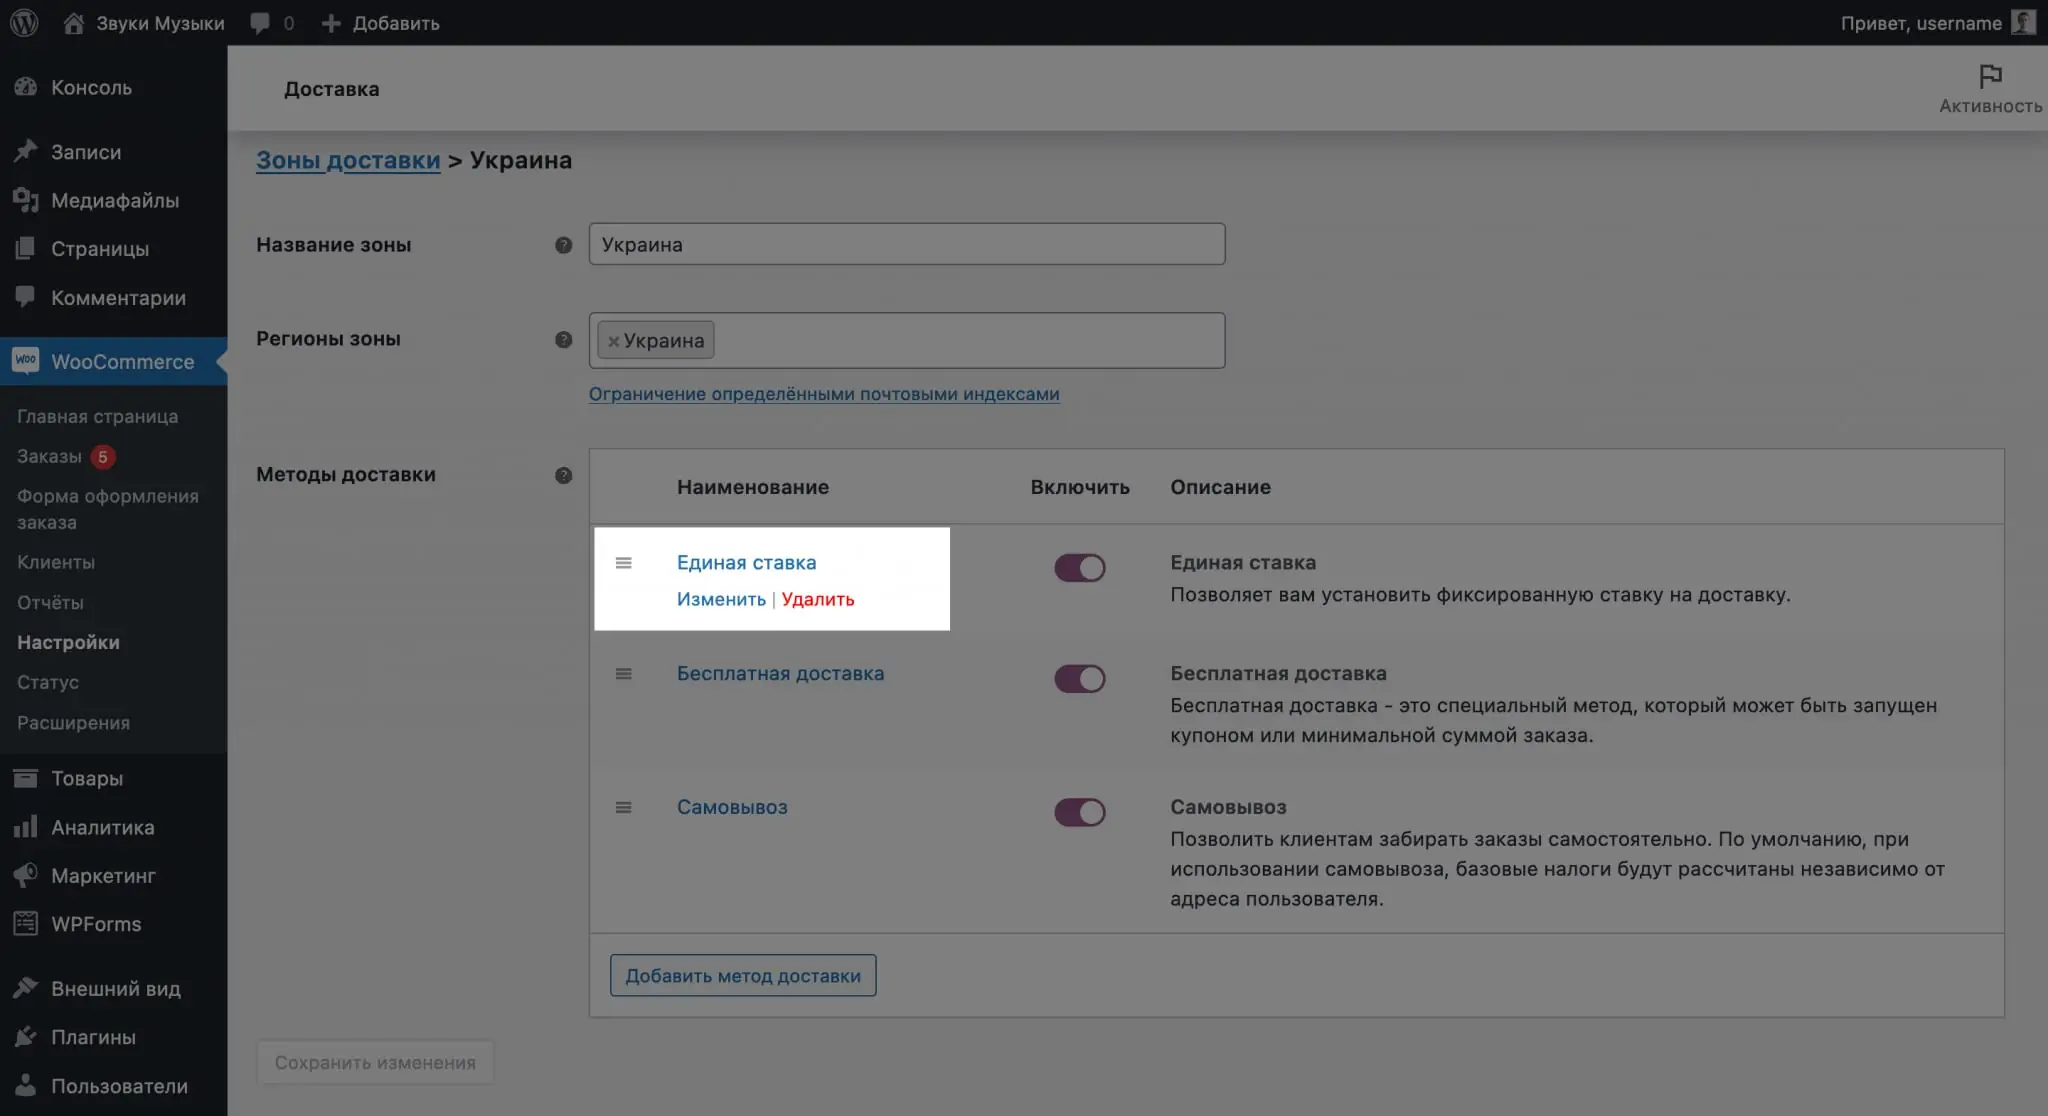
Each delivery method will have settings that will help you customize the conditions for its use. To open them, hover over the method and click "Edit".
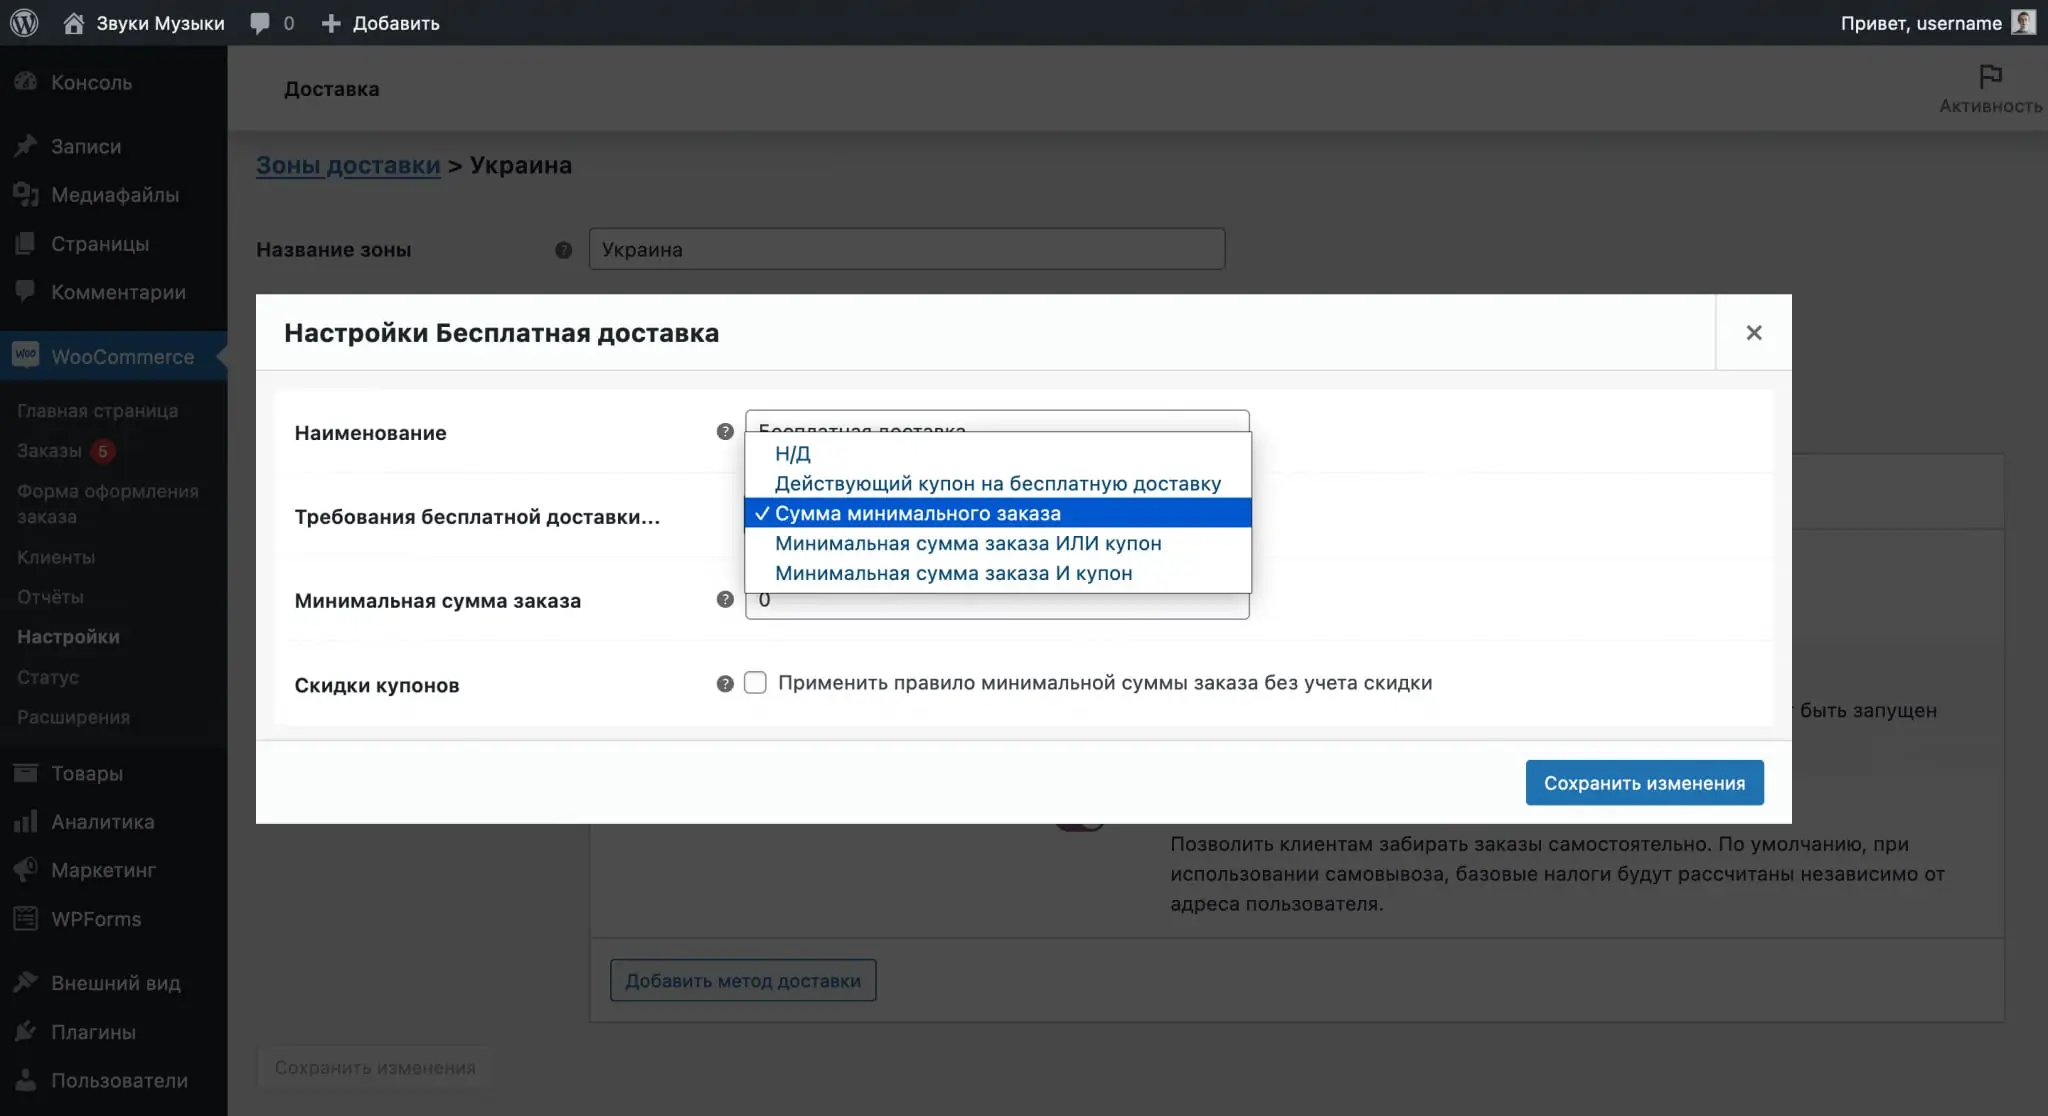
The “Free Shipping” method in the parameters will have the opportunity to select the conditions under which delivery will become free. This could be a coupon or minimum order amount.
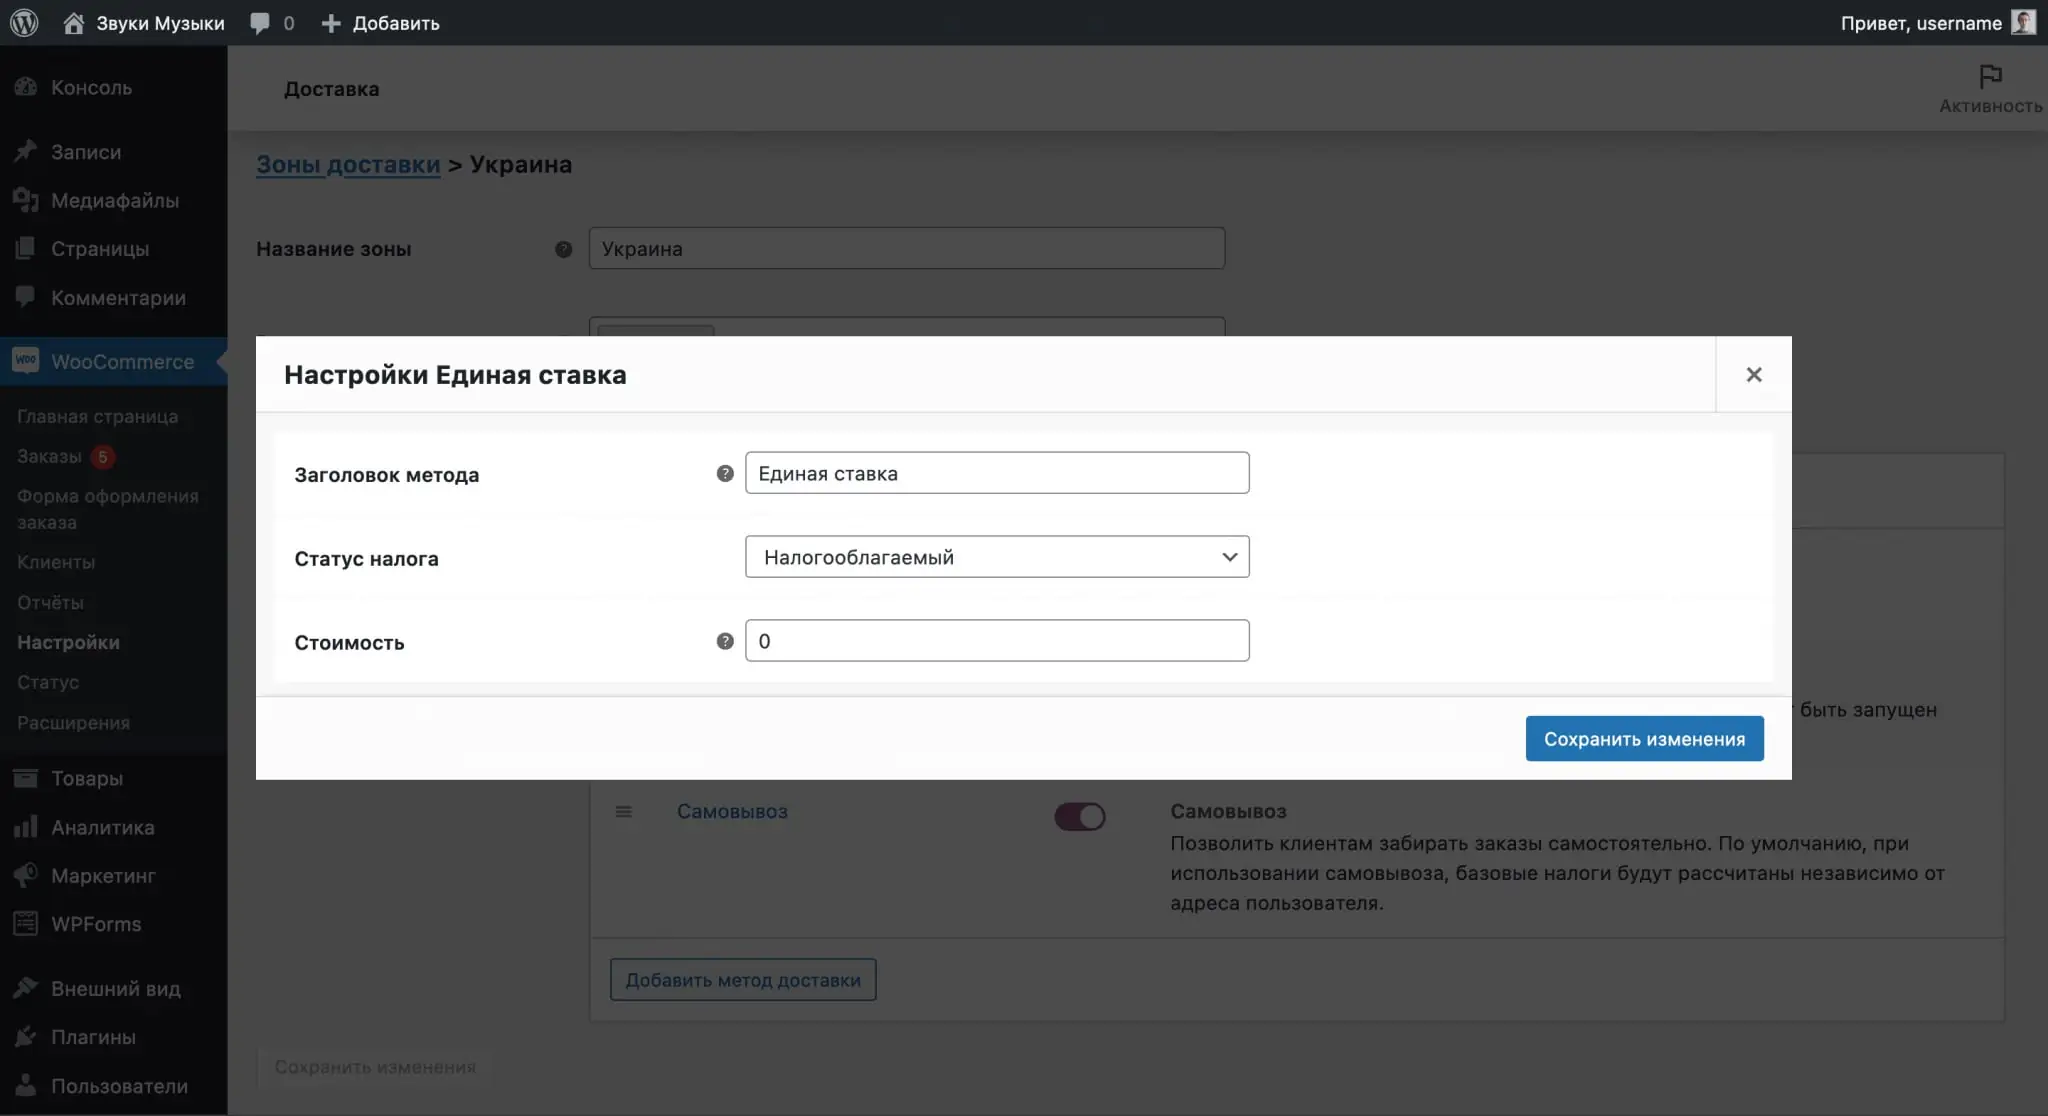
The Flat Rate method will have the option in the options to select a flat shipping cost and indicate whether that cost will be subject to tax.
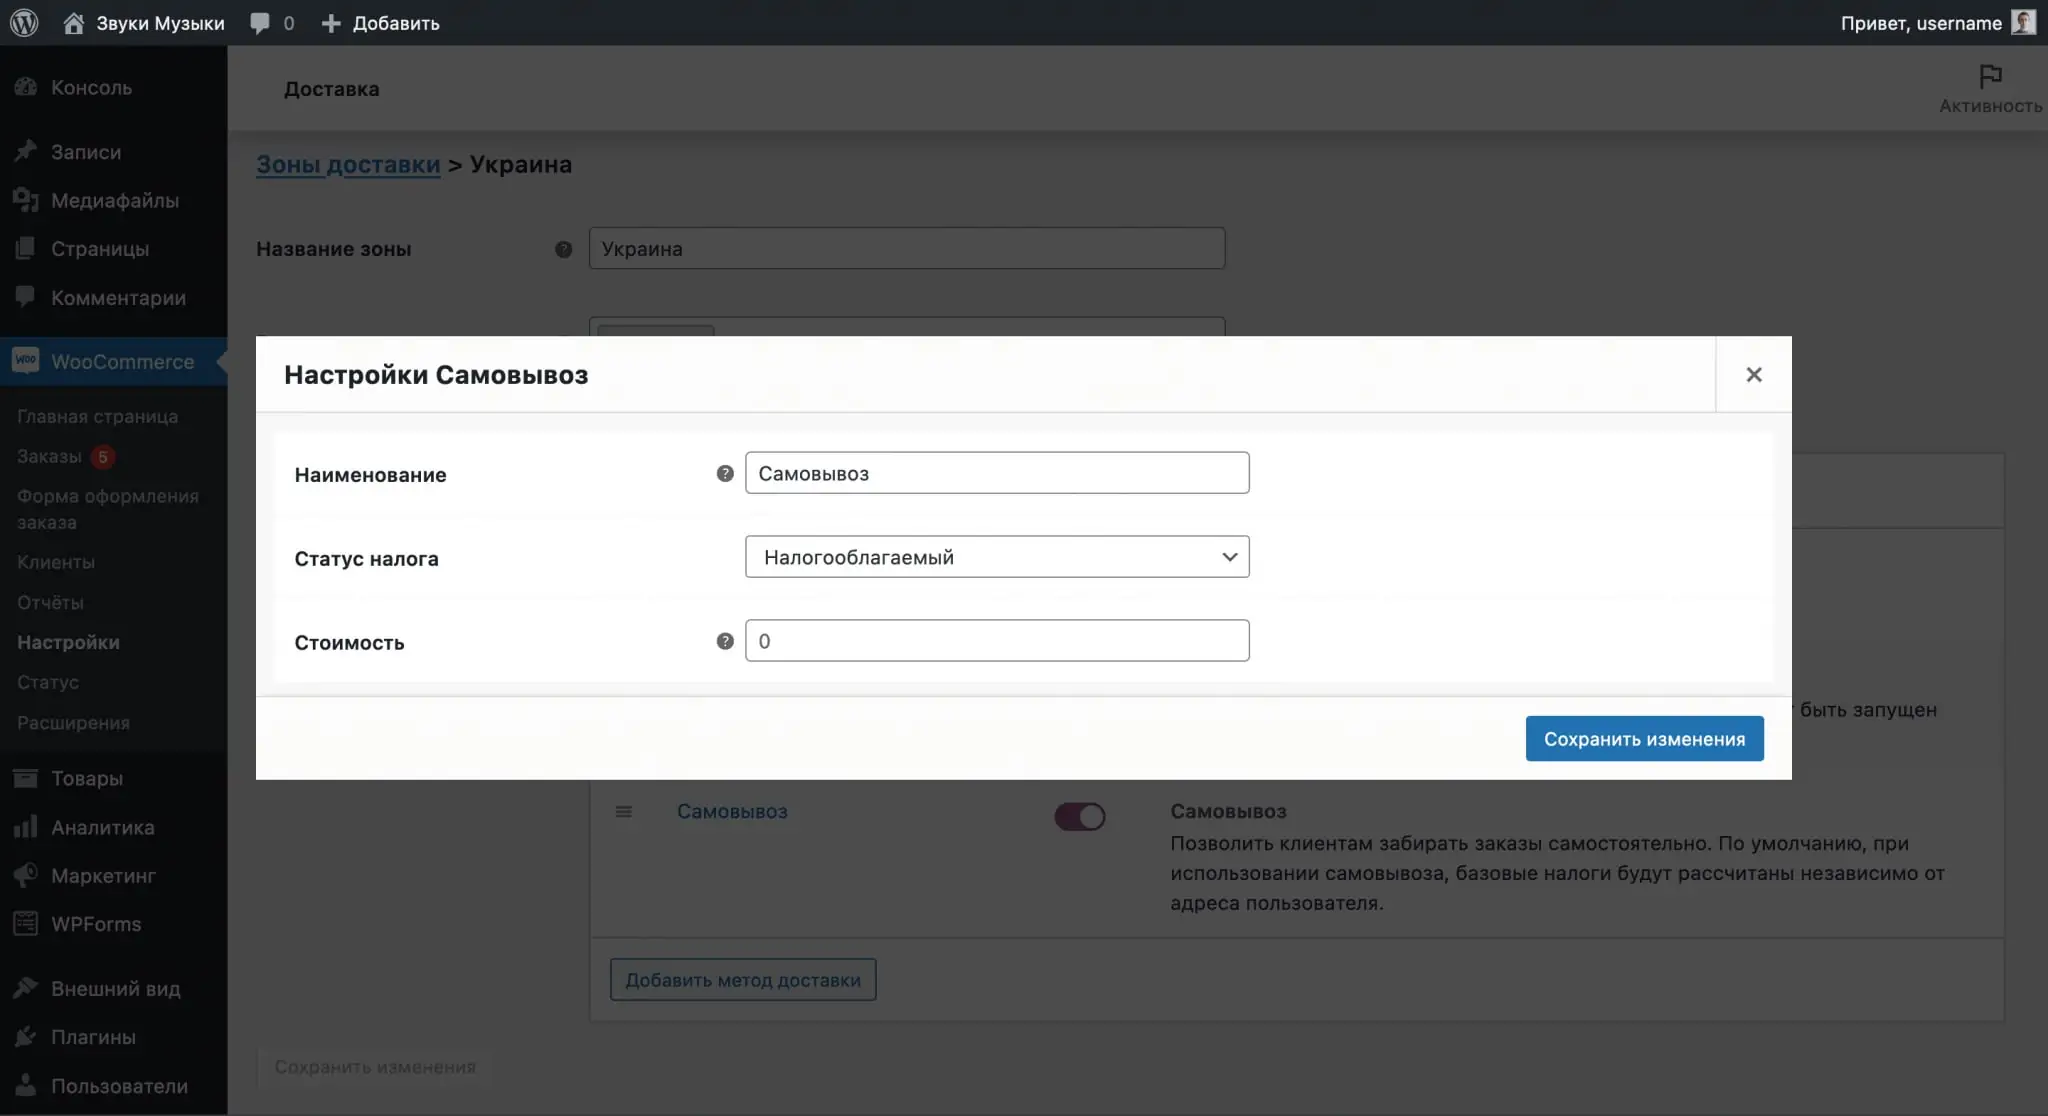
The “Pickup” method will have the same options in the parameters as the “Flat Rate” method: delivery cost and taxation of the cost.
Delivery options
Here you will find several parameters divided for convenience into three blocks: “Calculations”, “Delivery destination” and “Debugging mode”.
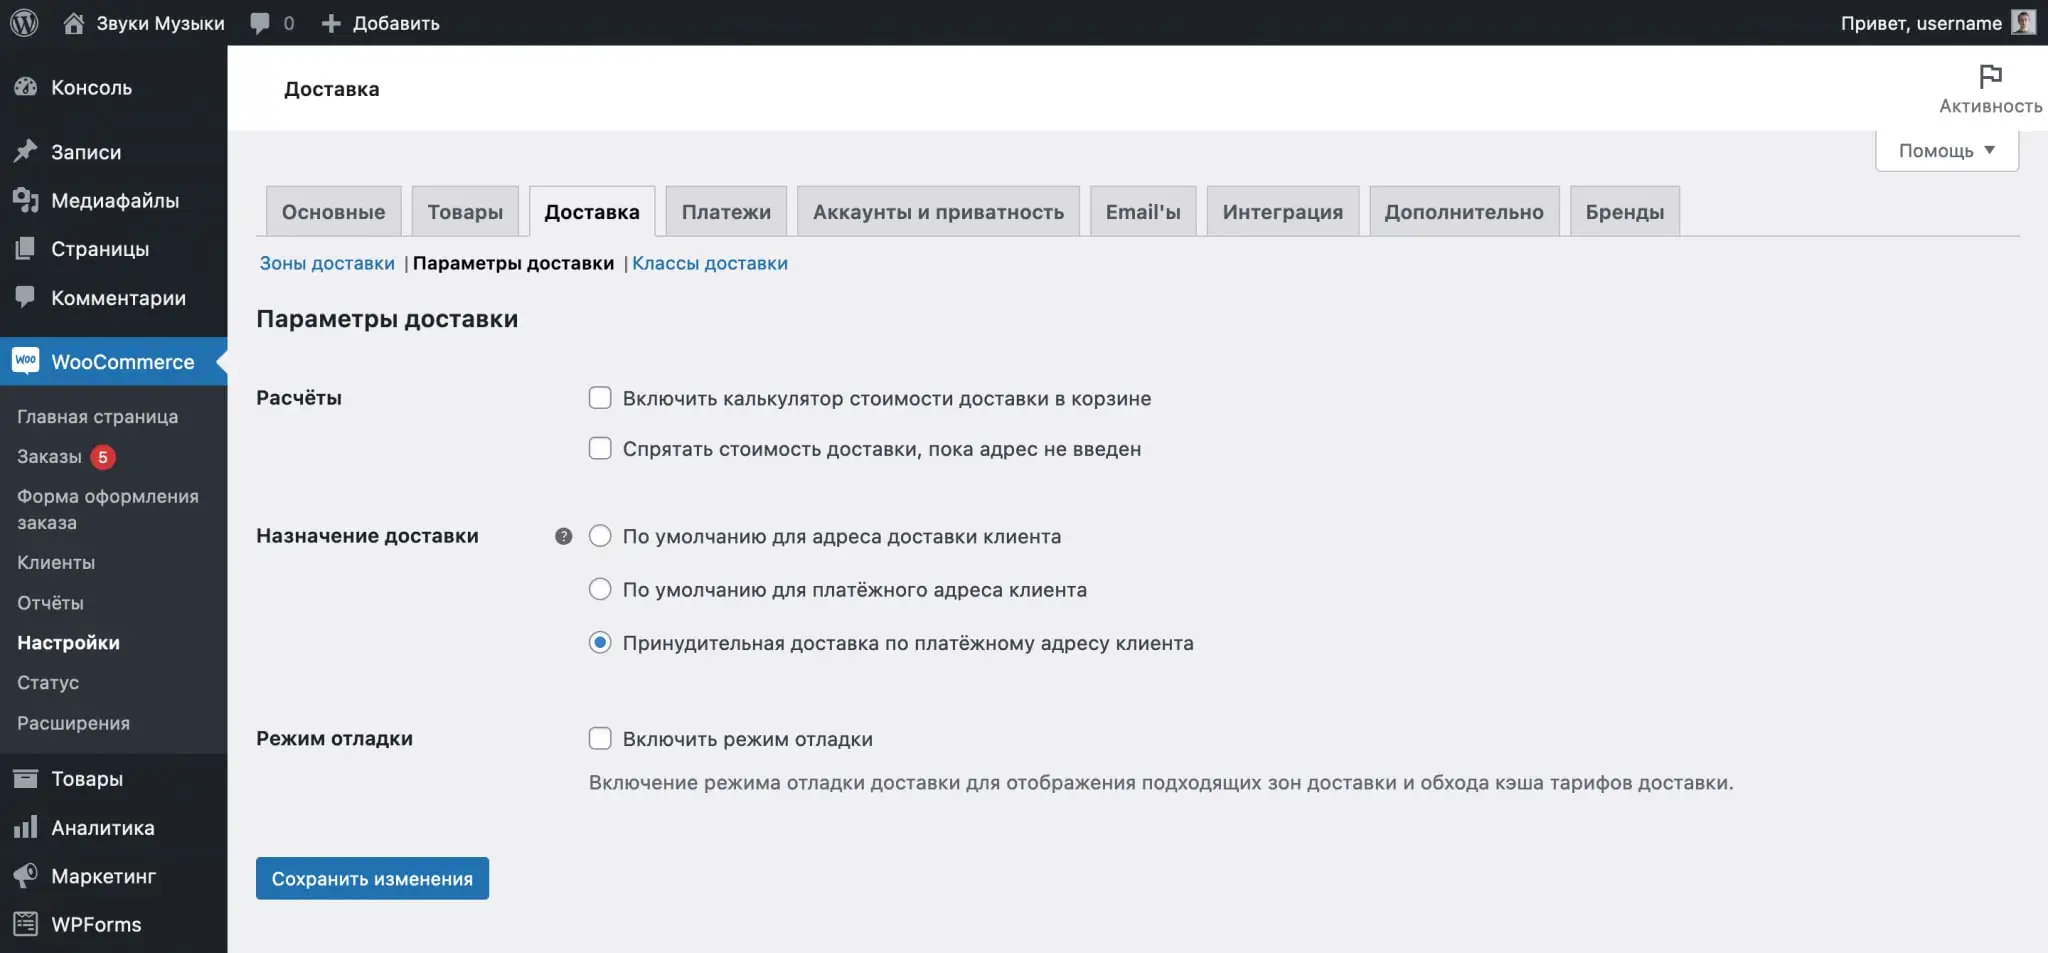
There are two options for calculations:
- Include a shipping cost calculator in the cart—adds the ability to specify the delivery address in the cart and calculate its cost relative to it. Typically, the address can only be changed on the checkout page.
- Hide Shipping Costs Until Address Entered—Disables shipping options in the cart and on the checkout page until the customer enters an address.
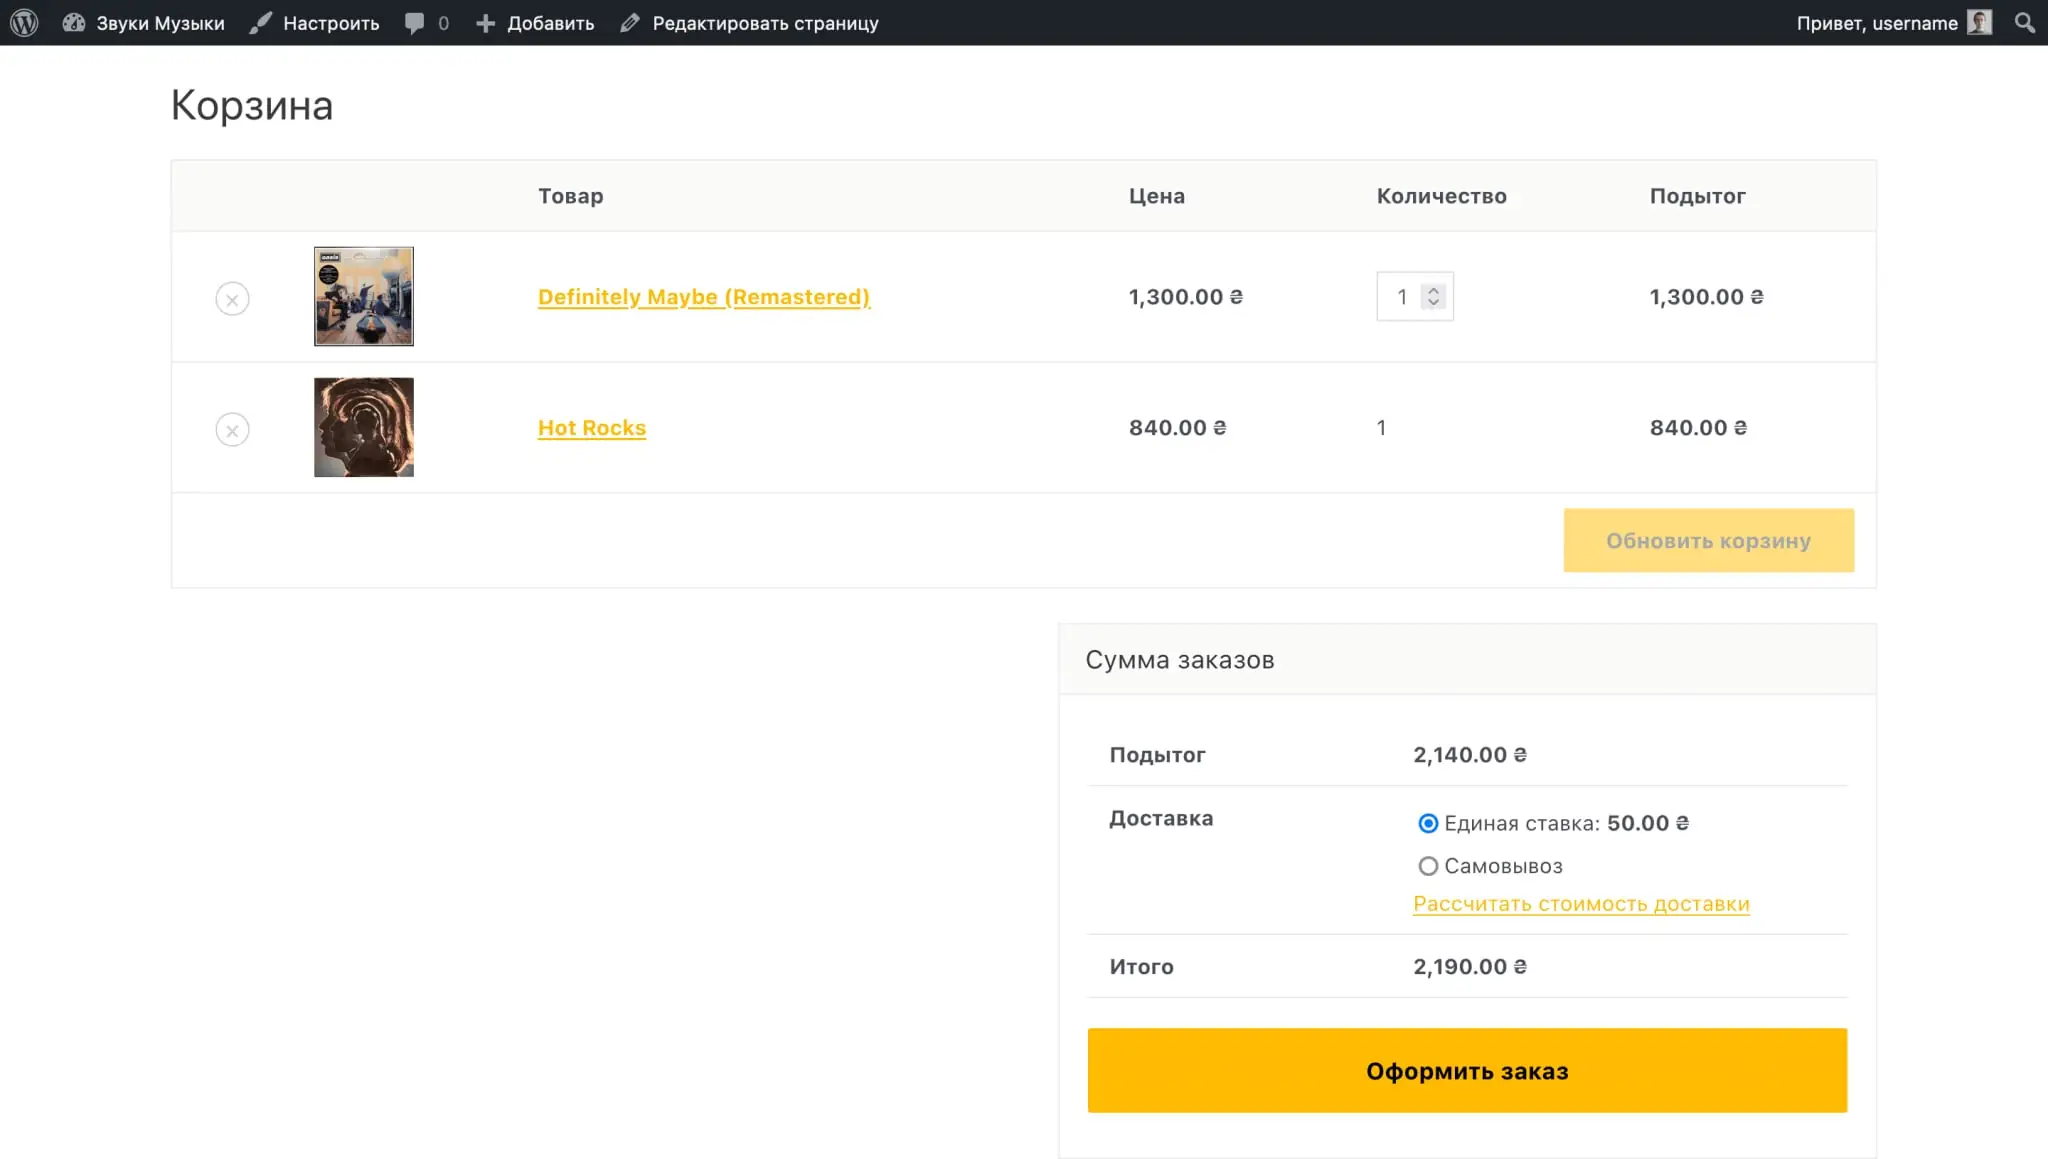
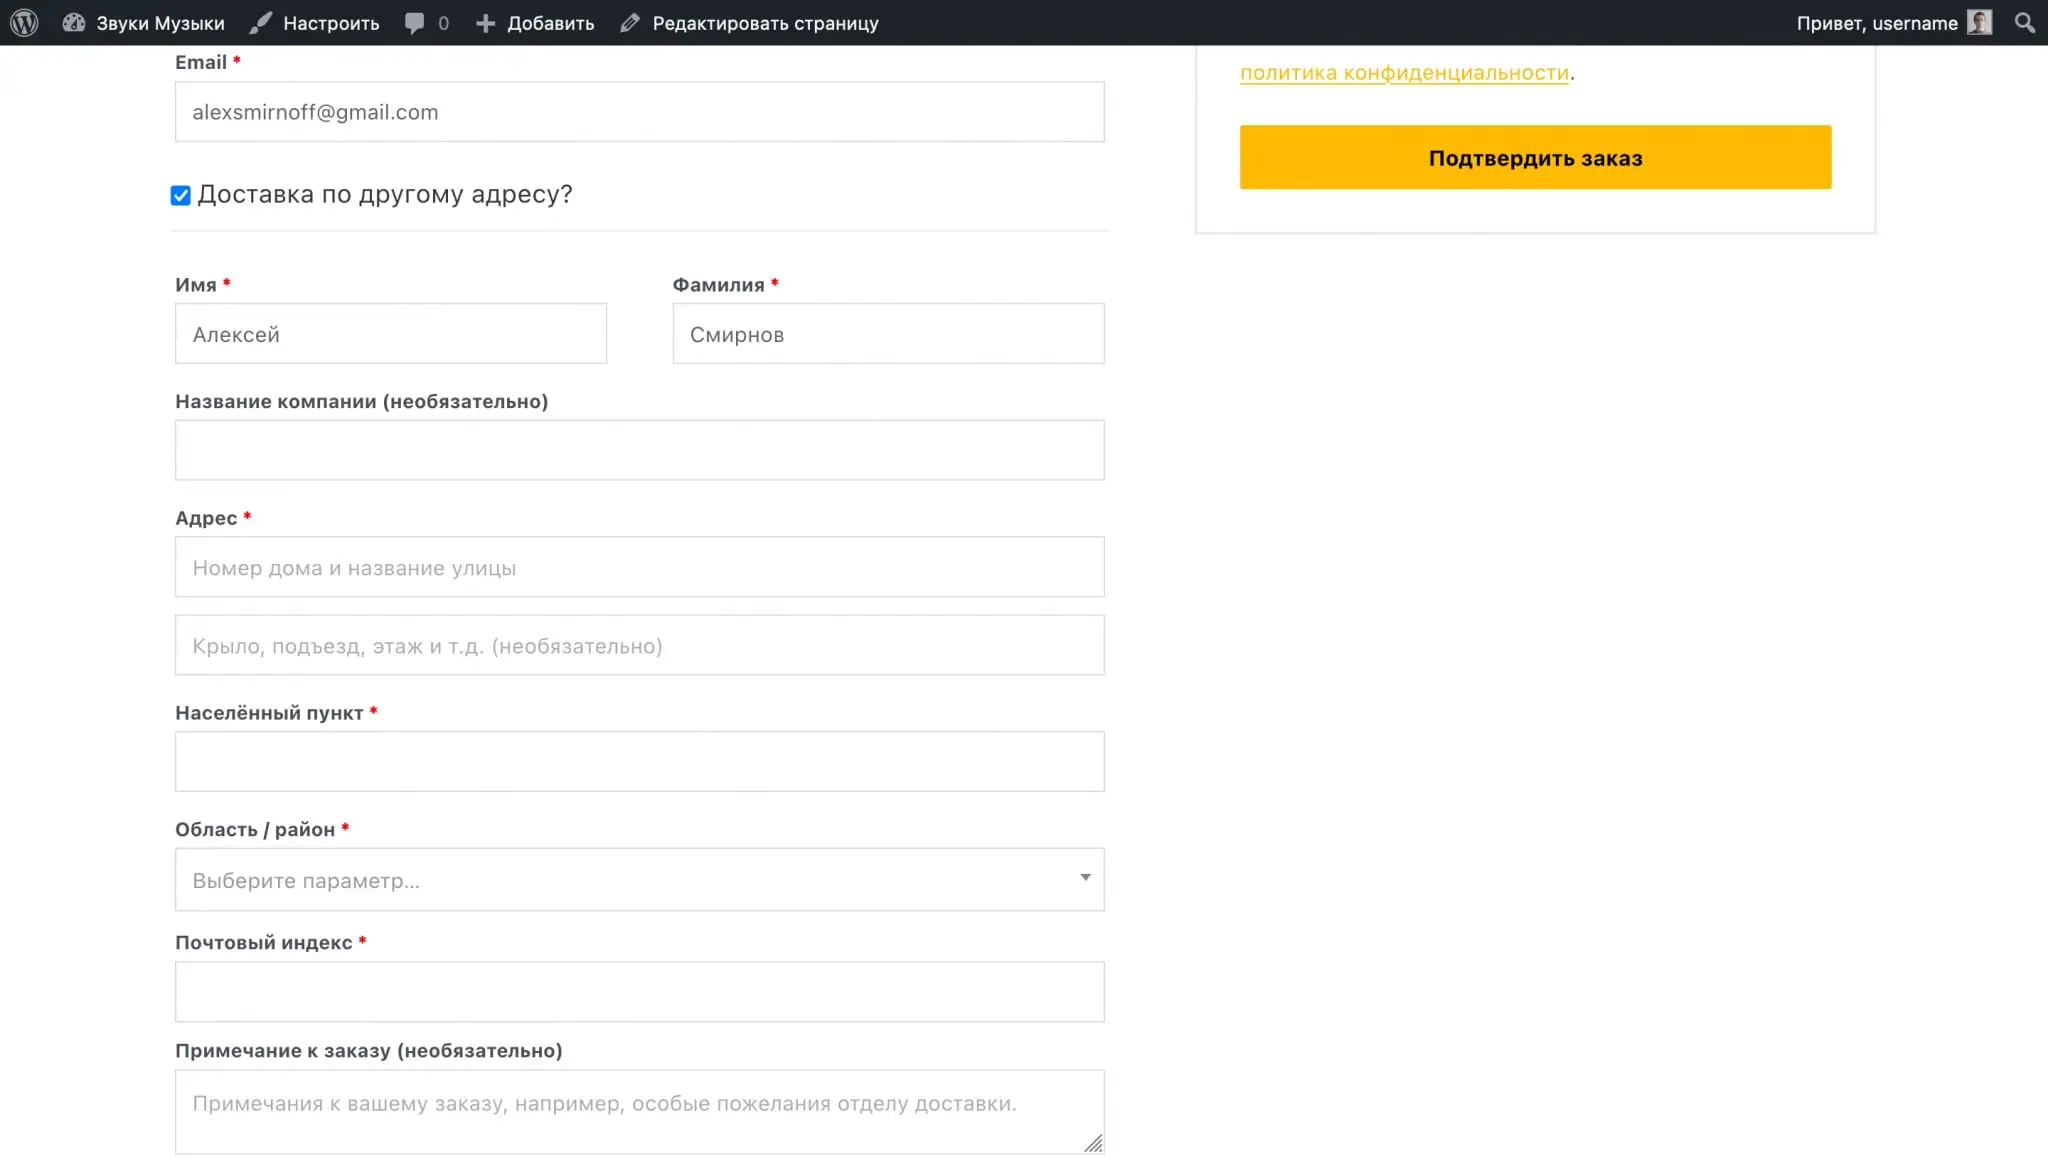
The delivery destination determines which address will be used by default for delivery. The first two options provide that on the checkout page the buyer will have the option “Ship to a different address”, where he will be able to specify an address that is different from the one in the account.
To remove the "Ship to another address" option from the checkout page, select the "Force delivery to customer's billing address" option.
Debug mode will help you understand what's wrong if shipping rates are applied incorrectly. In this mode, caching of shipping options will not work, and the shipping zone to which WooCommerce assigned you will be displayed in the cart and on the checkout page.

Delivery classes
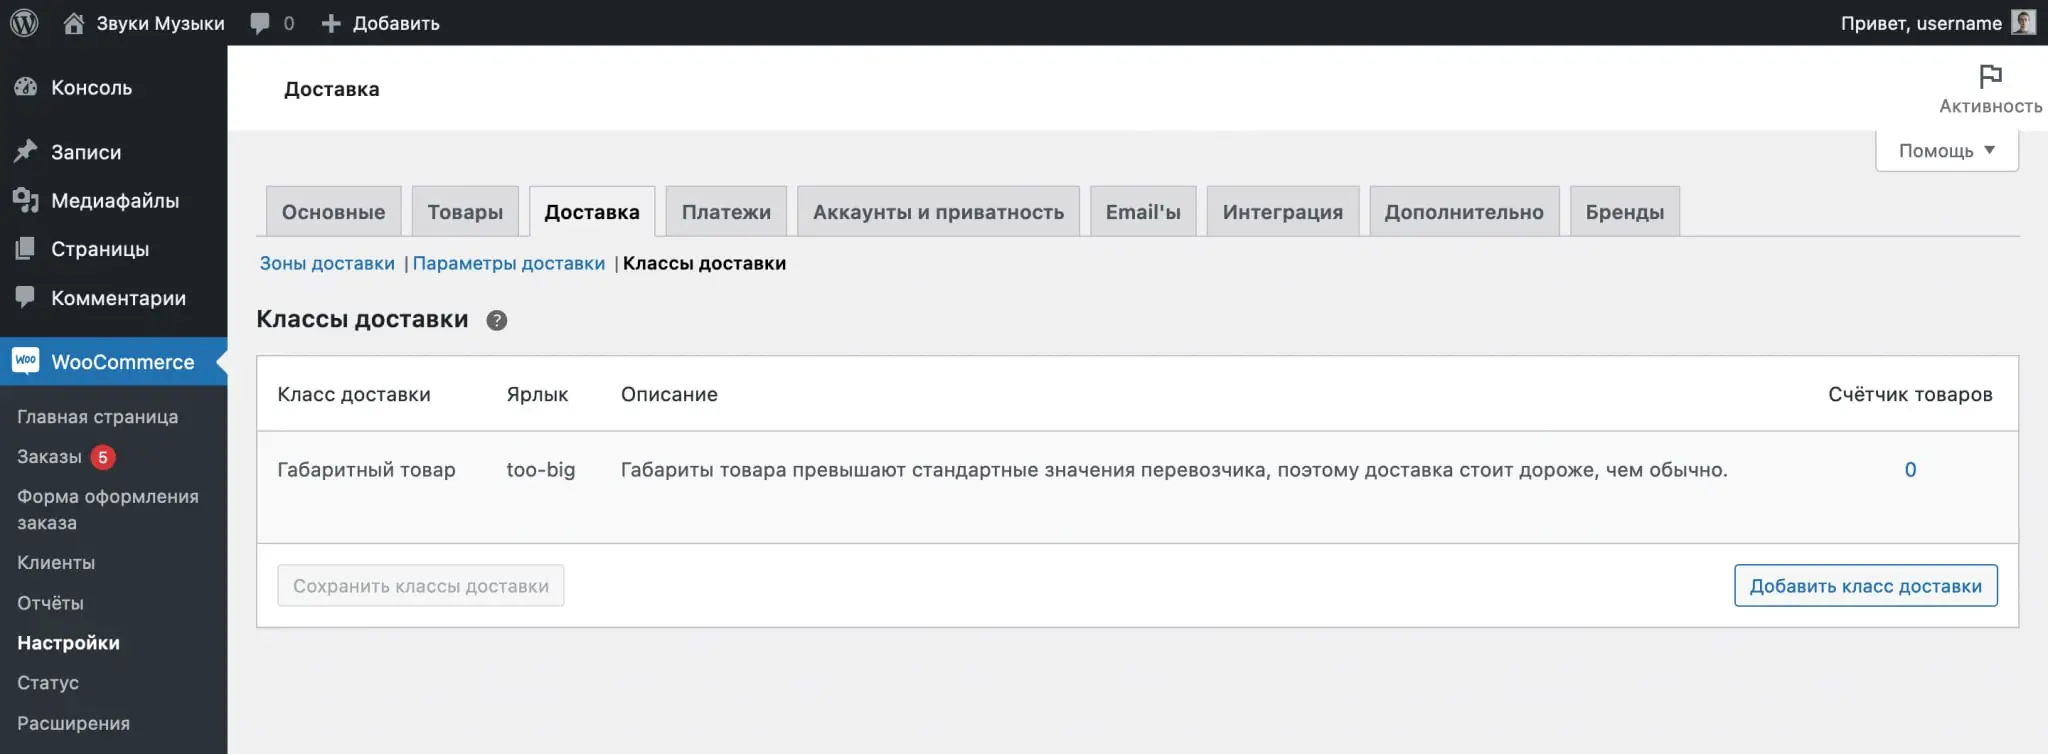
Classes allow you to vary the cost of a single rate for certain products. For example, you can choose products for which a flat rate will be free, or vice versa - it will cost more because the product is from another supplier or its dimensions are too large.
To create a class, click Add Shipping Class. In the fields that appear, create a name, label, and description for the class, and then save your changes. The label is a system value, fill it in Latin letters.
Now you need to set up the shipping cost for the class. To do this, go to the “Delivery Zones” subsection on the same tab and click “Edit” in the line with the desired zone to open its parameters.
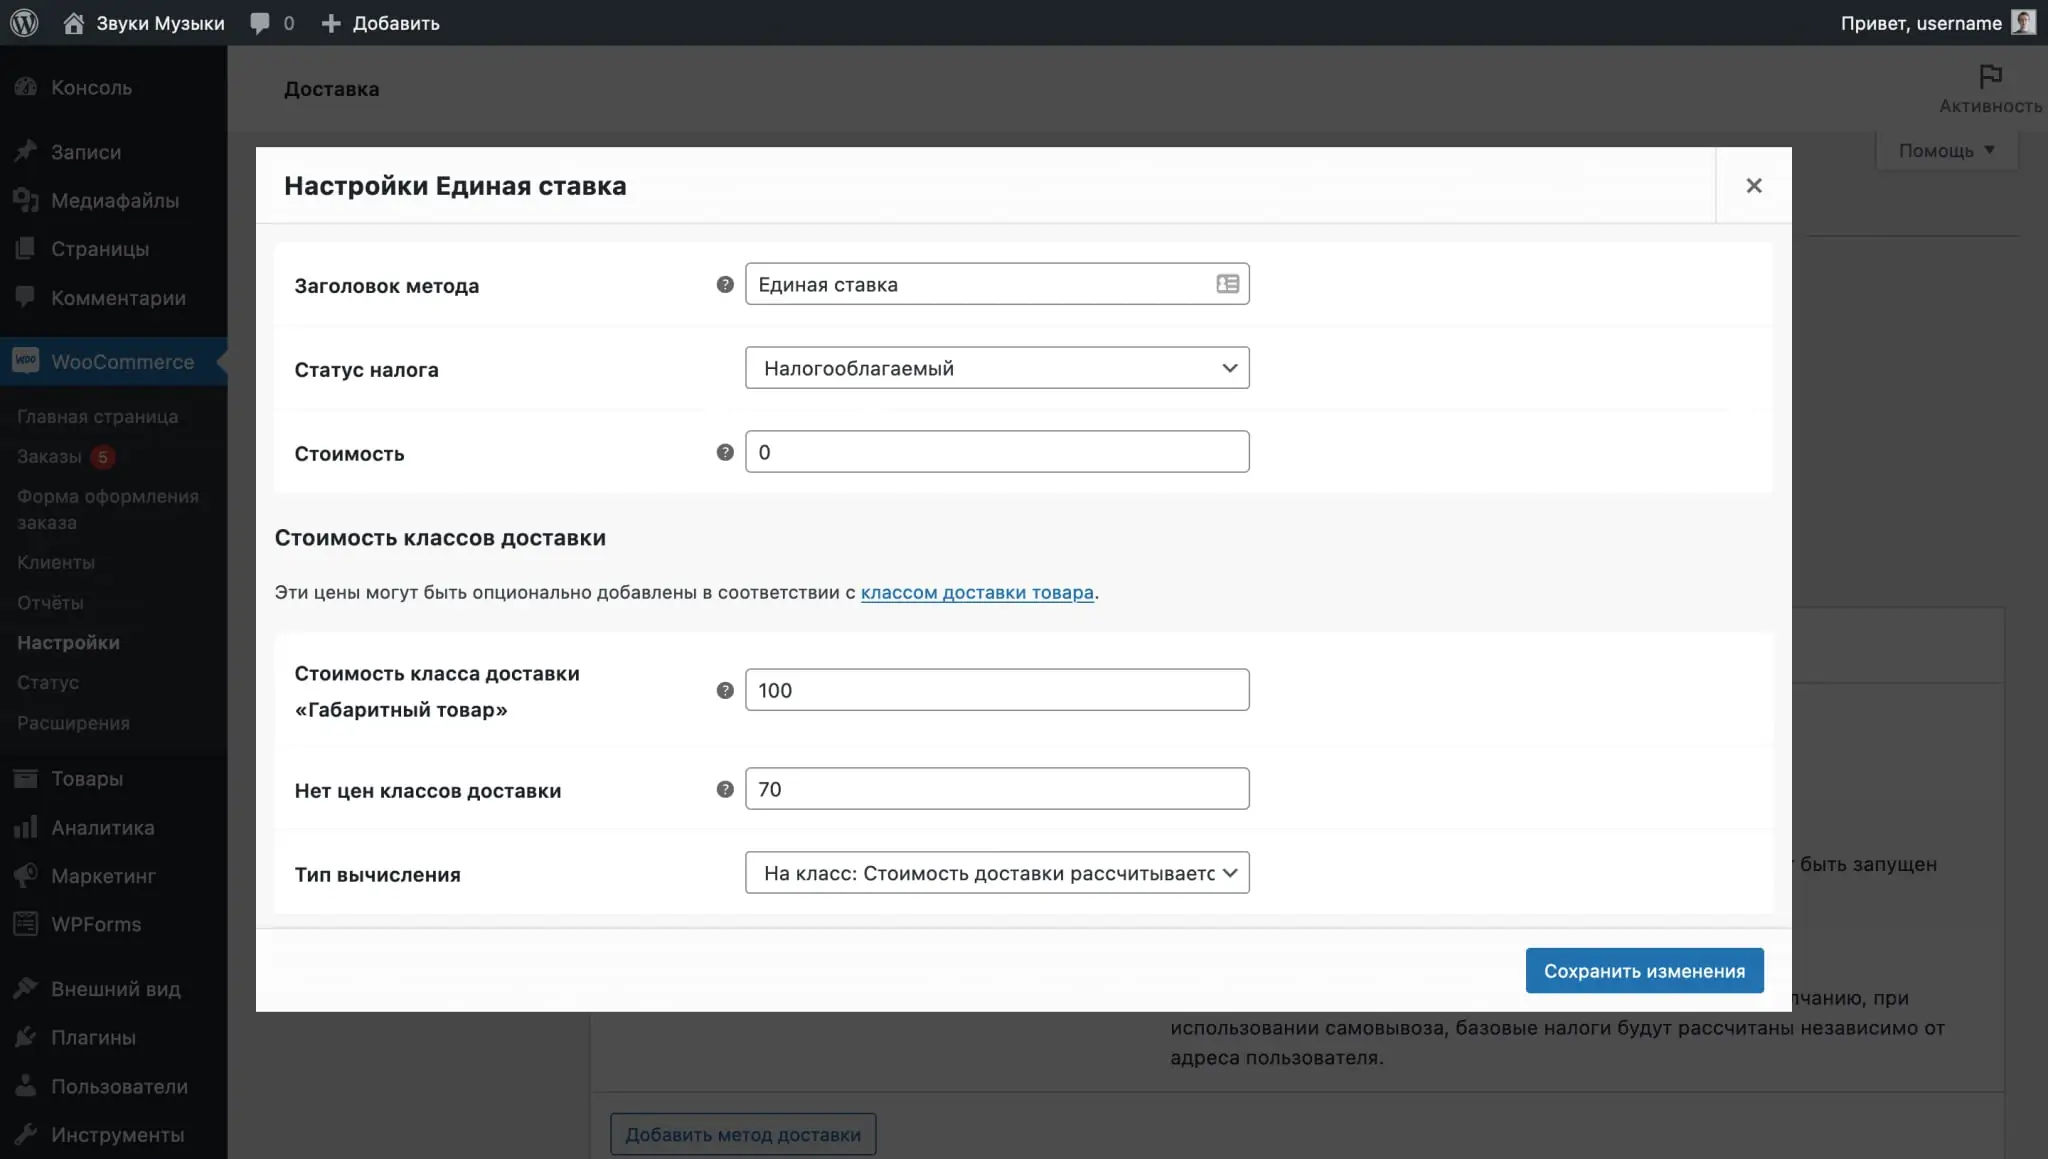
In the pop-up window, you will see additional options in the “Cost of delivery classes” block:
- Shipping class cost - the cost of shipping the goods to which you assign the class you just created.
- No shipping class prices - the cost of shipping goods without a class.
- Calculation type - calculate the shipping cost separately for each class or for the entire order.
By default, the shipping cost specified in the "Shipping Class Cost" field is added to the original cost specified in the "Cost" field. To prevent this from happening, set the value in the “Cost” field to 0, and enter the value from the “Cost” field in the “No shipping class prices” field.
After setting up prices for delivery of goods with and without a class, all that remains is to assign a class to the necessary goods. To do this, go to edit the desired product, open the “Delivery” subsection in the “Product Data” block and you will see the “Delivery Class” option in it.
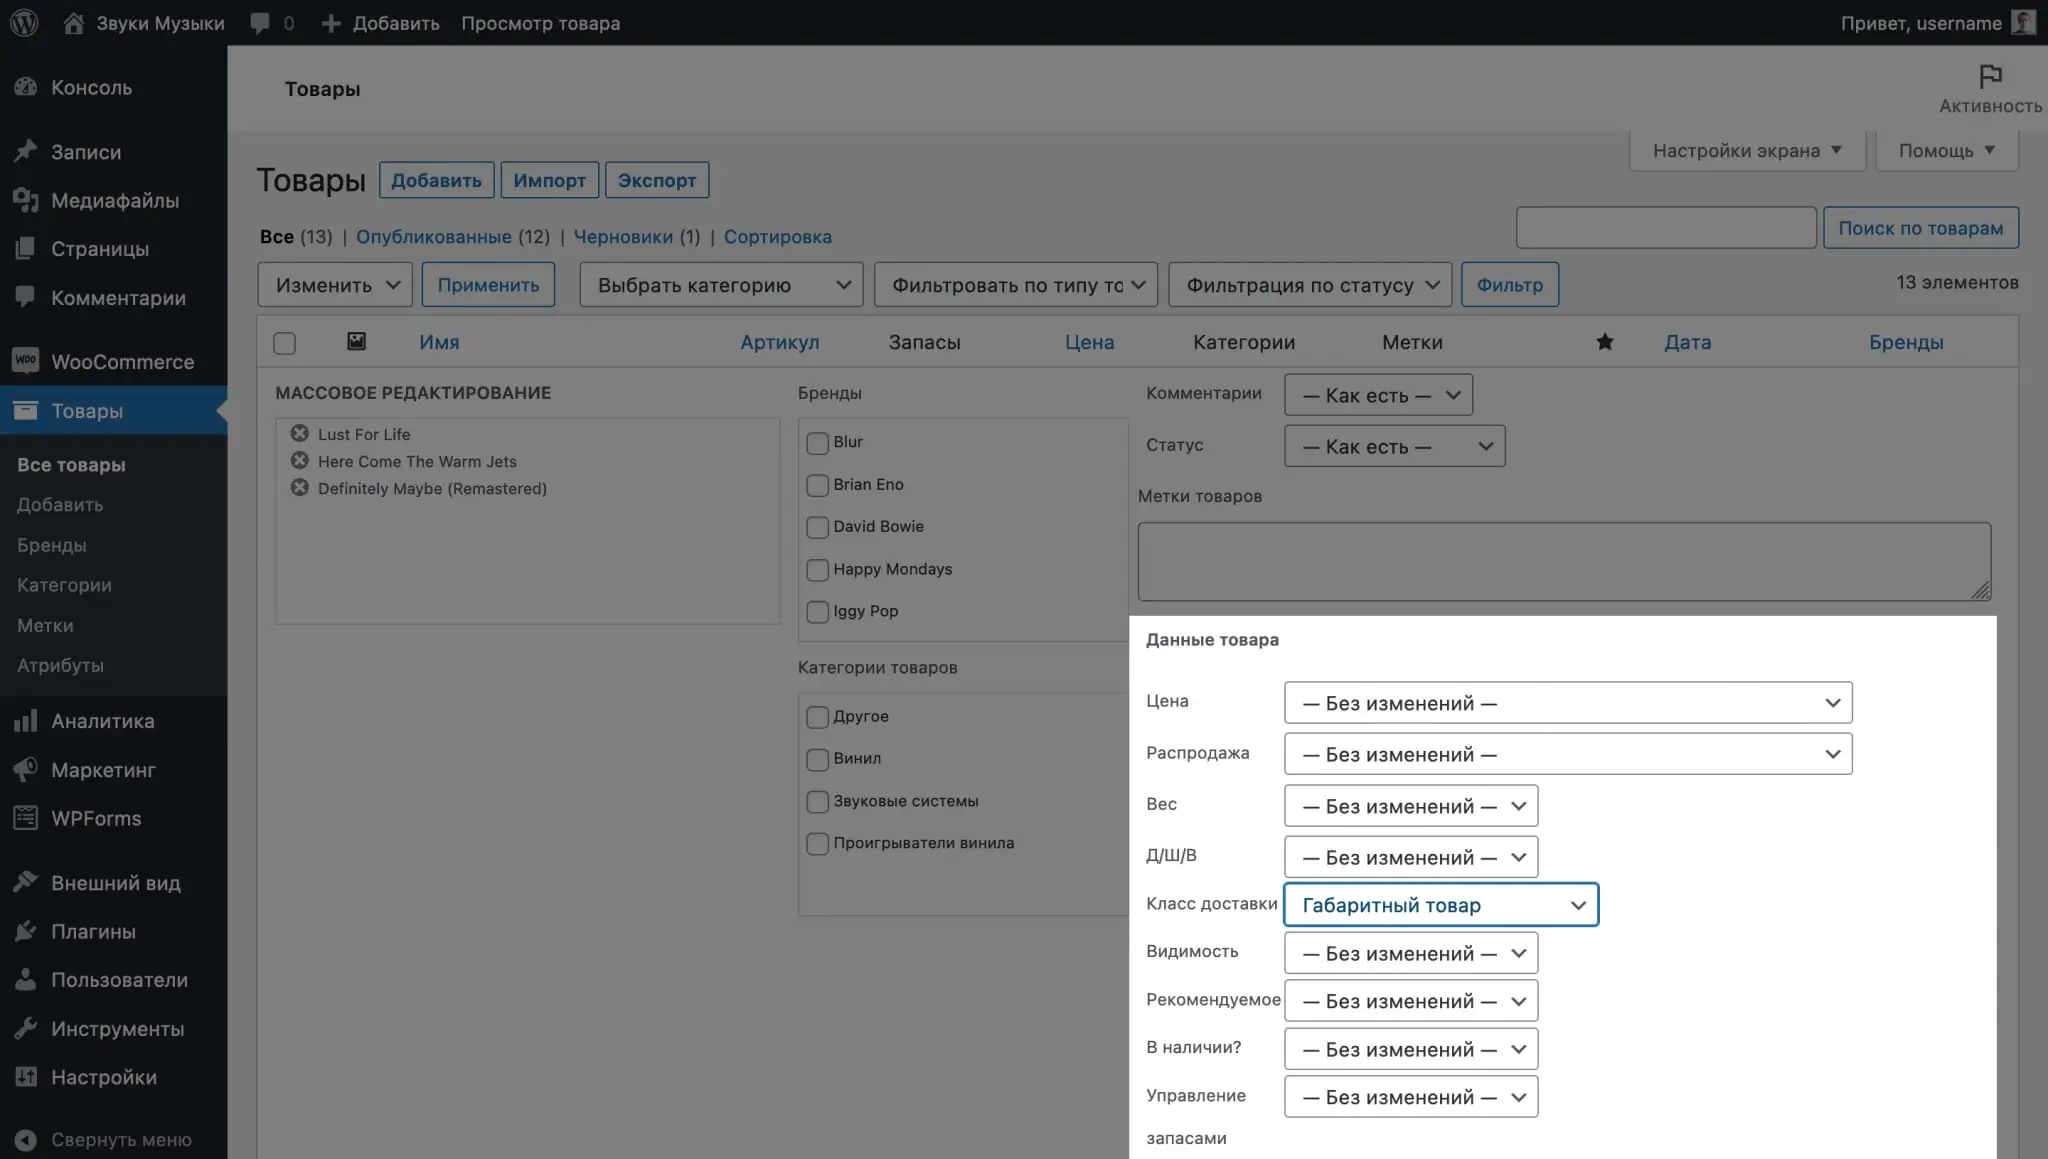
You can also assign a class to several products at once if you have many of them. To do this, mark the required products with a checkmark in the “Products” section, in the “Actions” item at the top of the table, select “Change”, after which in the options that open, “Delivery class” will be in the “Product data” block.
Delivery plugins
If you plan to use standard delivery methods, but deliver using third-party services, the orders themselves will not go into their system; you will have to enter each order there manually.
To ensure that orders enter the delivery service system automatically, some of them make special plugins for WordPress. For example, for the Ukrainian market there are plugins for Ukrposhta, Nova Poshta, Justin. There are also plugins for international services like DHL.
After installing such plugins, an additional one will be added to the three standard delivery methods. Plus, plugins usually have their own parameters that will help you connect a personal account from the service website and calculate the cost.
Setting up payment in WooCommerce
In the Payments tab under WooCommerce - Settings, you will find three payment methods: Direct Bank Transfer, Check Payments, and Cash on Delivery. By default, all three methods will be disabled.
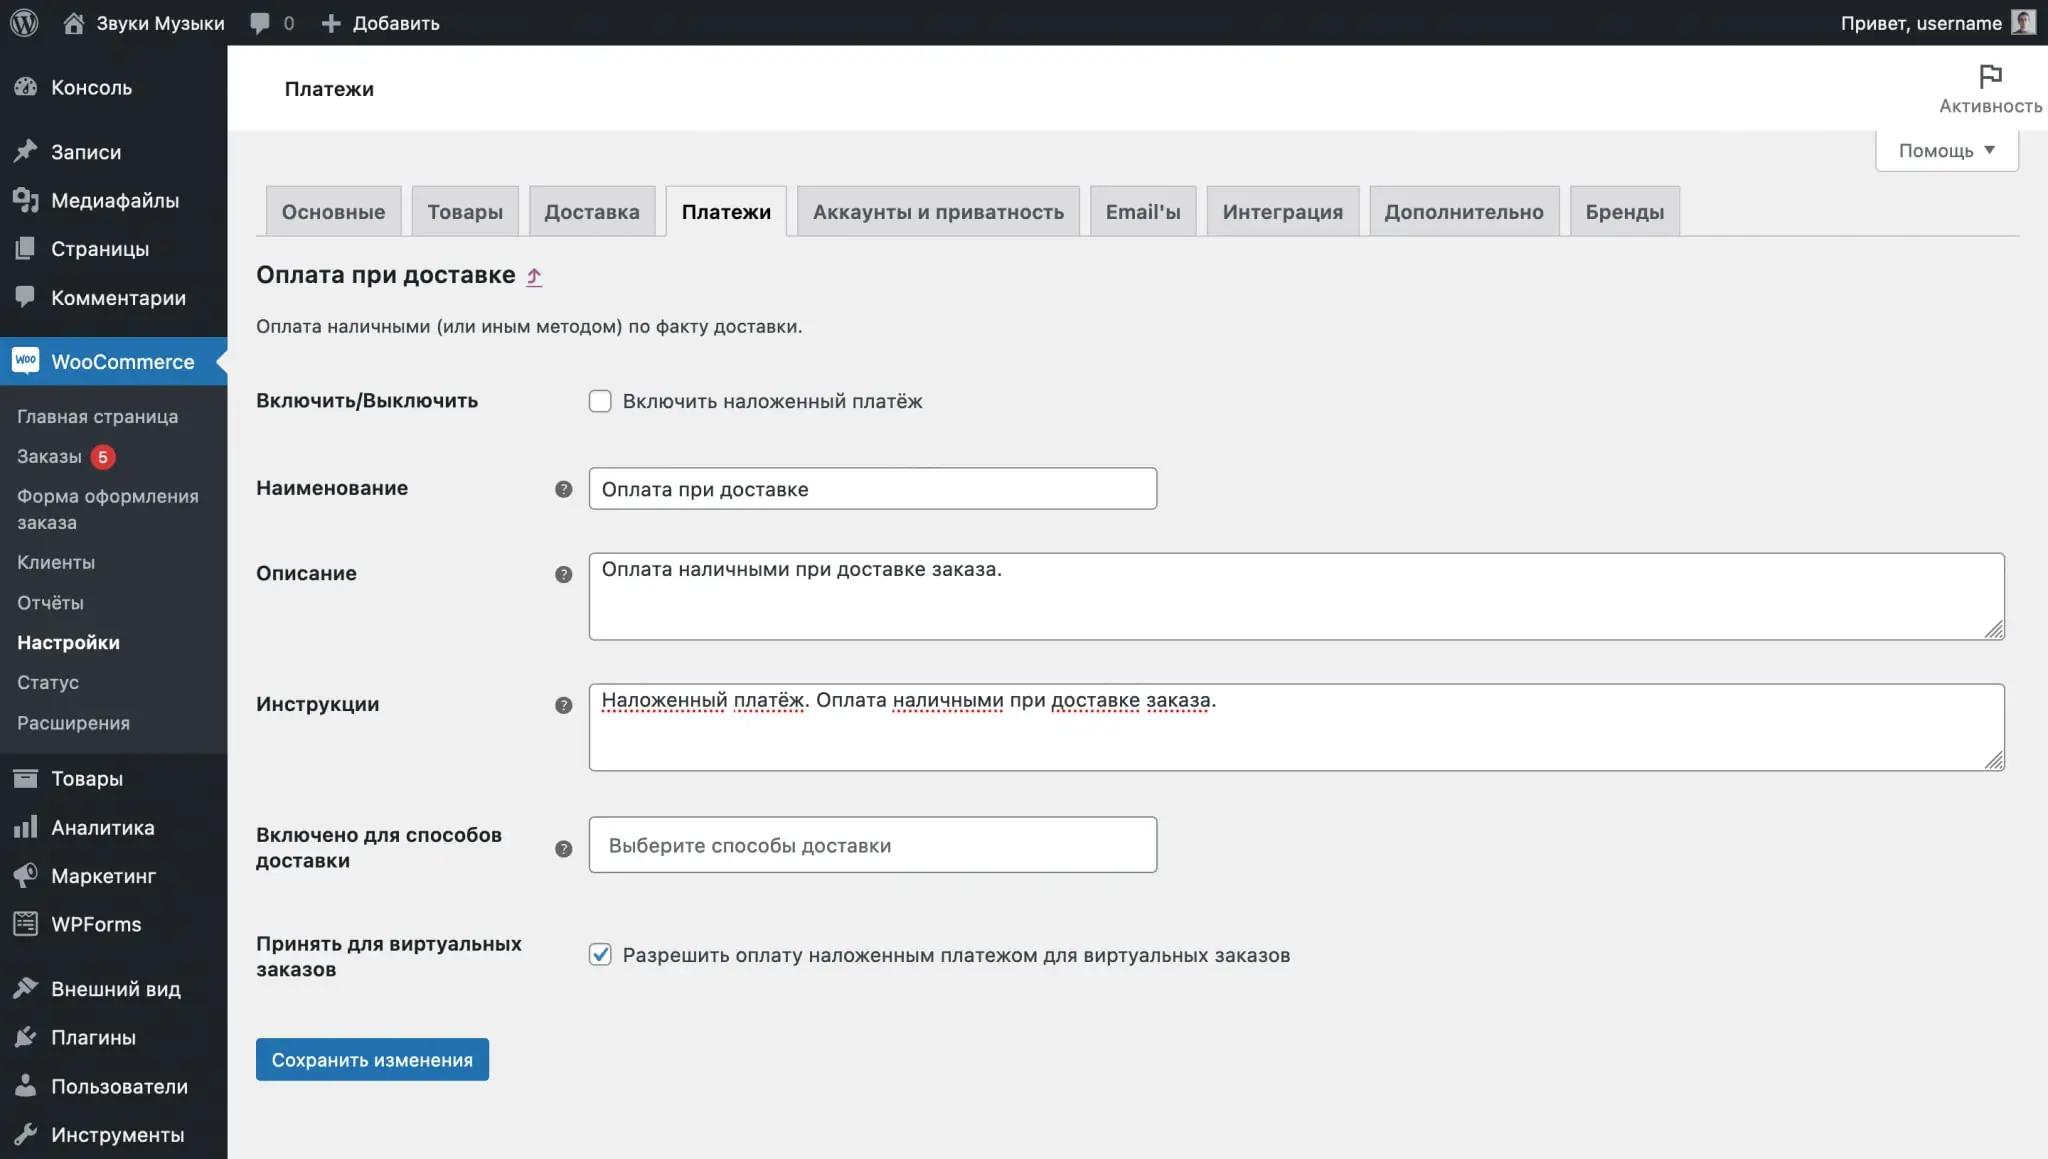
Payment Method Options
Click “Customize” in the line with the desired payment method to change its parameters: name and description of the method, payment instructions, and delivery methods for which this payment method will be available.
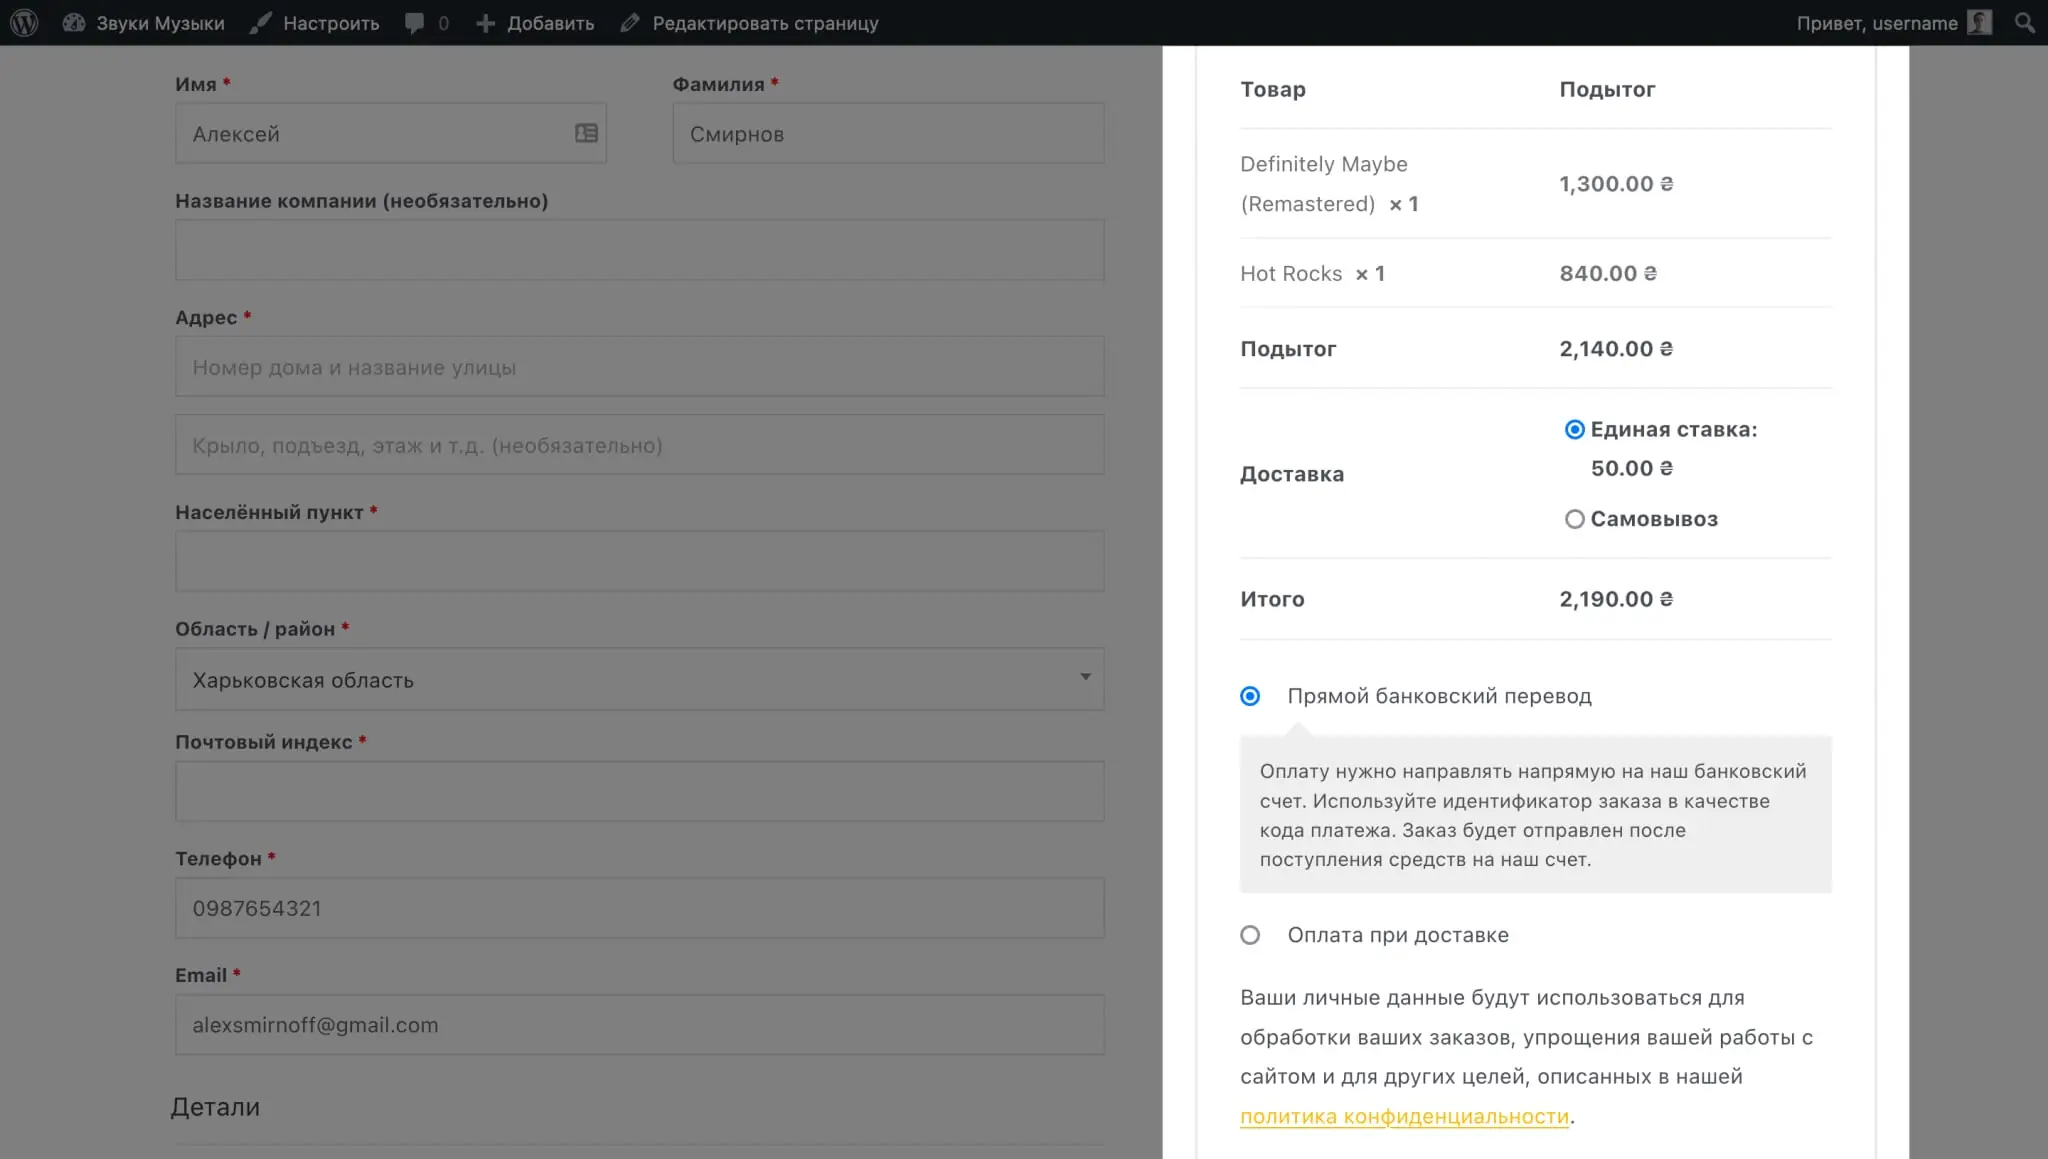
The name and description of the shipping method is displayed on the checkout page. Where the client will fill out contact information, as well as choose a method of payment and delivery.
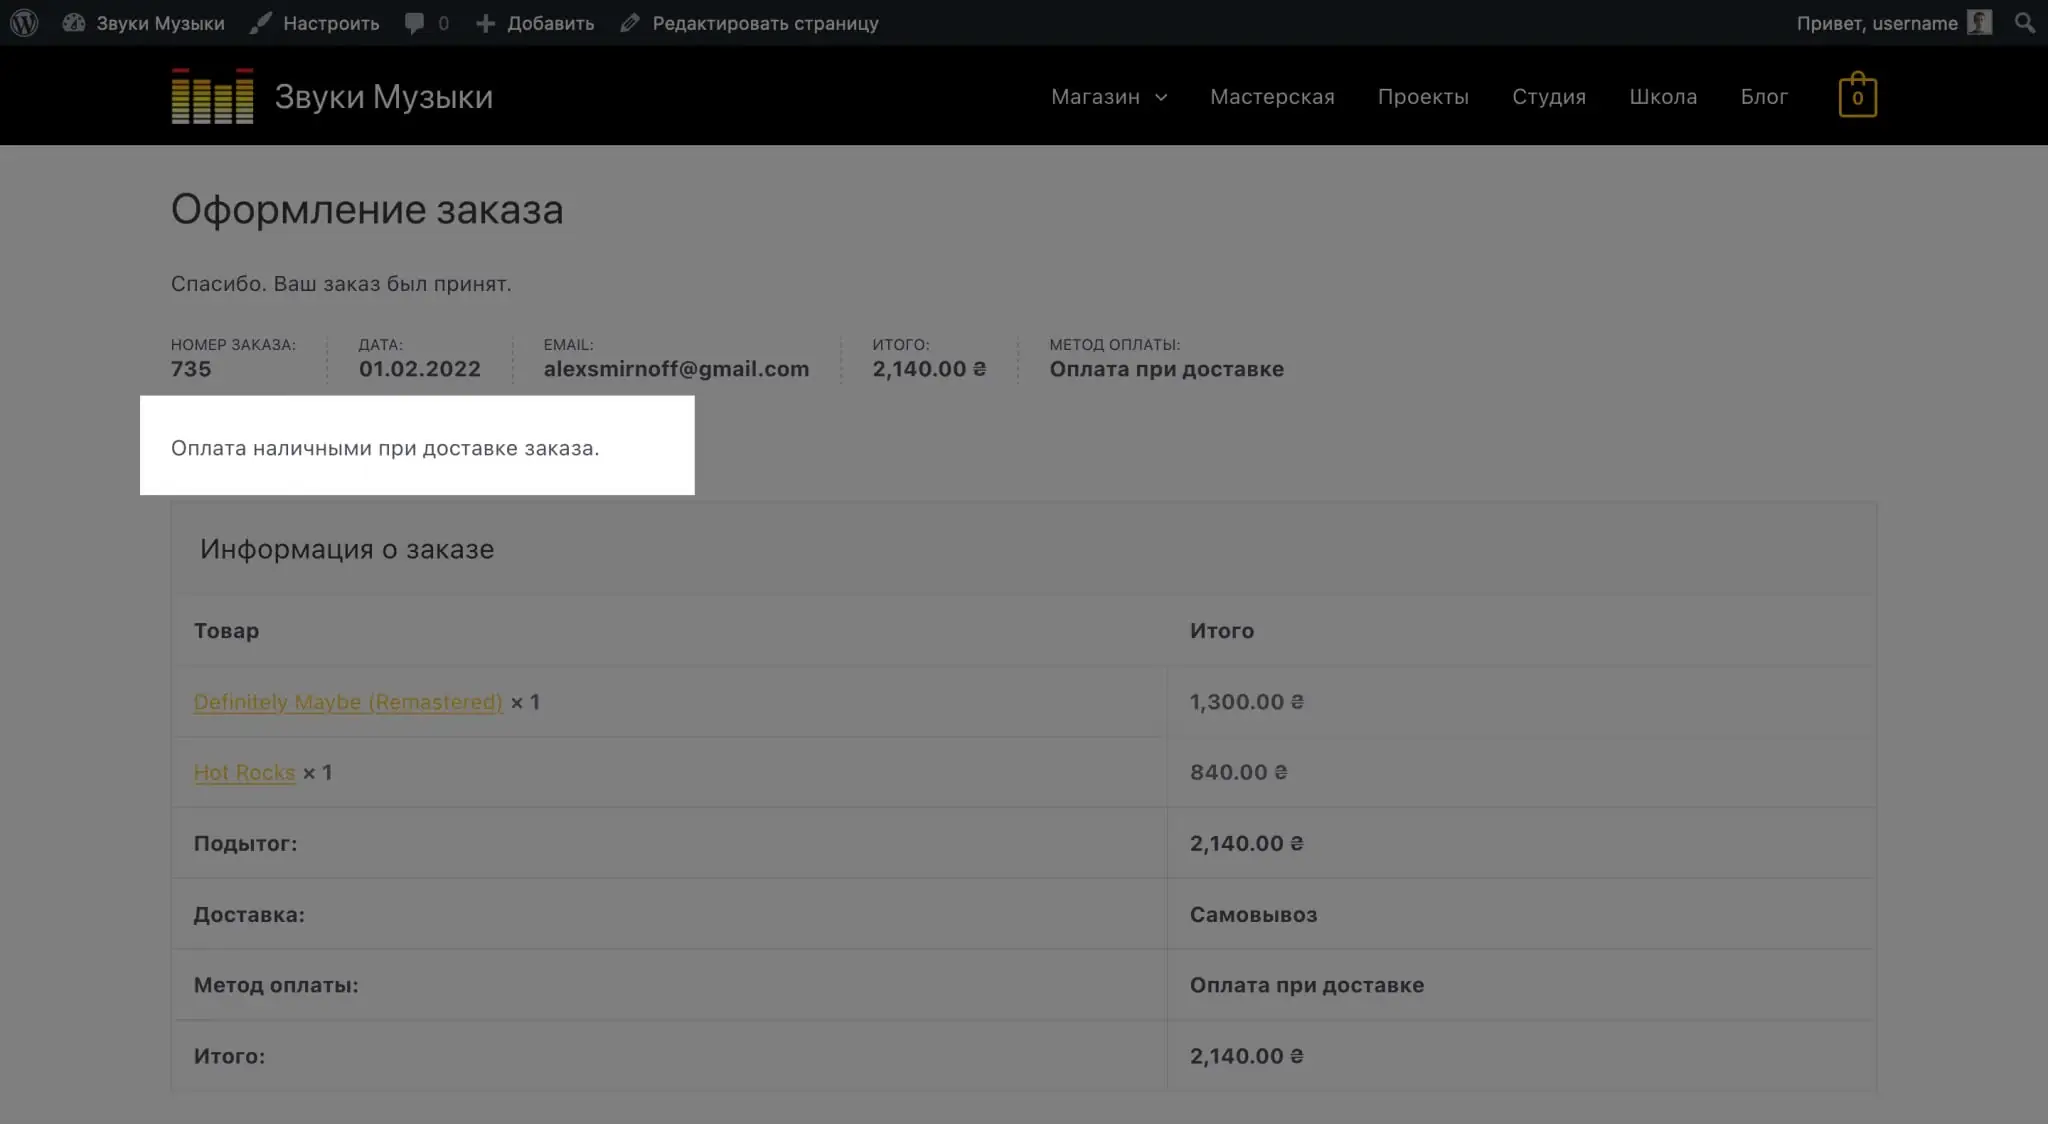
Payment instructions are displayed after placing an order on the screen with its details, as well as in the order confirmation letter. You can add payment details or clarify how to find a payment terminal.
Payment plugins
By default, WooCommerce does not allow card payments. To add it, you need to install a plugin for one of the popular payment gateways. For example, LiqPay, Fondy, EasyPay, WayForPay, or InterKassa.
After installing the plugin, an additional payment method will appear in the Payments tab in WordPress settings, where you can change its name and description. Also, an additional section is usually added to the sidebar where you can connect your account on the payment gateway website.
Removing built-in payment methods
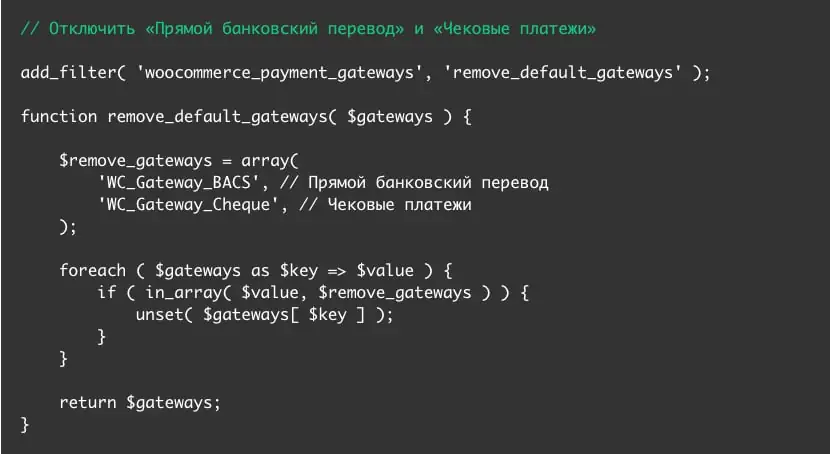
In Ukraine and neighboring countries, no one uses direct bank transfers or check payments. If you want, you can completely disable these payment methods to avoid taking up space. To do this, add the following code to the functions.php file in your theme folder:
Disabling payment on the site
If you want to accept orders and send payment instructions to customers separately, you can disable payment completely using this code, which you need to add to the end of the functions.php file in your store's theme folder.

Setting up currency and price display in WooCommerce
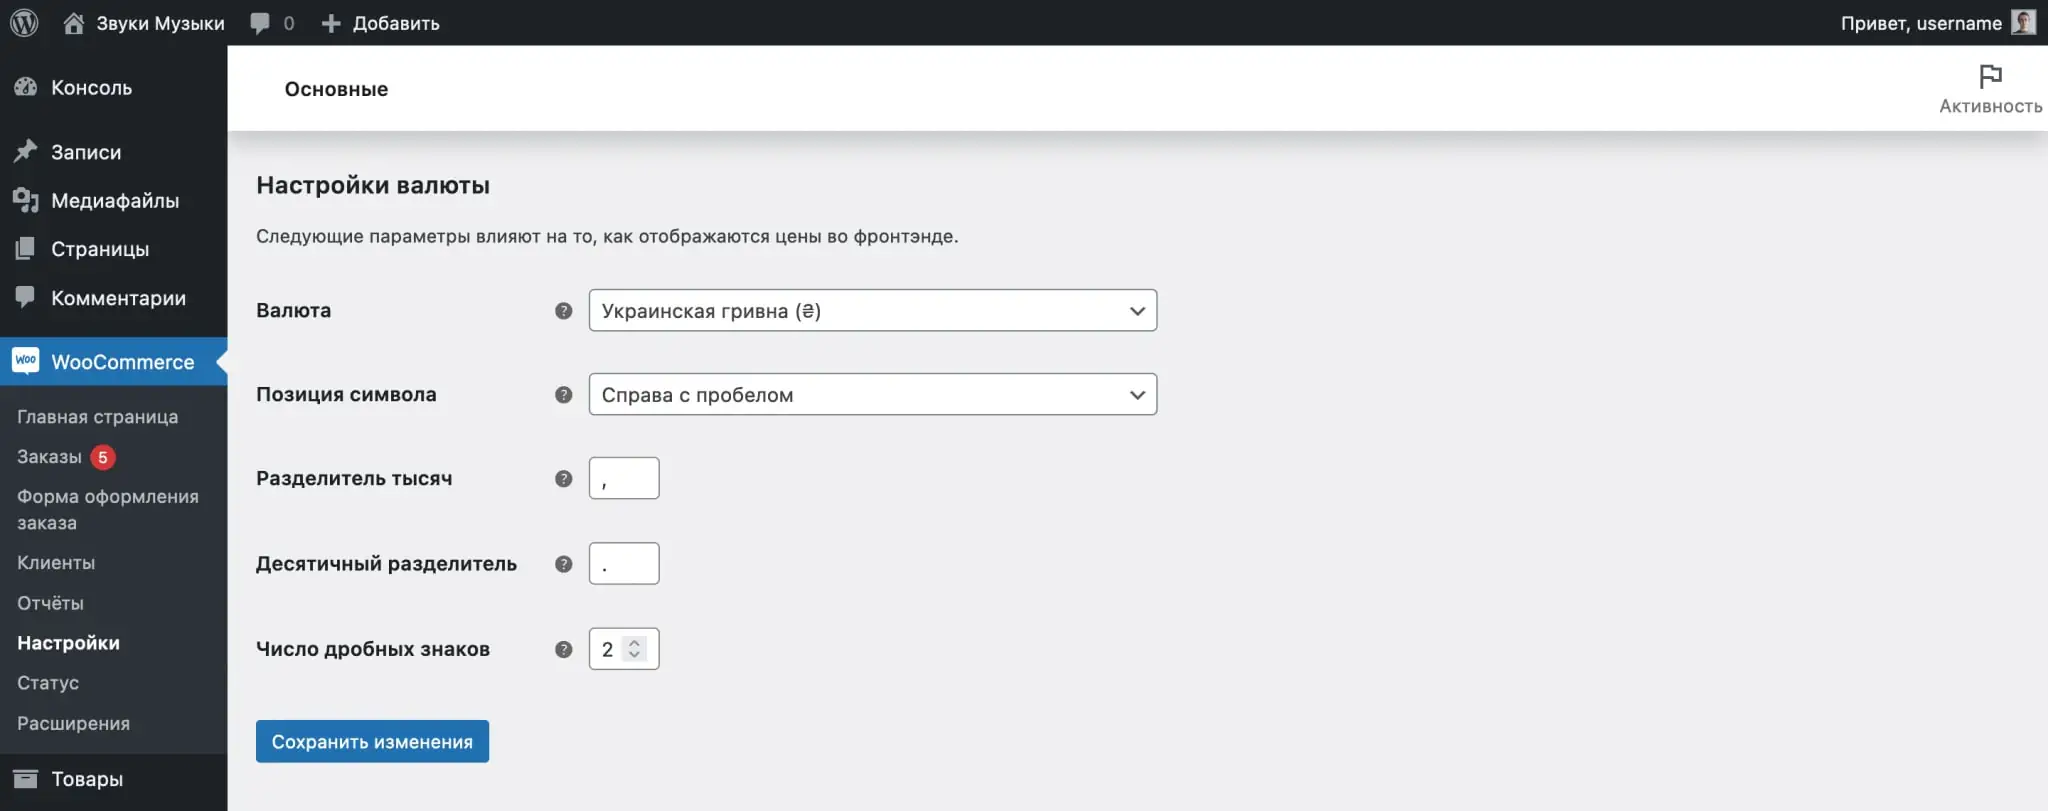
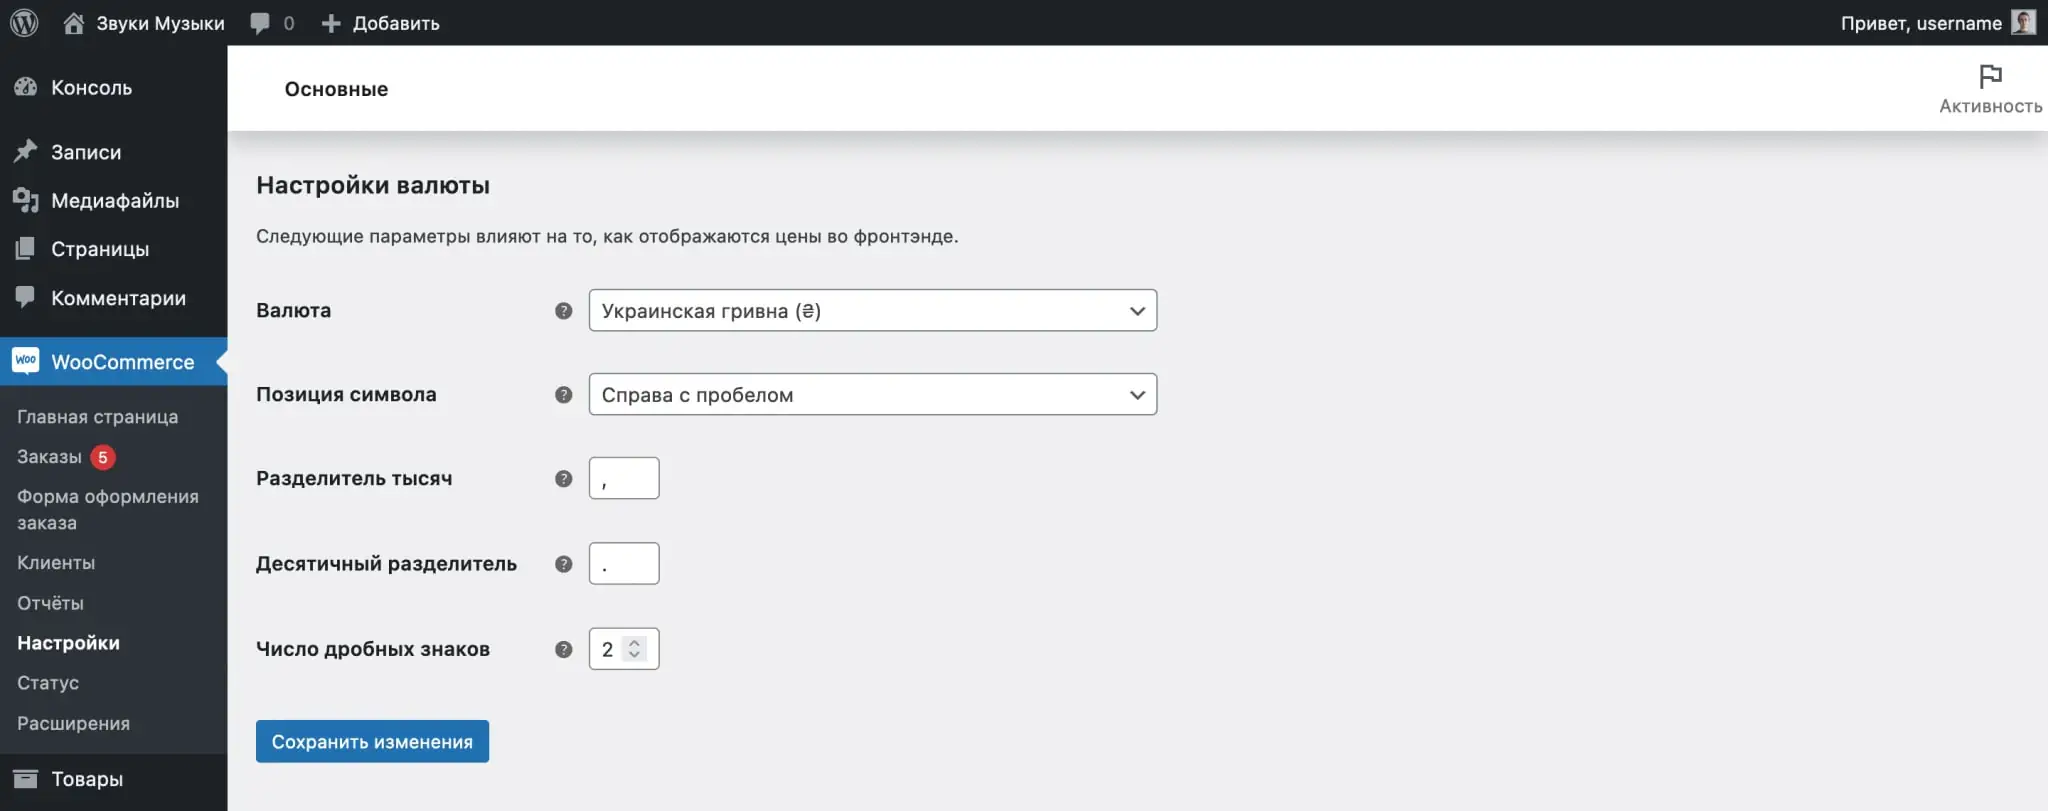
In your WordPress console, go to the “WooCommerce – Settings” section. On the “Basic” tab, at the very bottom there will be a “Currency Settings” block. In it you can change the currency itself and the price format.
The default price format is 1234.00 ₴. The currency symbol is located to the right of the price with a space, no thousands separator, a comma as a decimal separator, two numbers after the decimal point.
Alternatively, you can set the currency symbol to the left of the price and use a comma as the thousands separator and a period as the decimal separator.
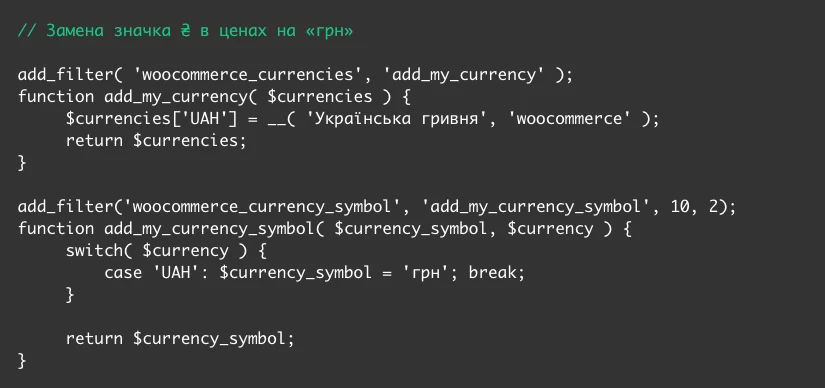
To replace the currency sign with letters, add the code from the example below to the functions.php file in your theme folder. In this example, the code will replace the hryvnia icon (₴) with “UAH”.
If you want the text “UAH” with a dot, find these letters in the code and add a dot before the closing quote.
Setting up promotional codes in WooCommerce
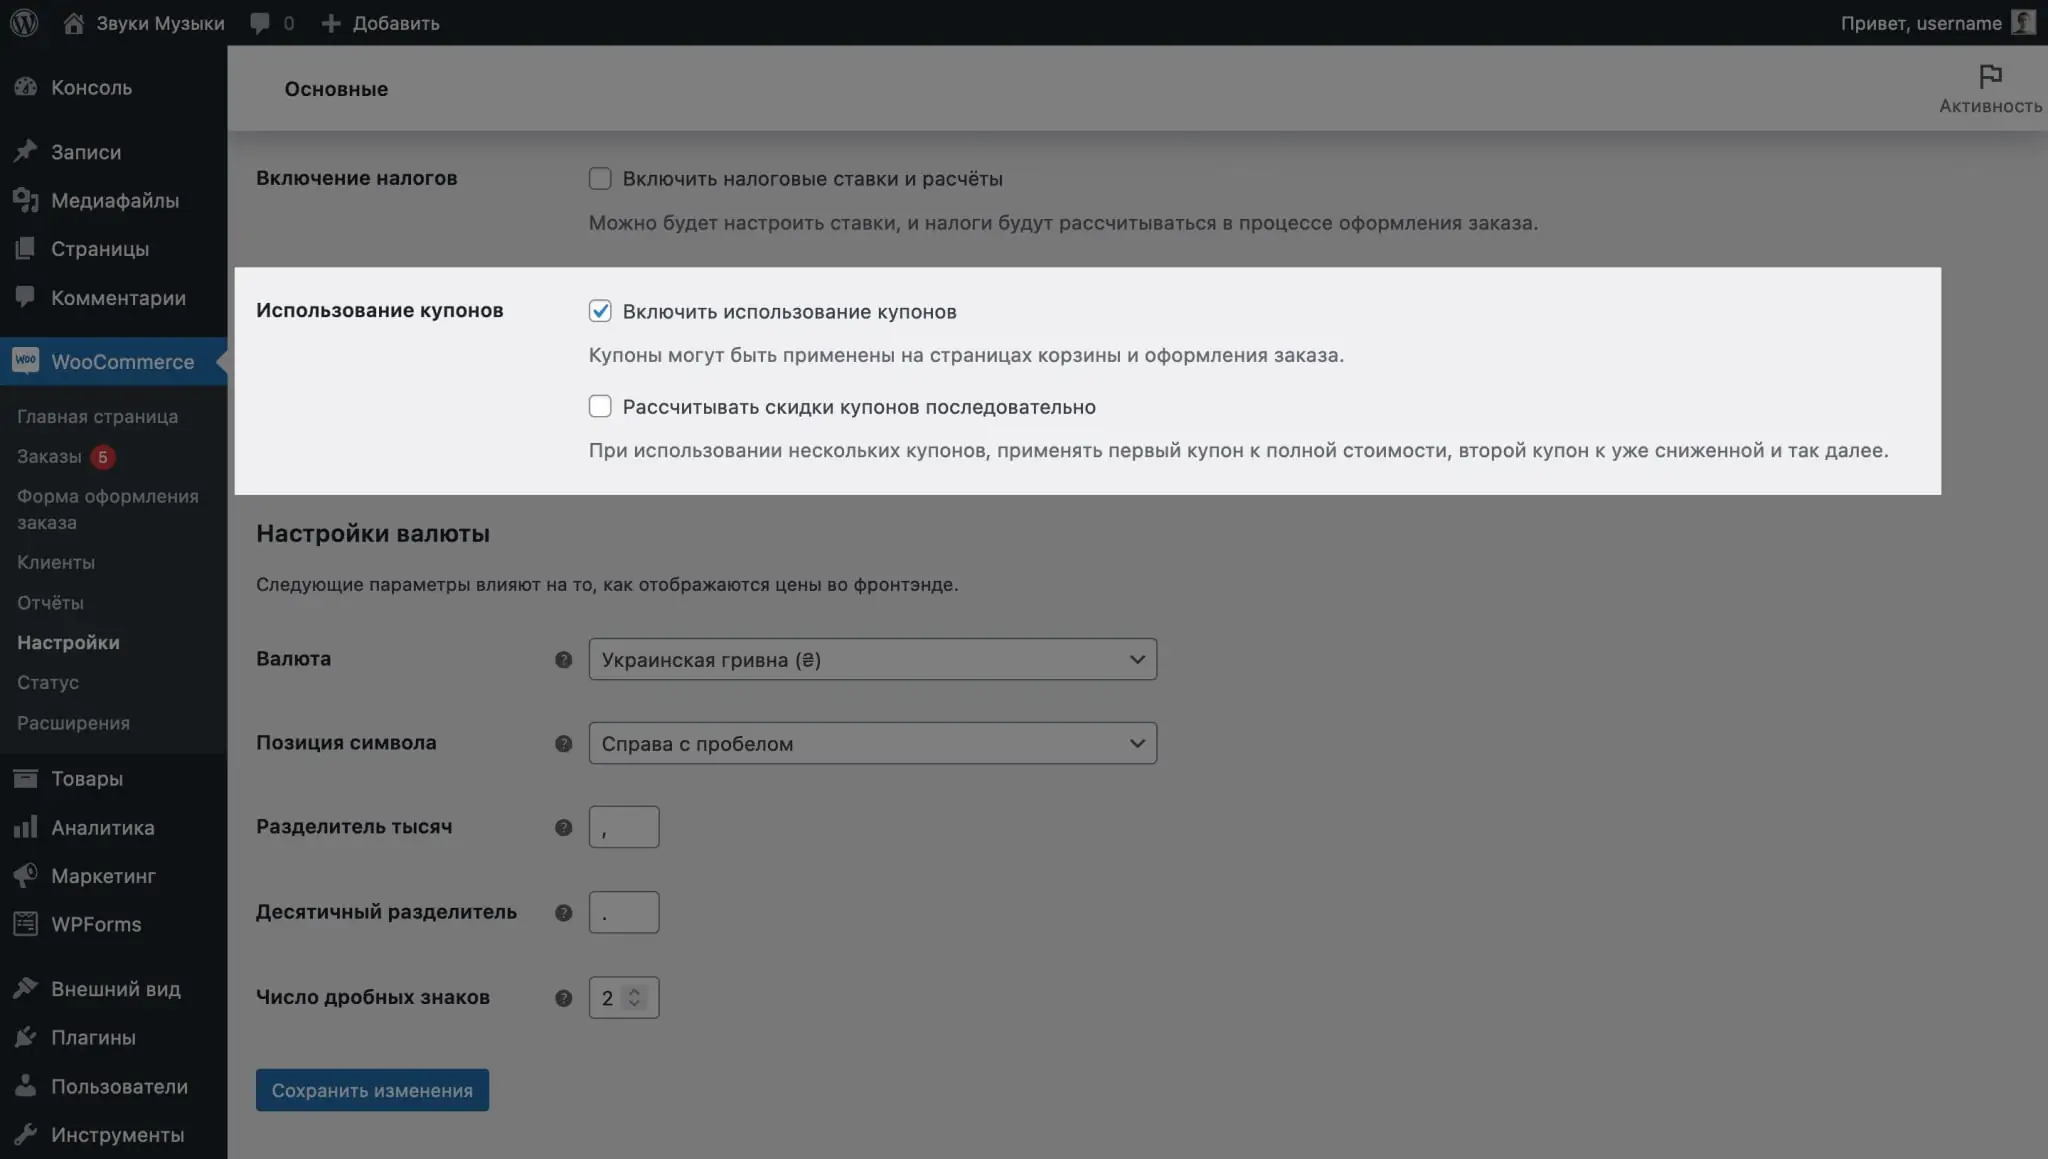
Coupon fields are displayed on the website in the cart and on the checkout page. If you don't plan to use them, these fields can be disabled in the General tab of WooCommerce settings.
Creating promotional codes
The promotional code management center is located in the “Marketing – Coupons” section. Here you will create new promotional codes and change the terms of use of already created ones.
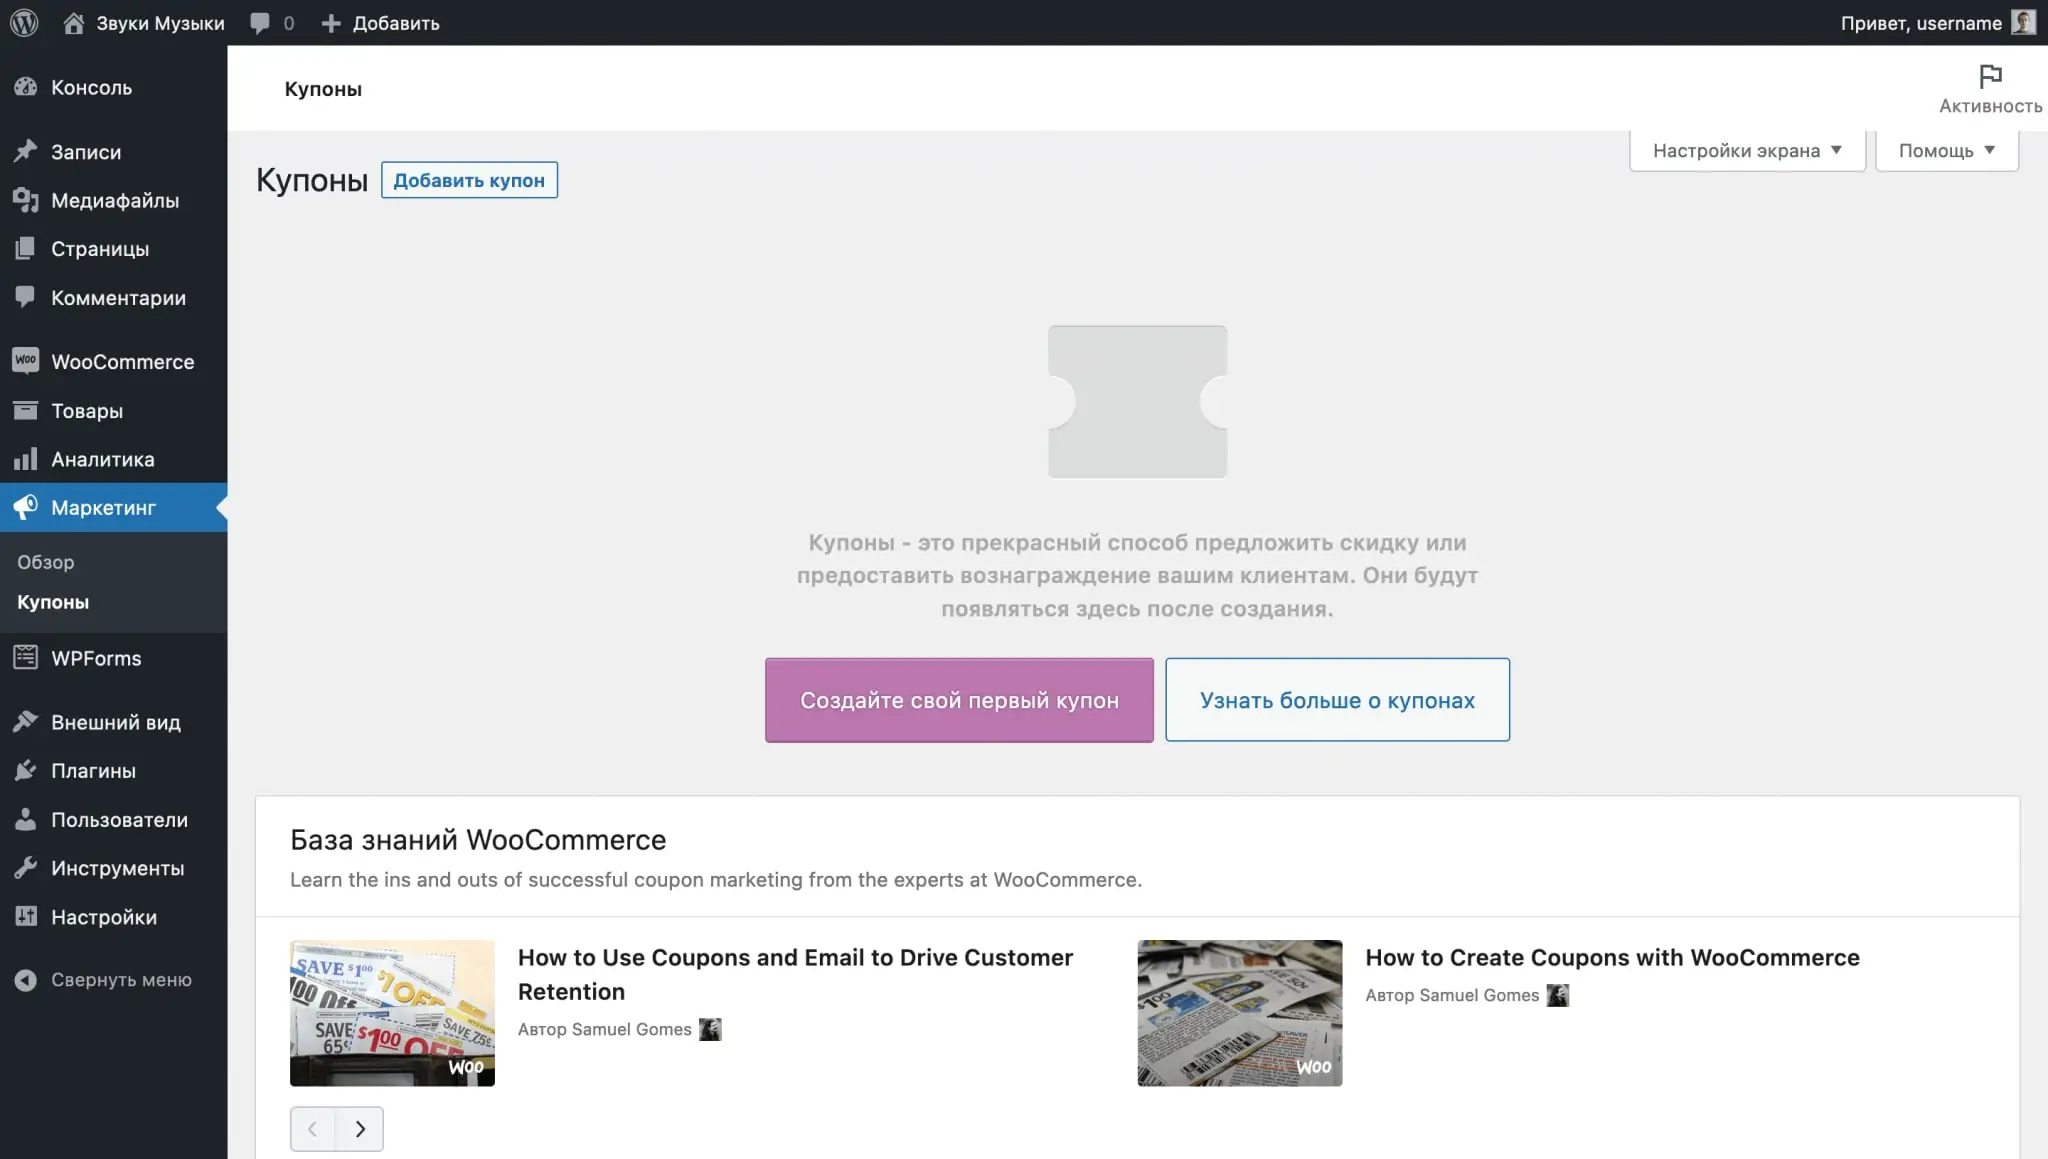
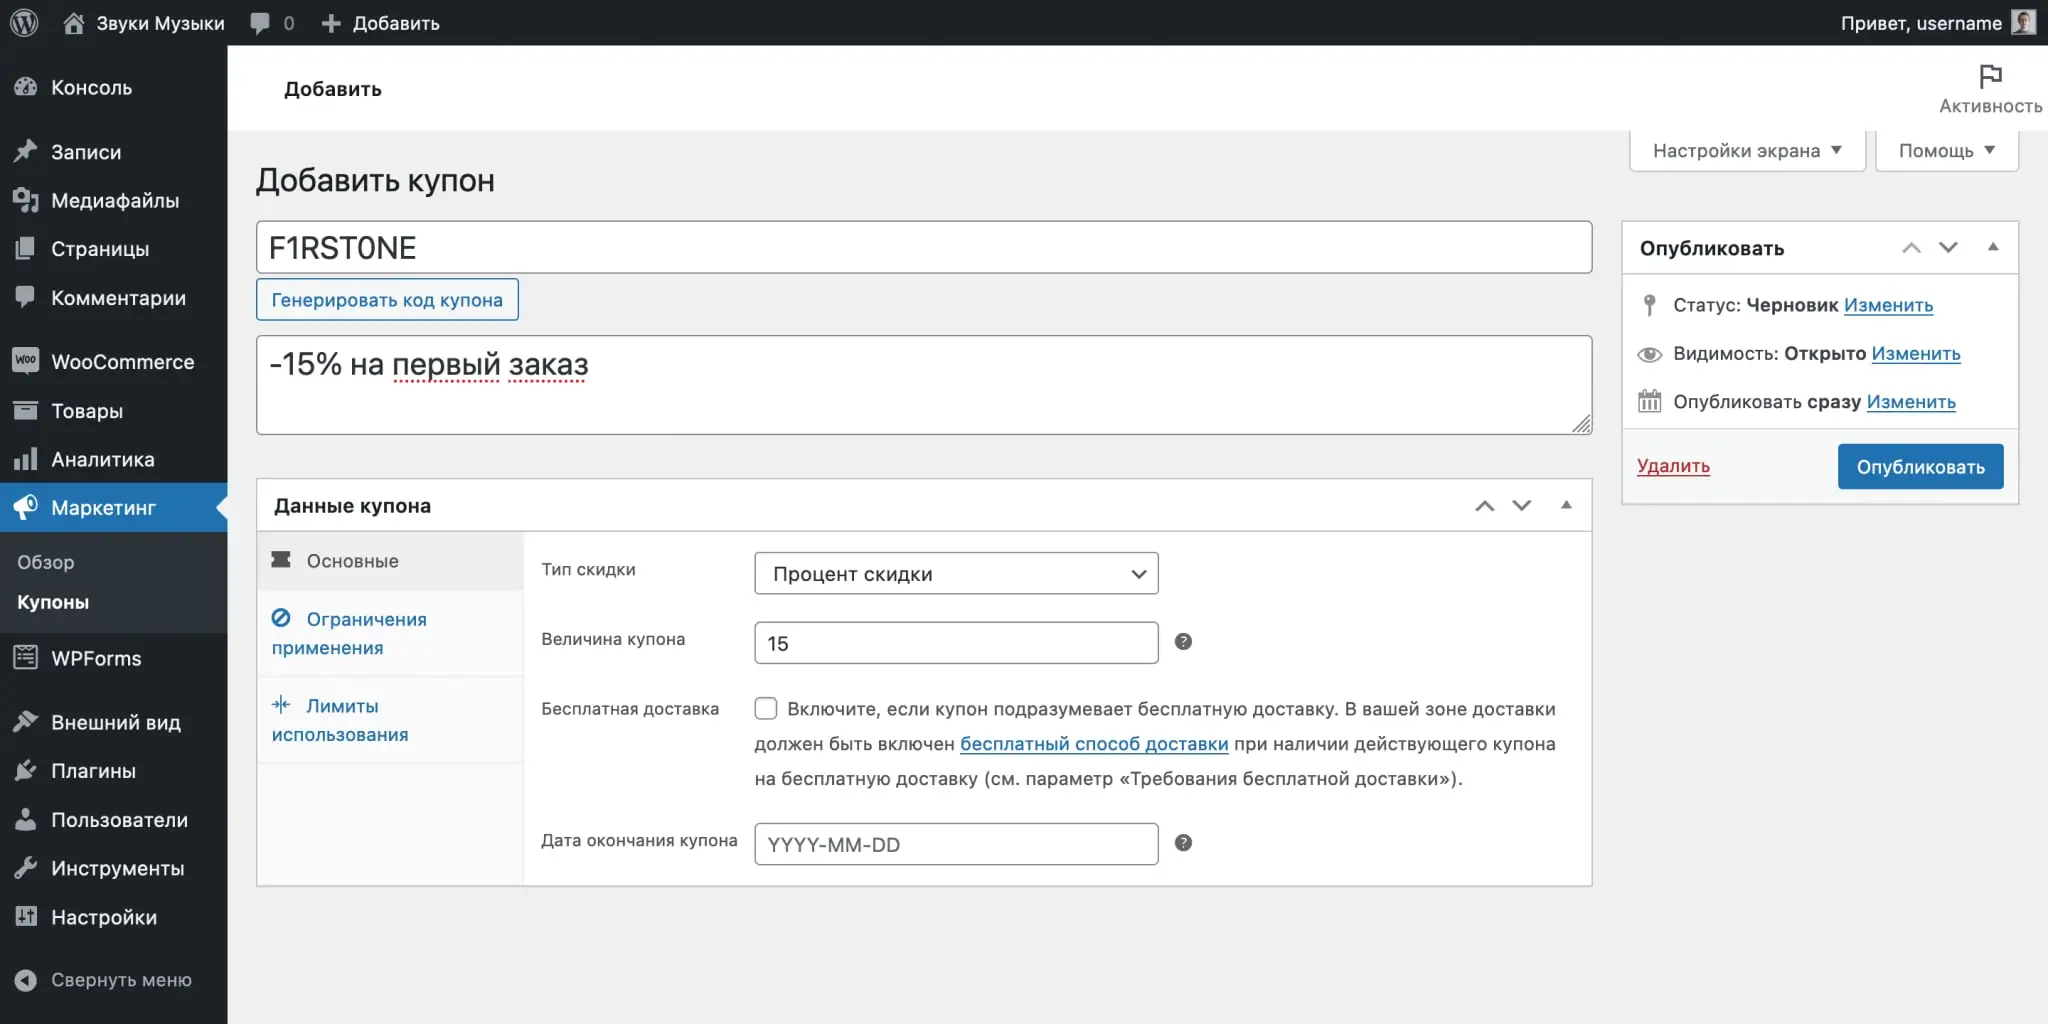
Click the purple “Create your first coupon” button. On the next page you will see fields for the name and description of the promotional code, as well as the “Coupon Data” block, where there will be three sections with parameters: “Basic”, “Use restrictions” and “Use limits”.
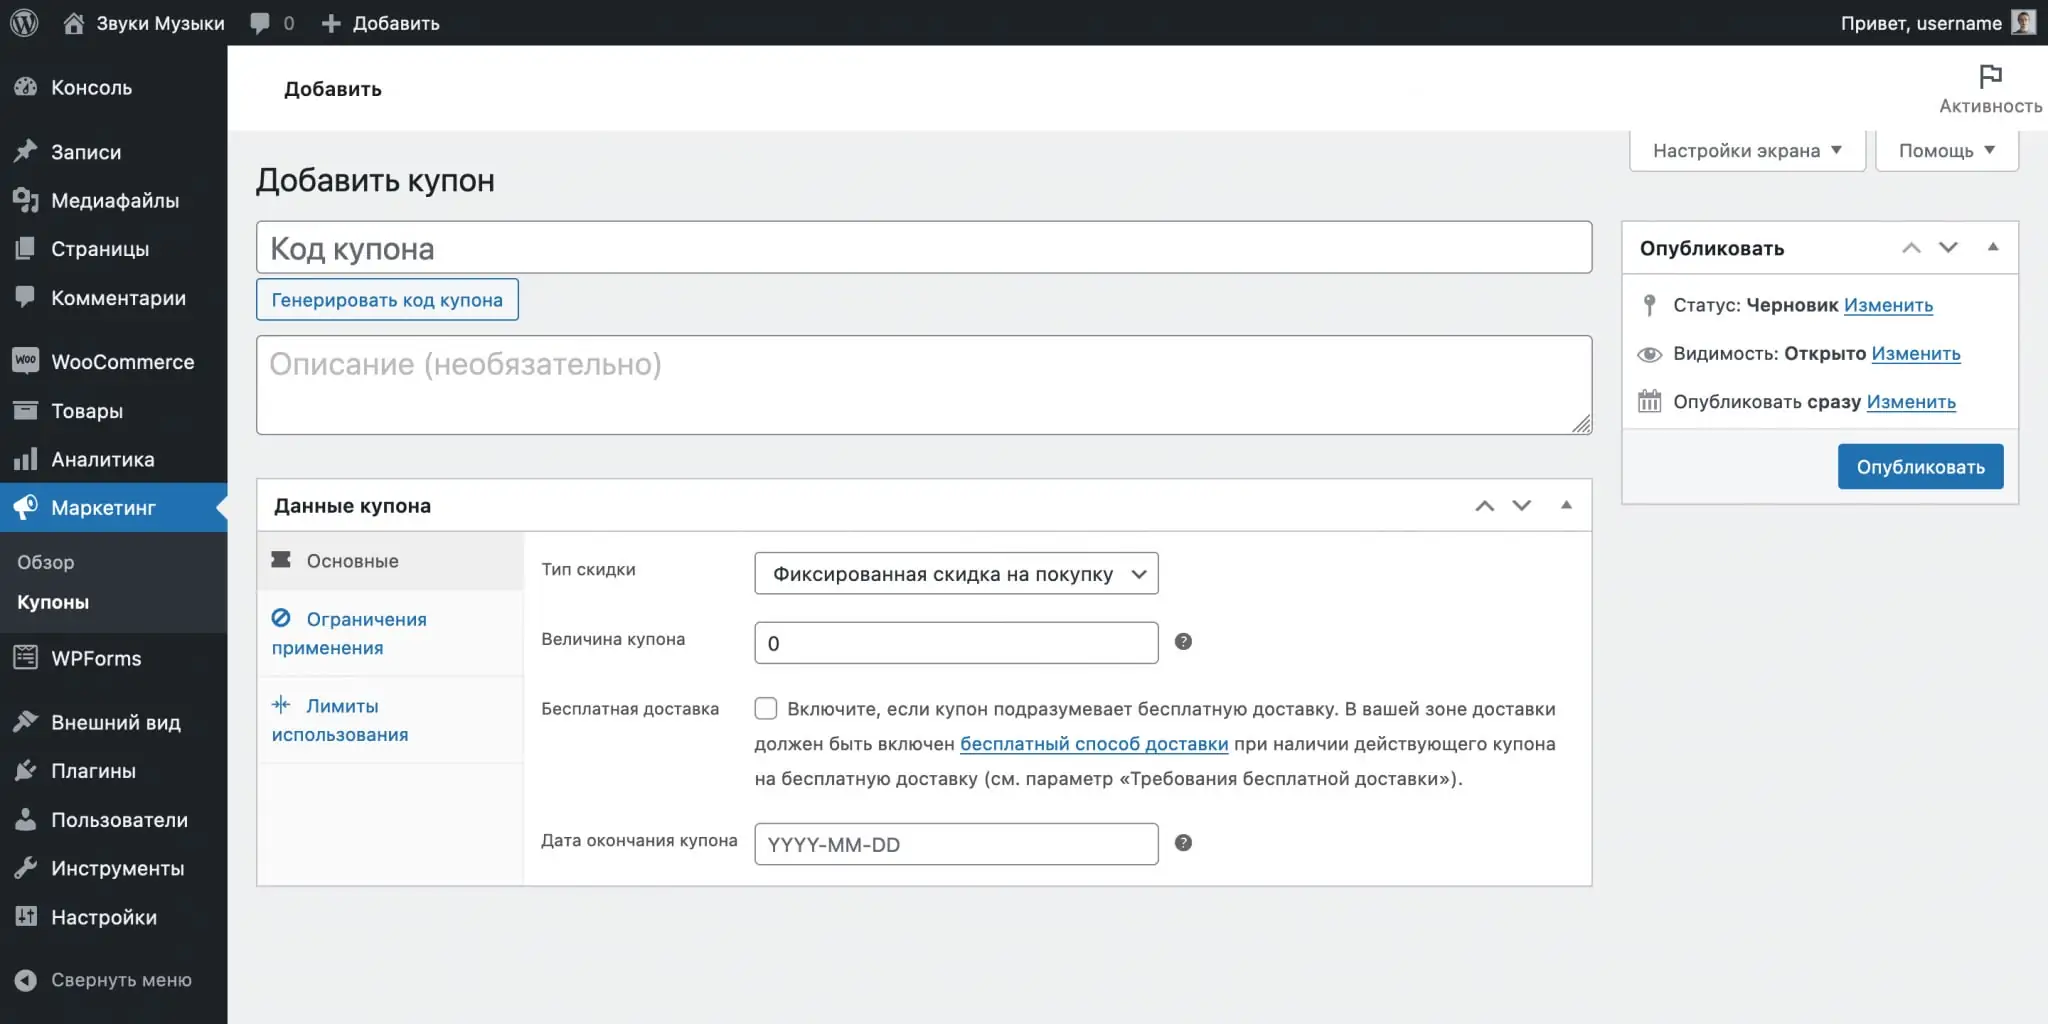
Basic. Here you will find four options that regulate the type of discount and the validity period of the promotional code:
- Discount type — percentage of the order or a fixed discount from the cost of the product/order.
- Coupon value — the amount of the discount in percentage or units of the currency established for the store.
Allow free shipping — assigns the promotional code the ability to provide free delivery. But in the WooCommerce settings, on the “Shipping” tab, the “Free Shipping” method must be active, and in its parameters, in the “Free Shipping Requirements” item, you need to select the “Valid Free Shipping Coupon” condition. - Coupon expiration date — the ability to set the expiration date of a promotional code, after which it will no longer be possible to receive a discount.
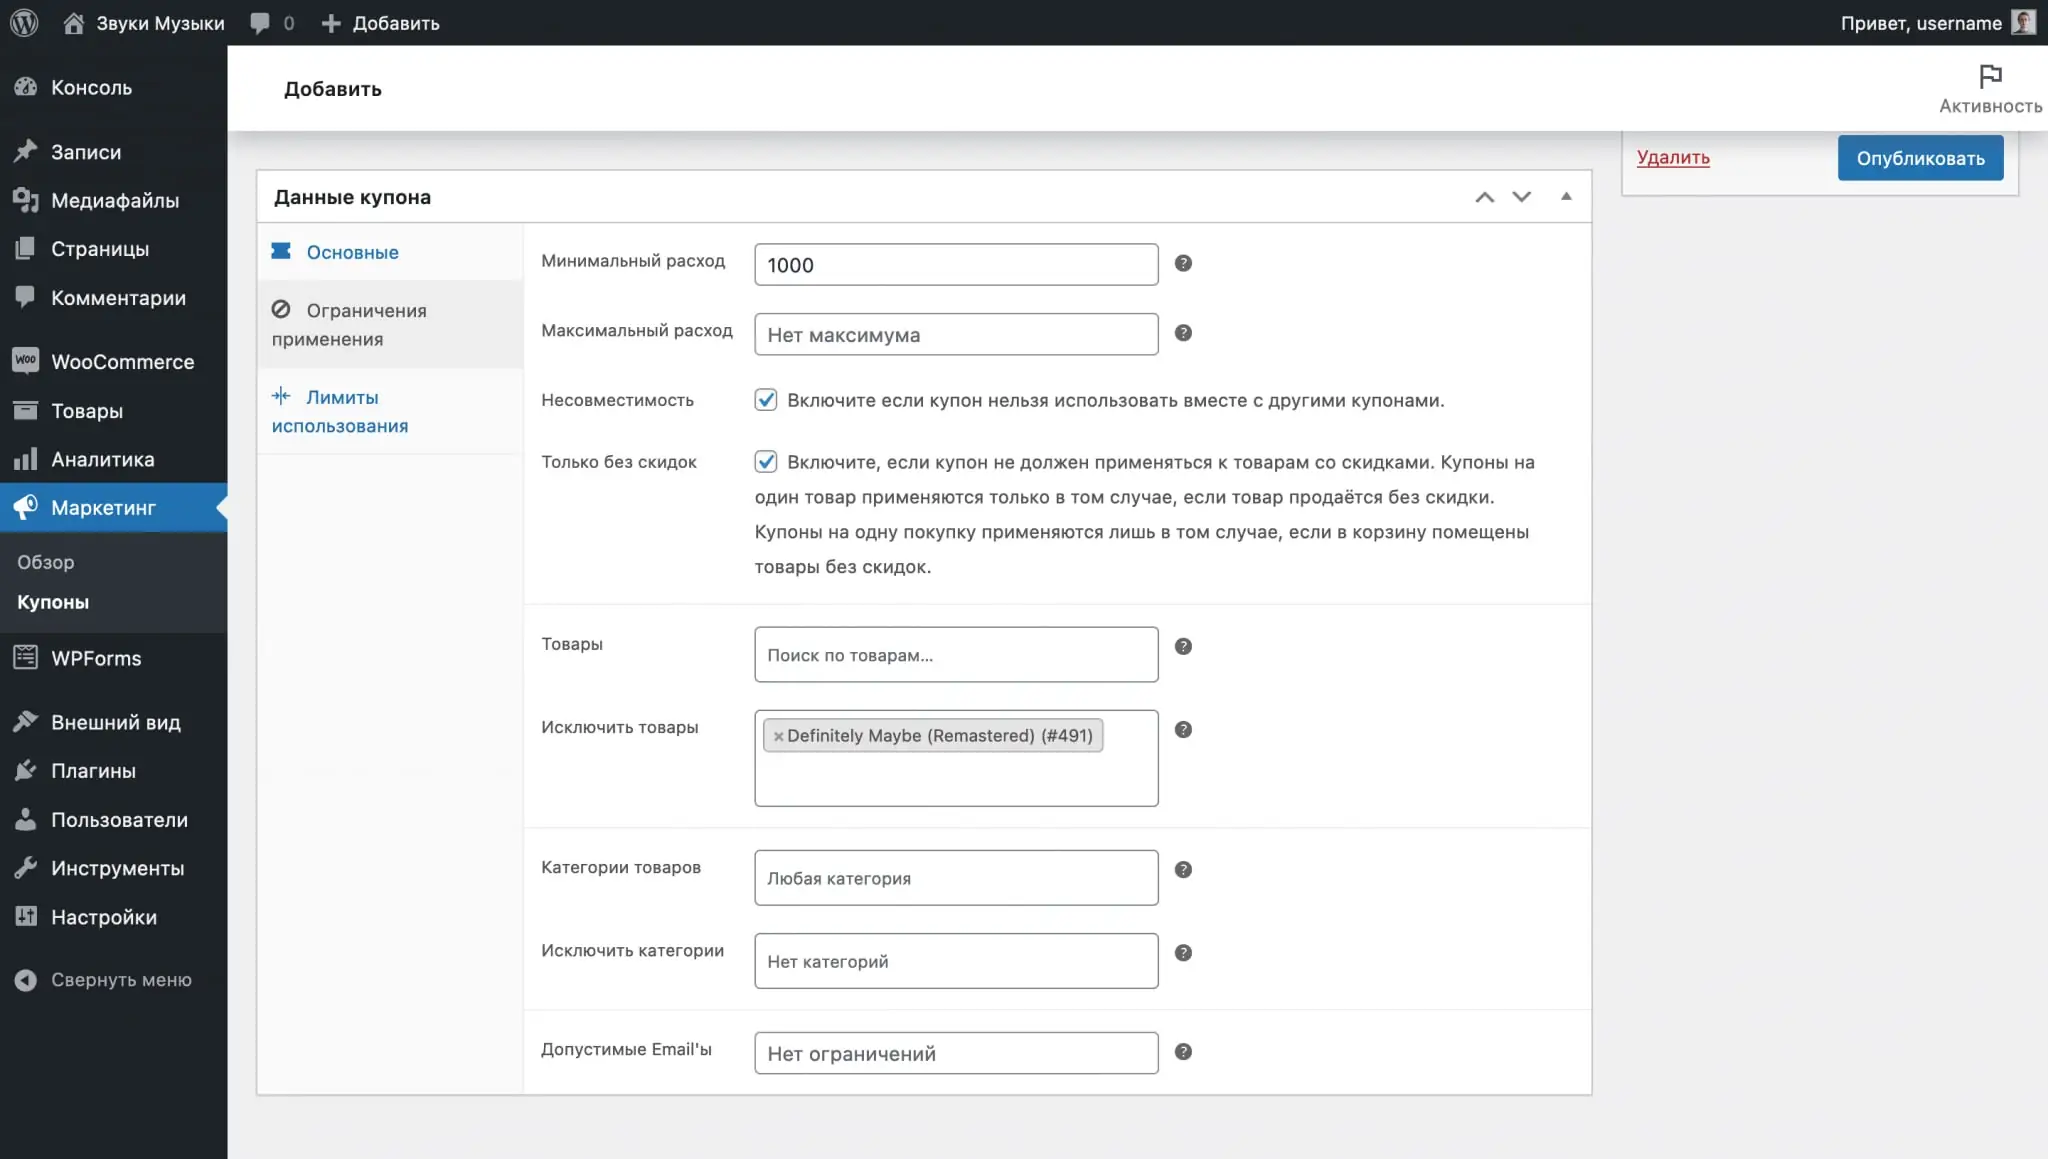
Limitations of use. Here you will find several options that will help you set up the conditions for using the promotional code:
- Minimum/Maximum flow — the minimum and maximum order amount for which a promotional code can be used.
- Incompatibility — a ban on using this promotional code with others.
- Only without discounts — a ban on the use of promotional codes for items on sale.
- Products — products for which the promotional code will be valid.
- Exclude products — products for which the promotional code will NOT be valid.
- Product categories — categories for which the promotional code will be valid.
- Exclude categories — categories for which the promotional code will NOT be valid.
- Acceptable Emails — email addresses of users who have the right to use the promotional code. This way you can make a personal promotional code for a birthday or for a gift certificate.
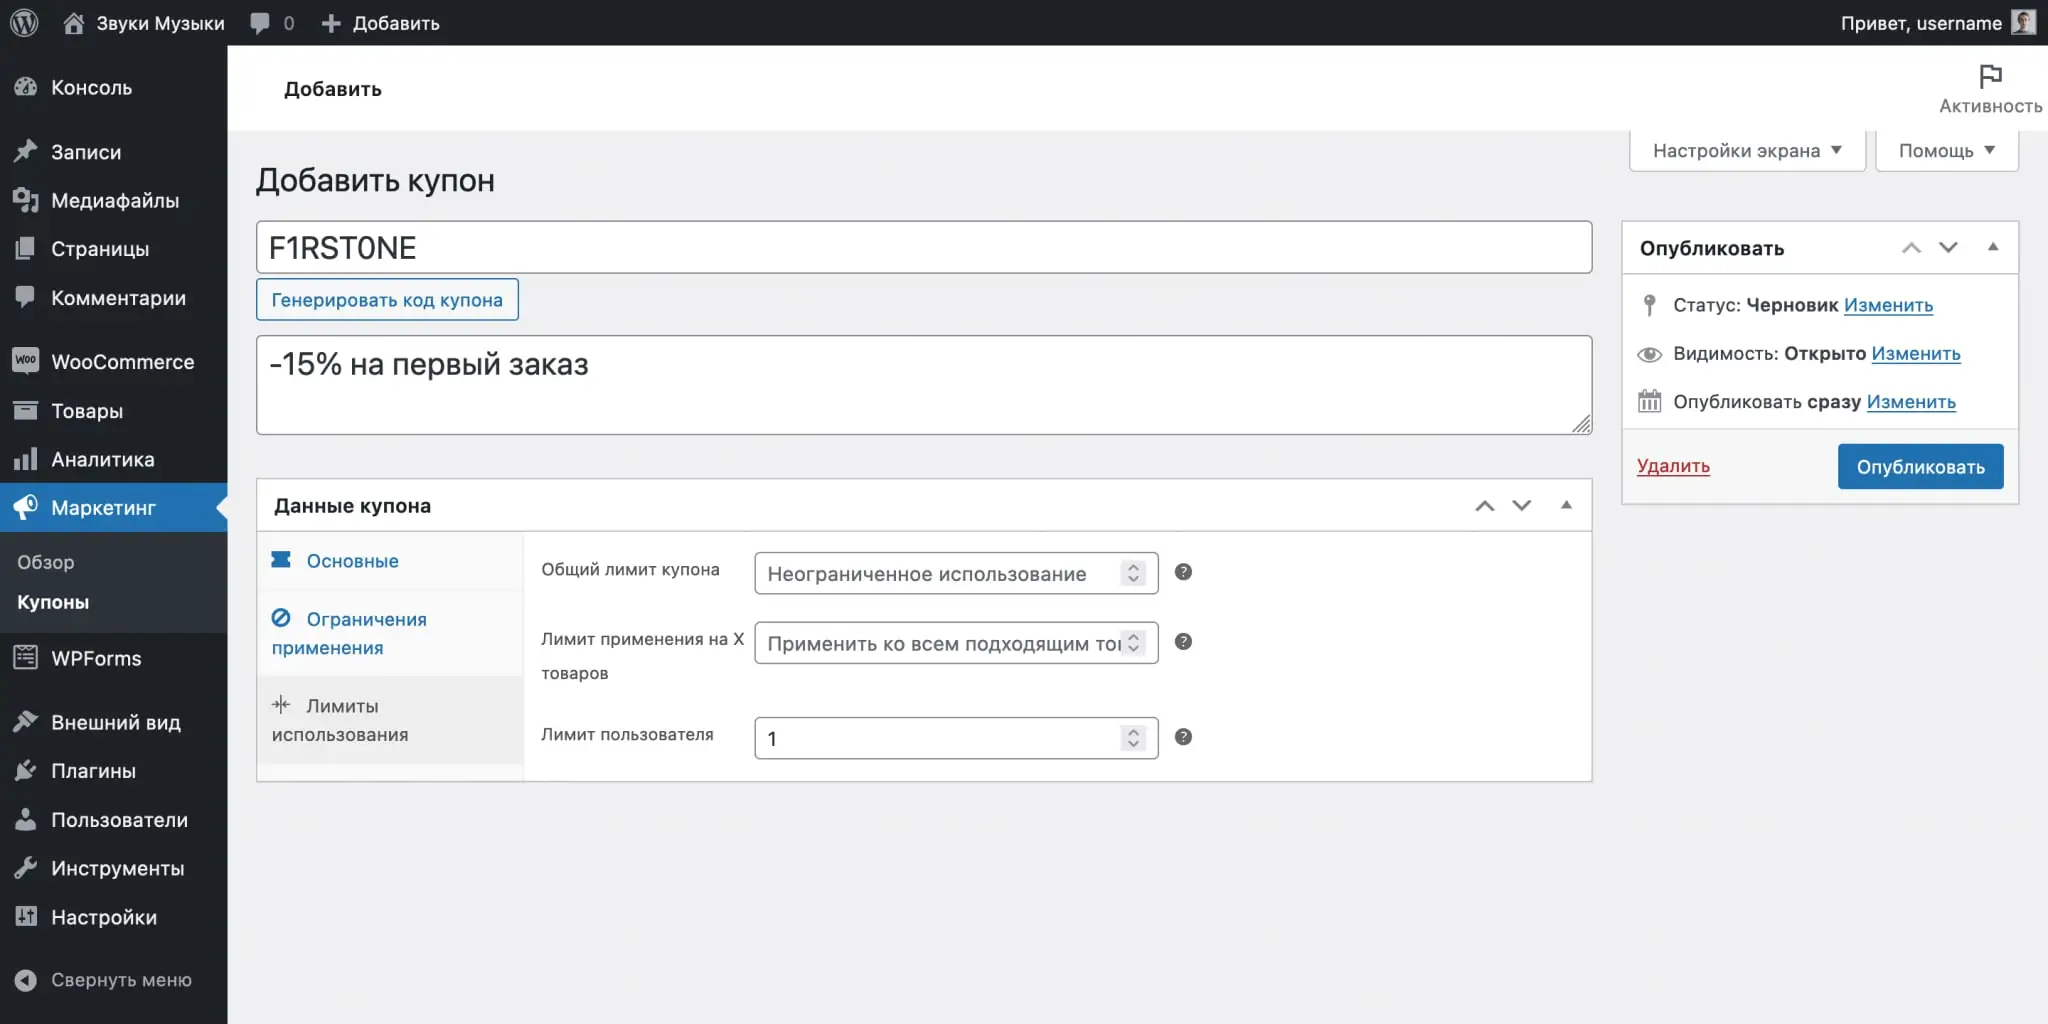
Usage limits. Here you will find three options that will help you set limits on the use of the promotional code:
- Application limit per coupon — how many times can a promotional code be used in total?
- Application limit for X products — the maximum number of individual items in the cart that will be subject to a discount. Leave the field blank so that the promotional code applies to all items in your cart.
- Application limit per user — how many times a promotional code can be used by one person.
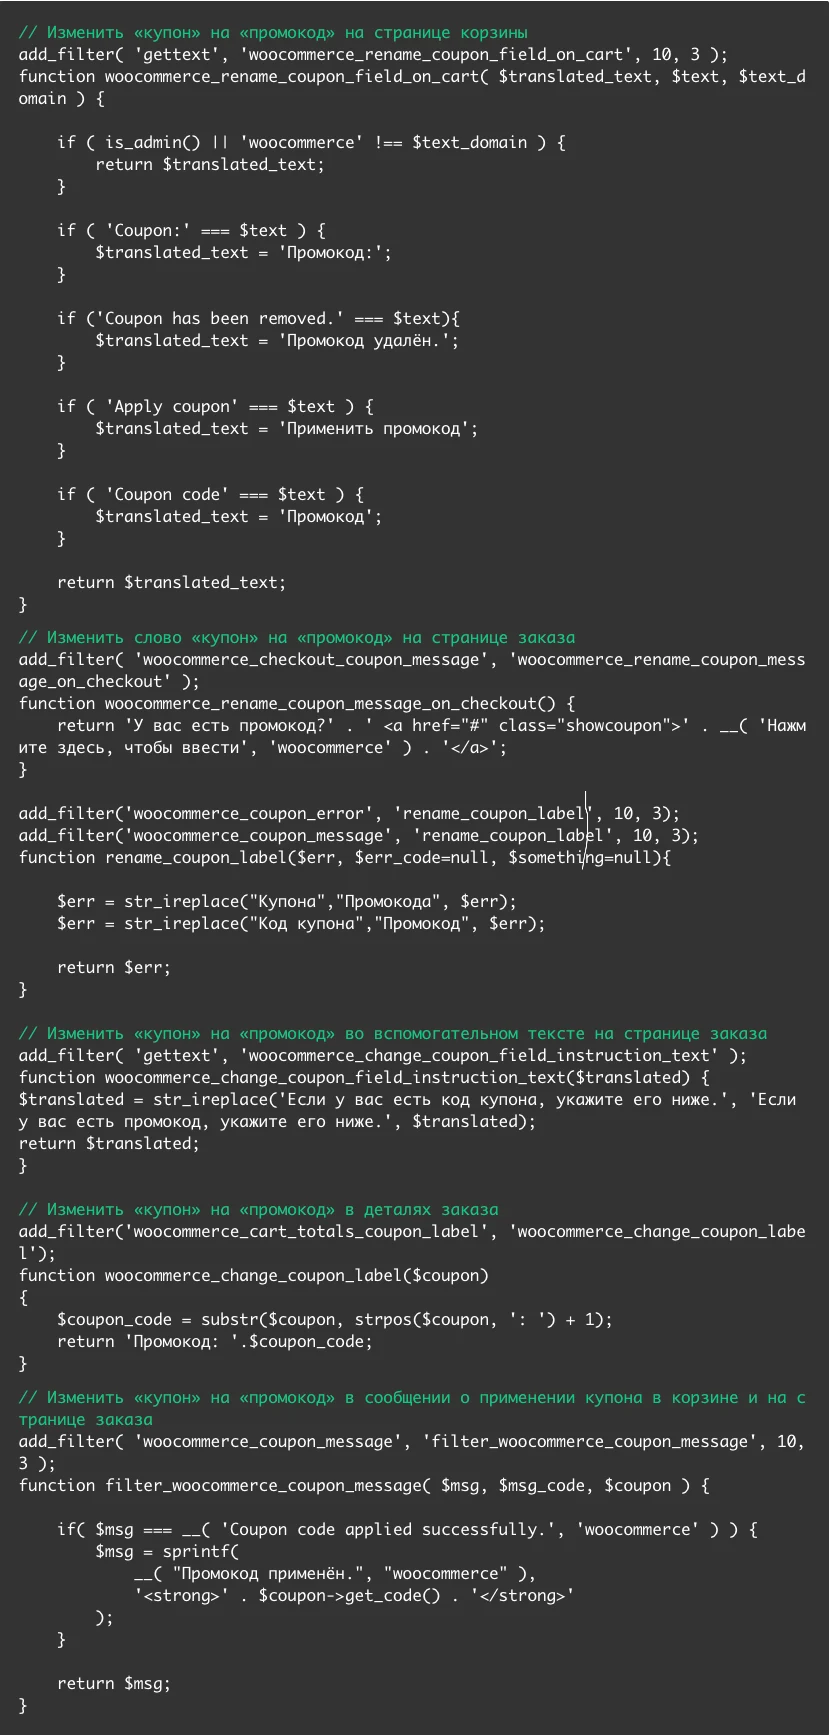
Replacing the text “coupon” with “promotional code”
The promotional code will be referred to as “coupon” in your cart and on the checkout page. If you prefer the word "promotional code", you can implement it by adding this code to the functions.php file in your theme folder:
Setting up WooCommerce notifications
WooCommerce automatically sends emails to customers and the store owner when certain events occur, such as a new order or a change in its status. You can change the parameters of these letters on the “Emails” tab.
At the top of the tab there will be a table with all the templates, and just below there will be some global notification parameters.
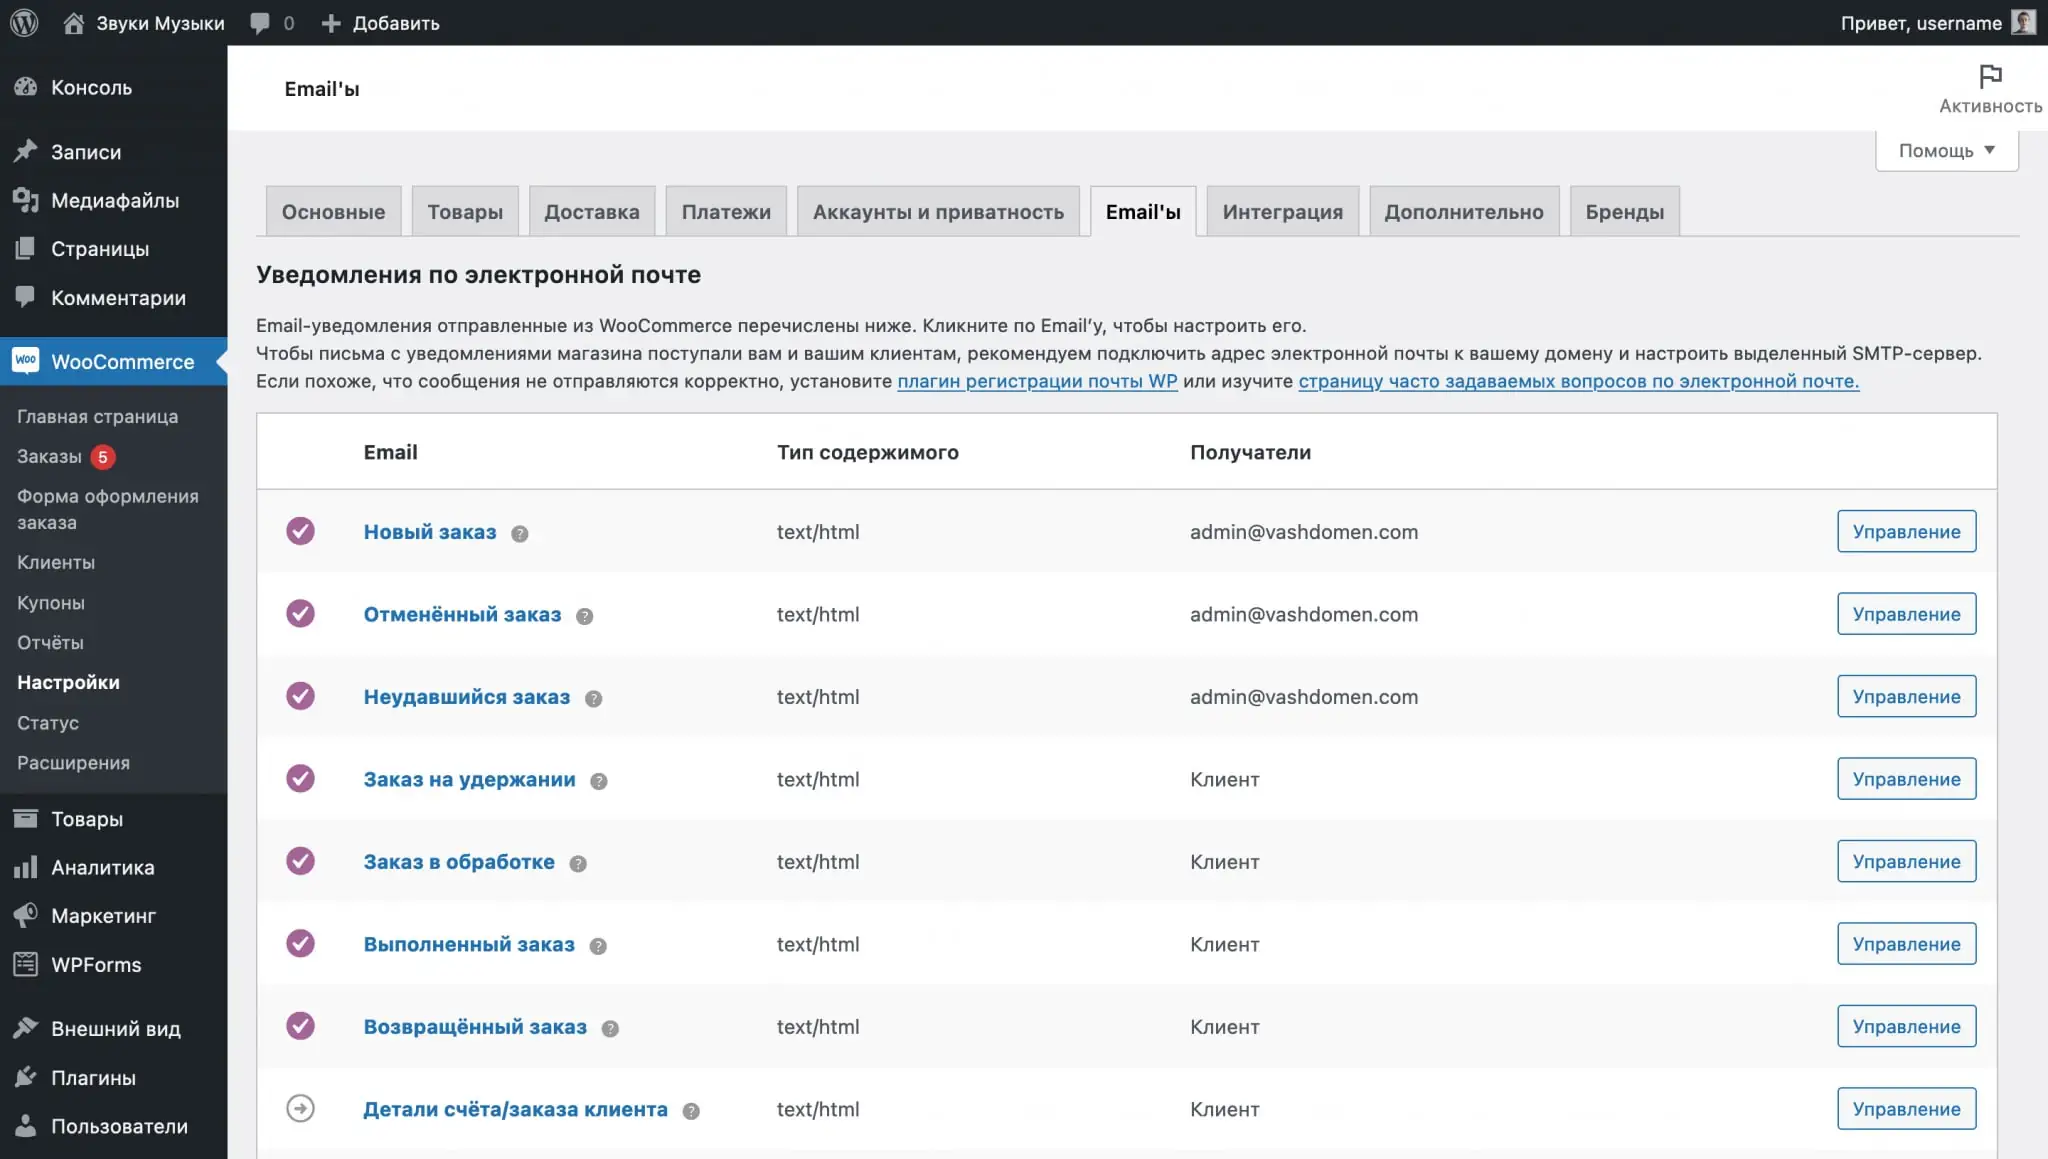
Setting up a template
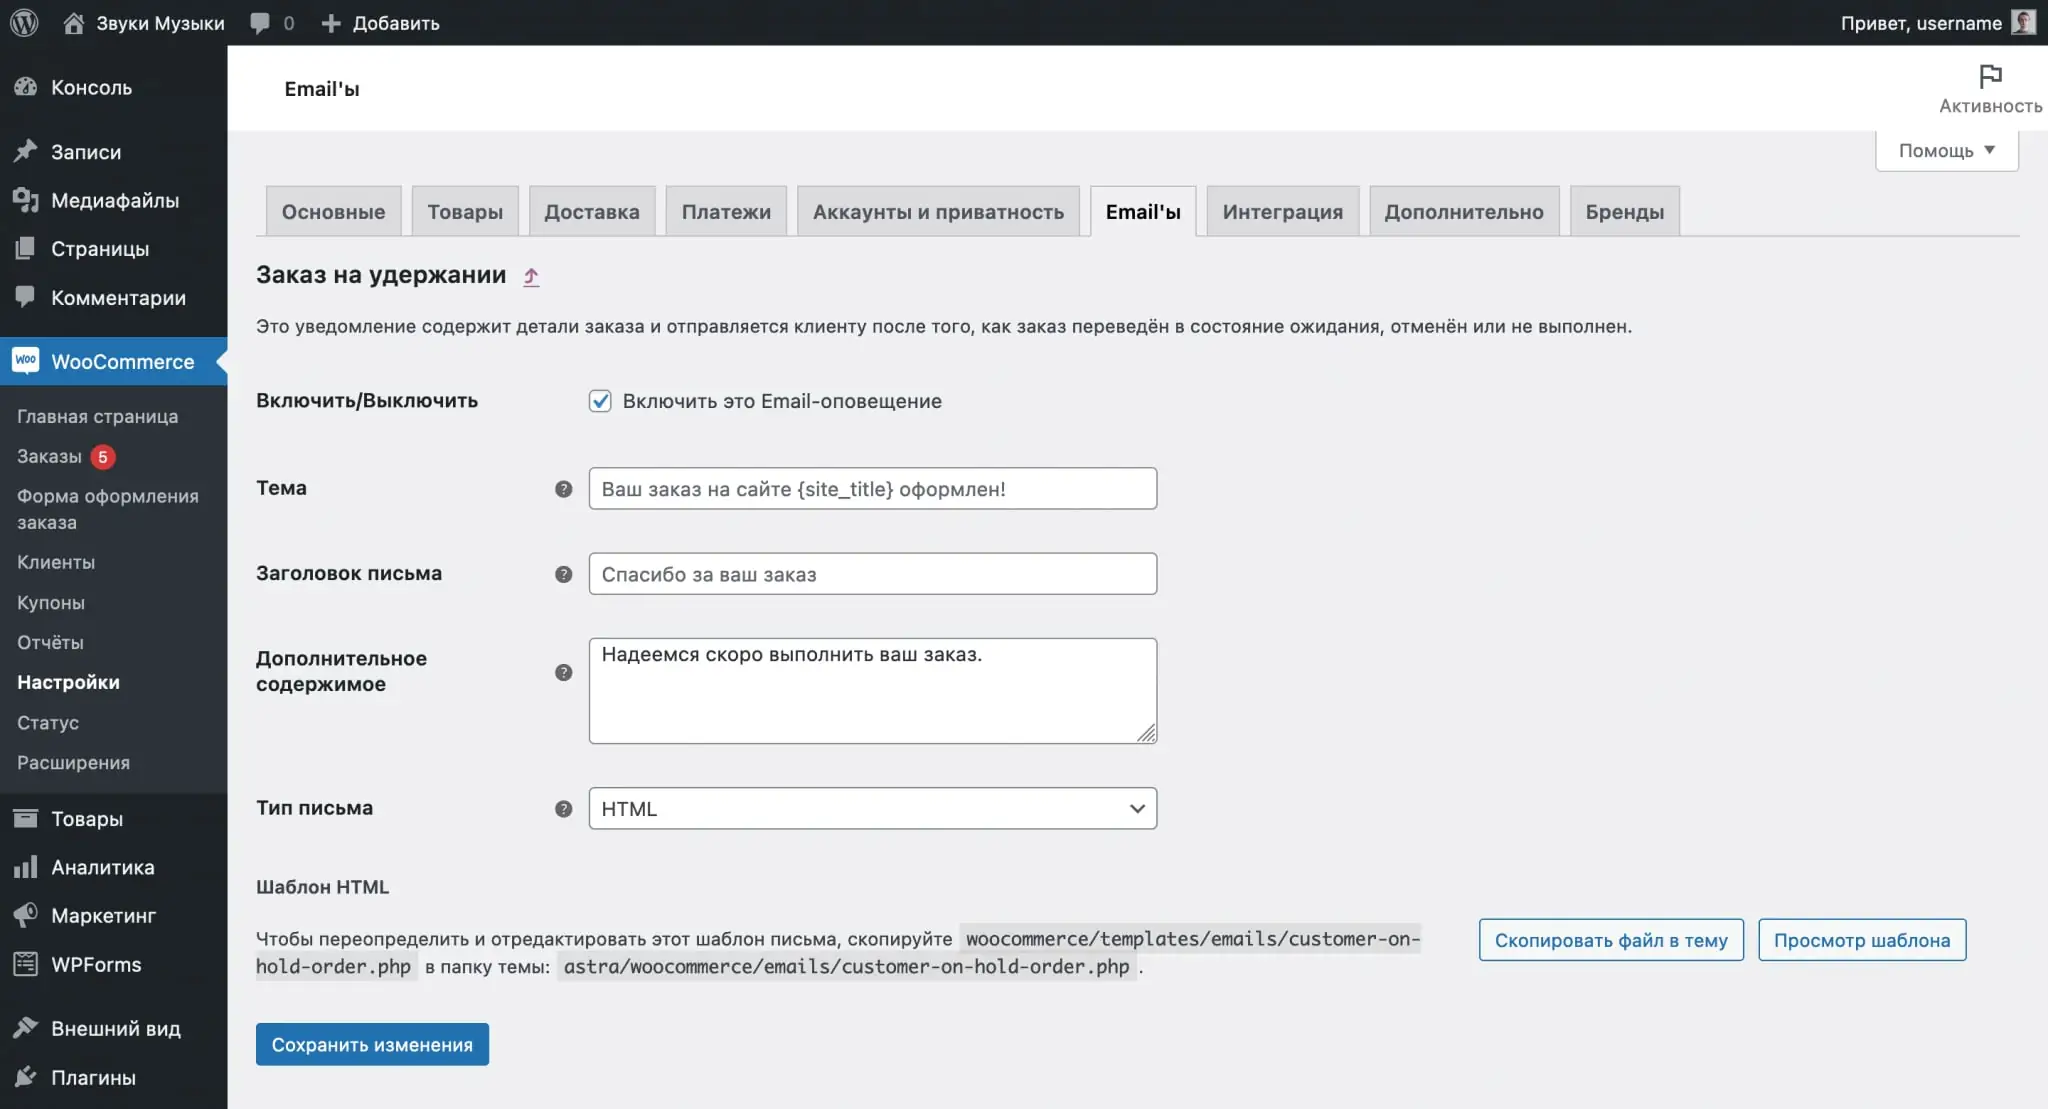
Click the "Manage" button in the line with the template to change it. Among the options will be the ability to turn the notification on/off, change its subject, title and additional text. You cannot completely change the contents of the template; you can only partially personalize it to suit your business.
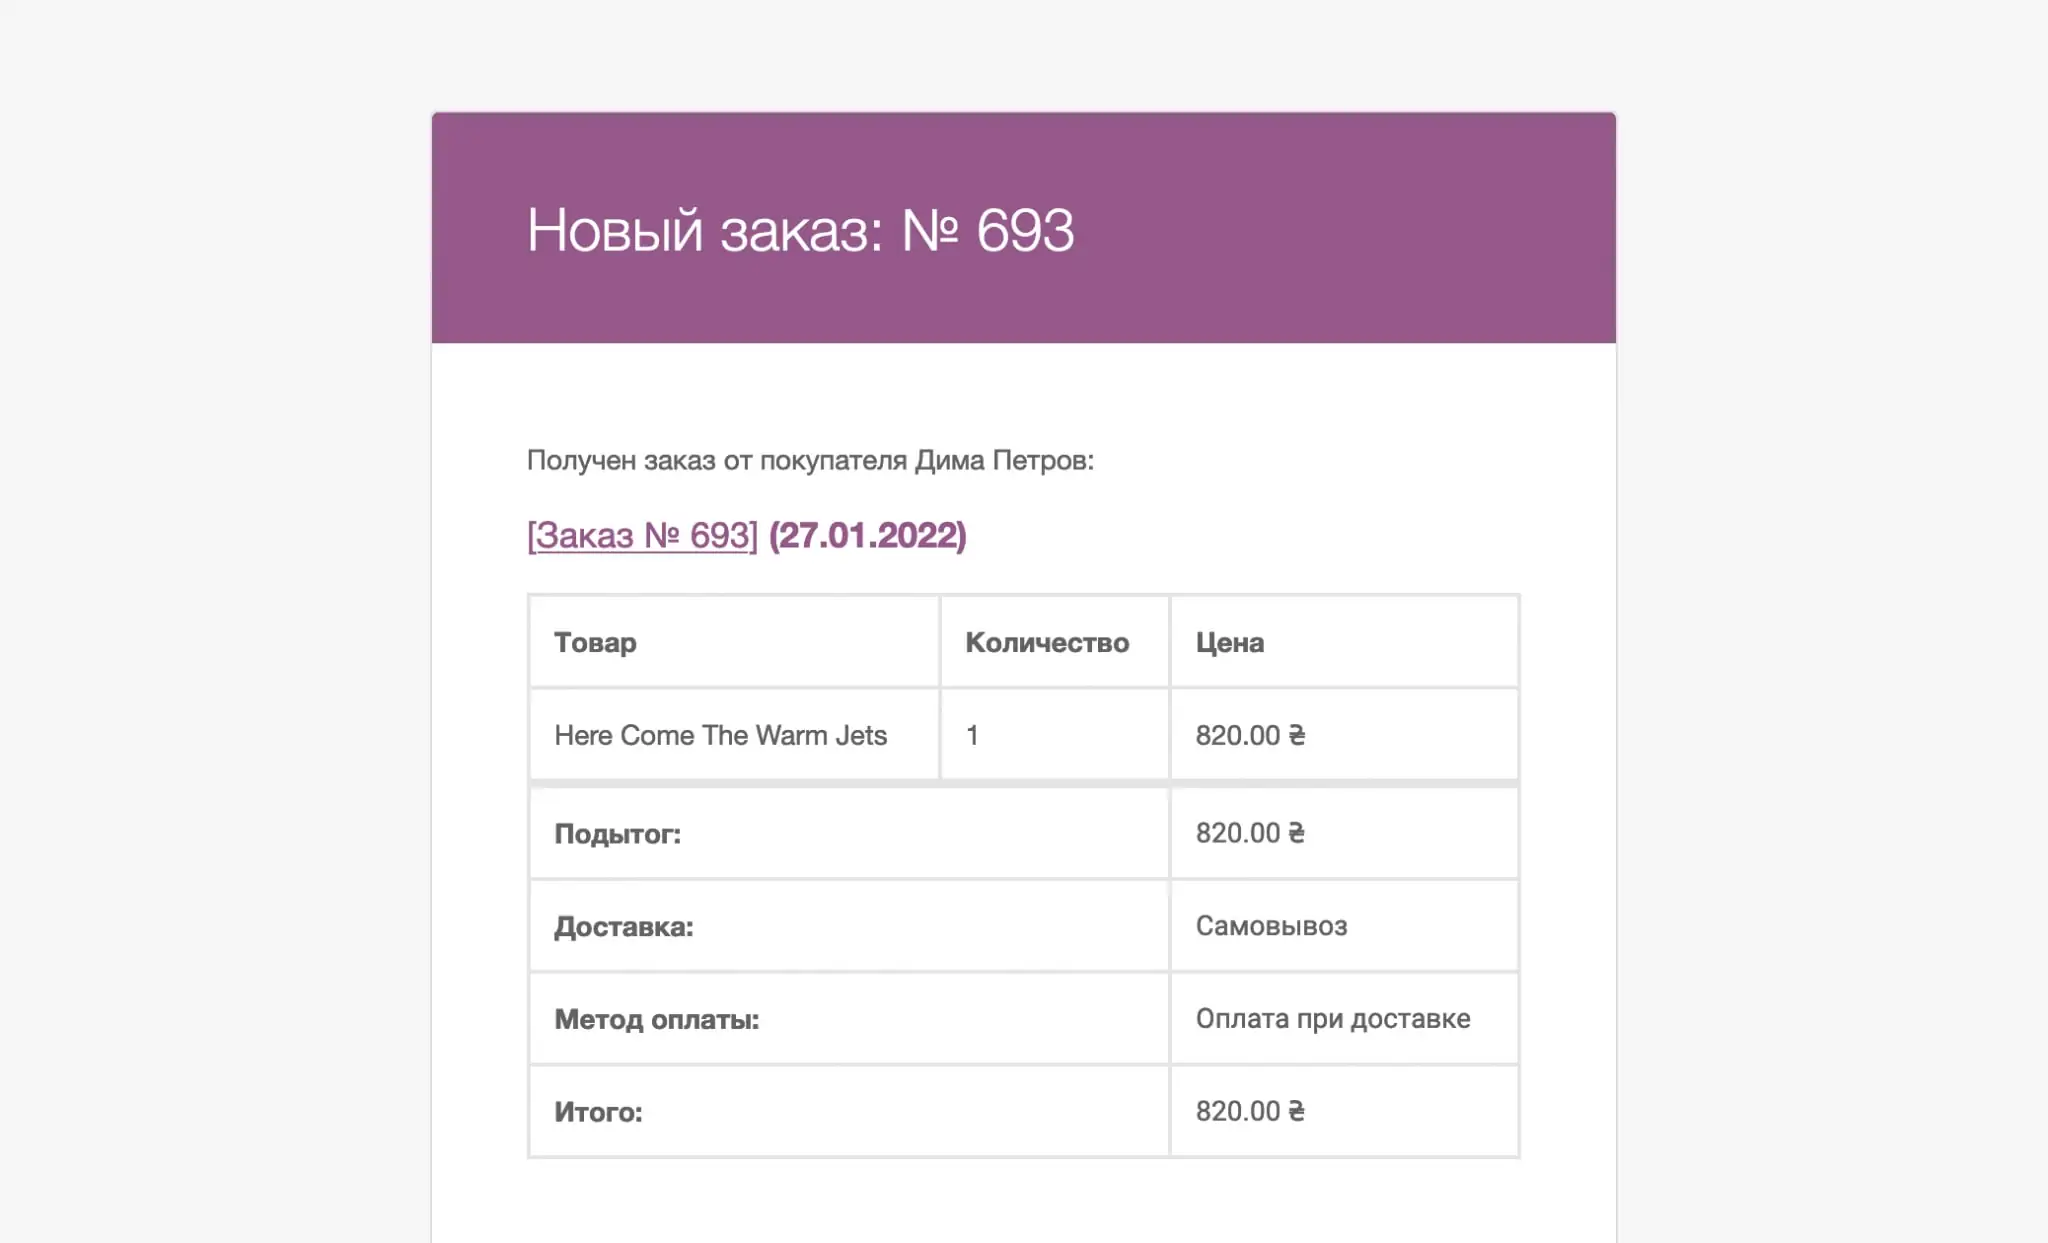
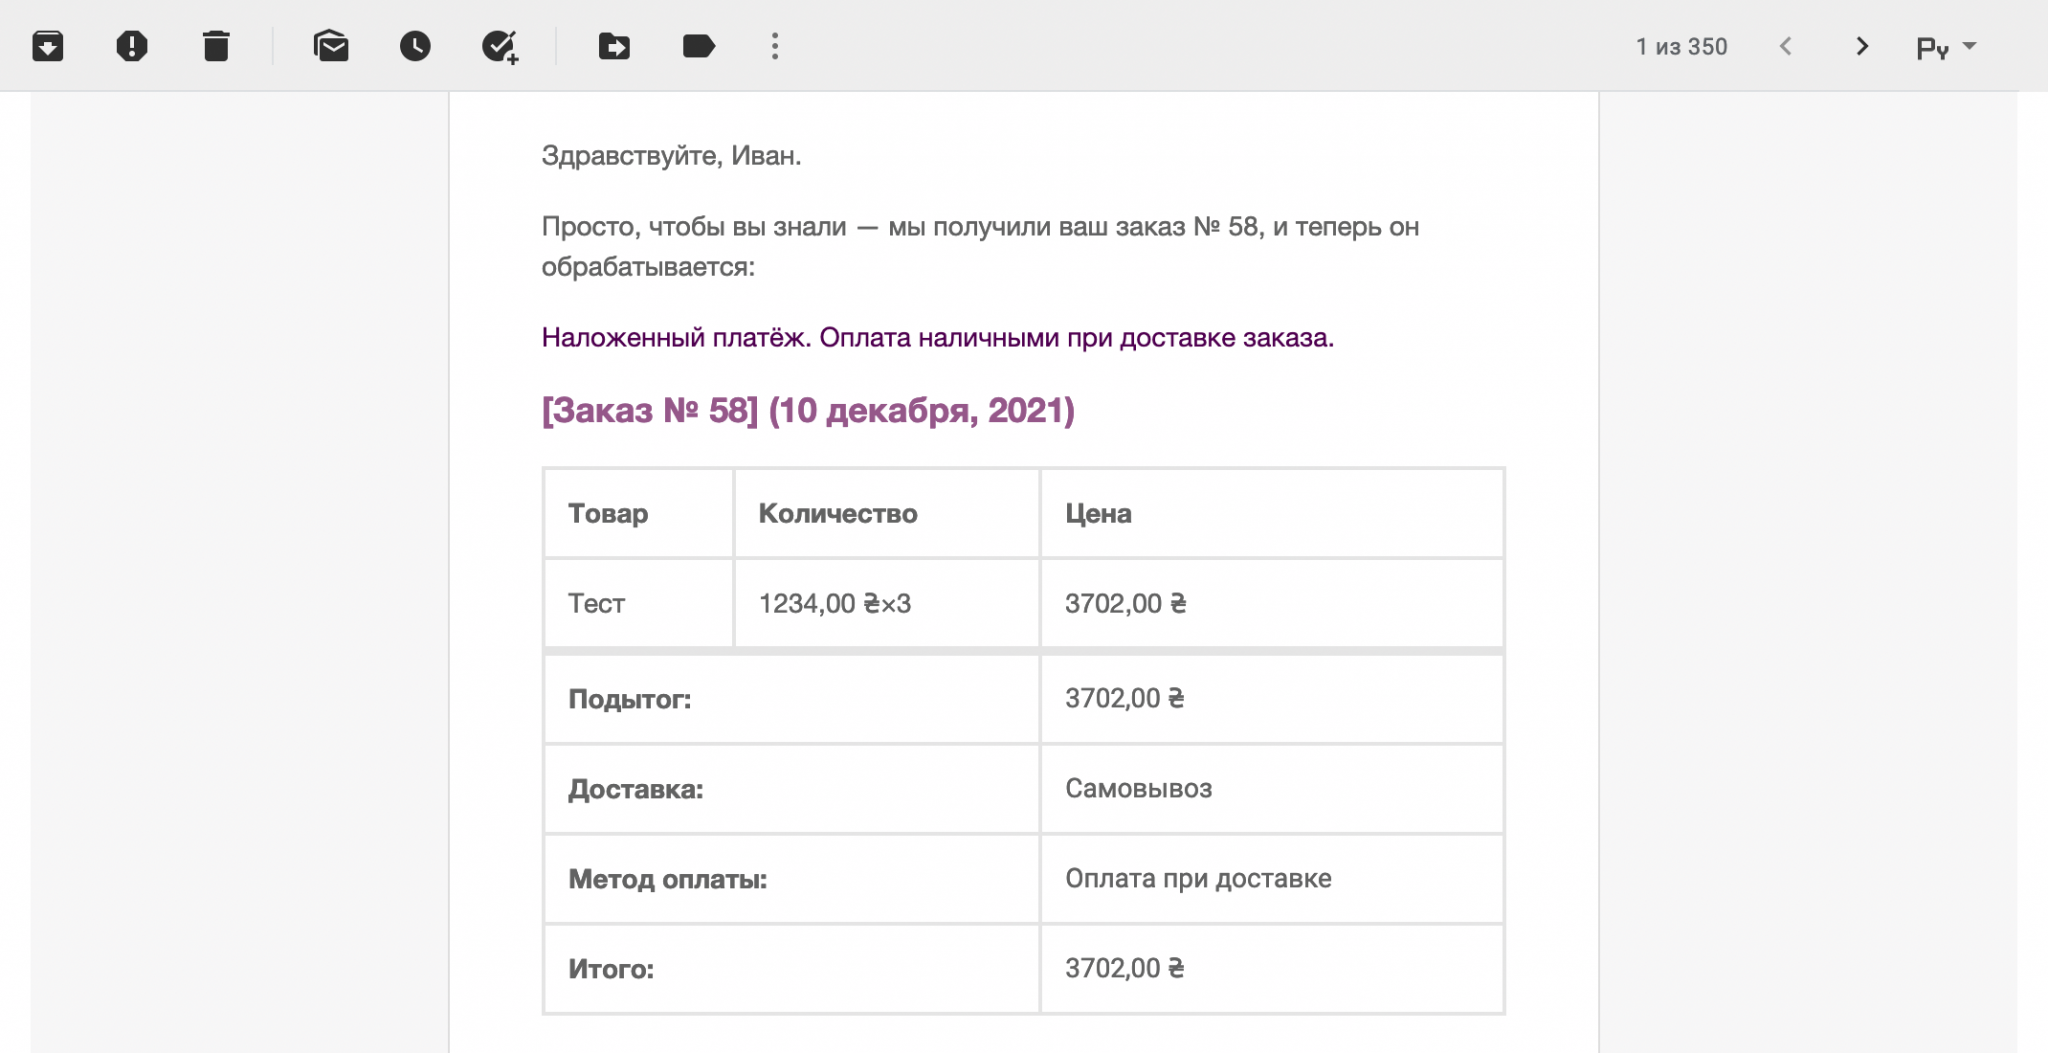
In most cases, you can test the email design by placing a test order on your own email. For example, this is what a notification called “Order in Process” looks like by default in Gmail. The client will receive it when he places a new order.
Under the table with templates you will find two blocks with global notification parameters: “Email sender parameters” and “Email template”.
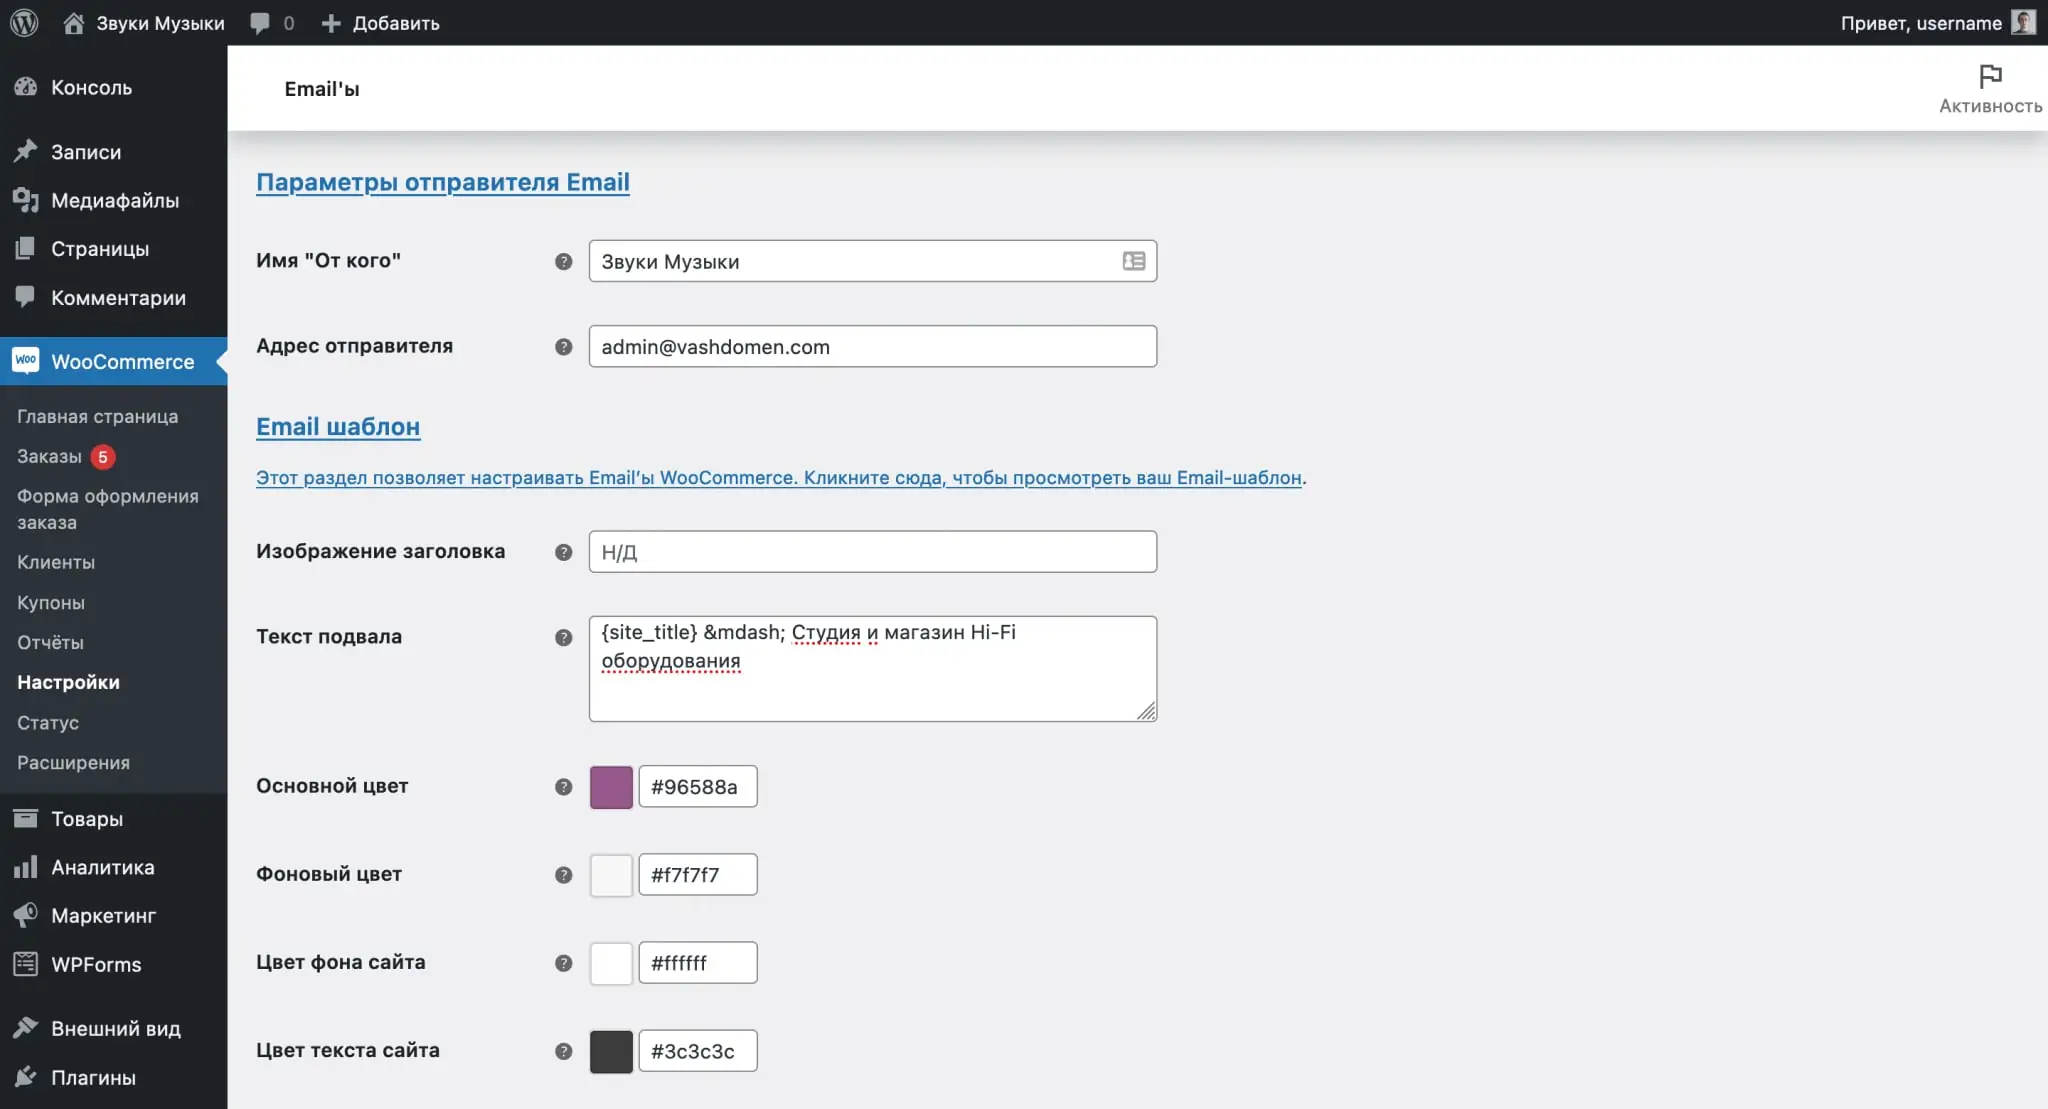
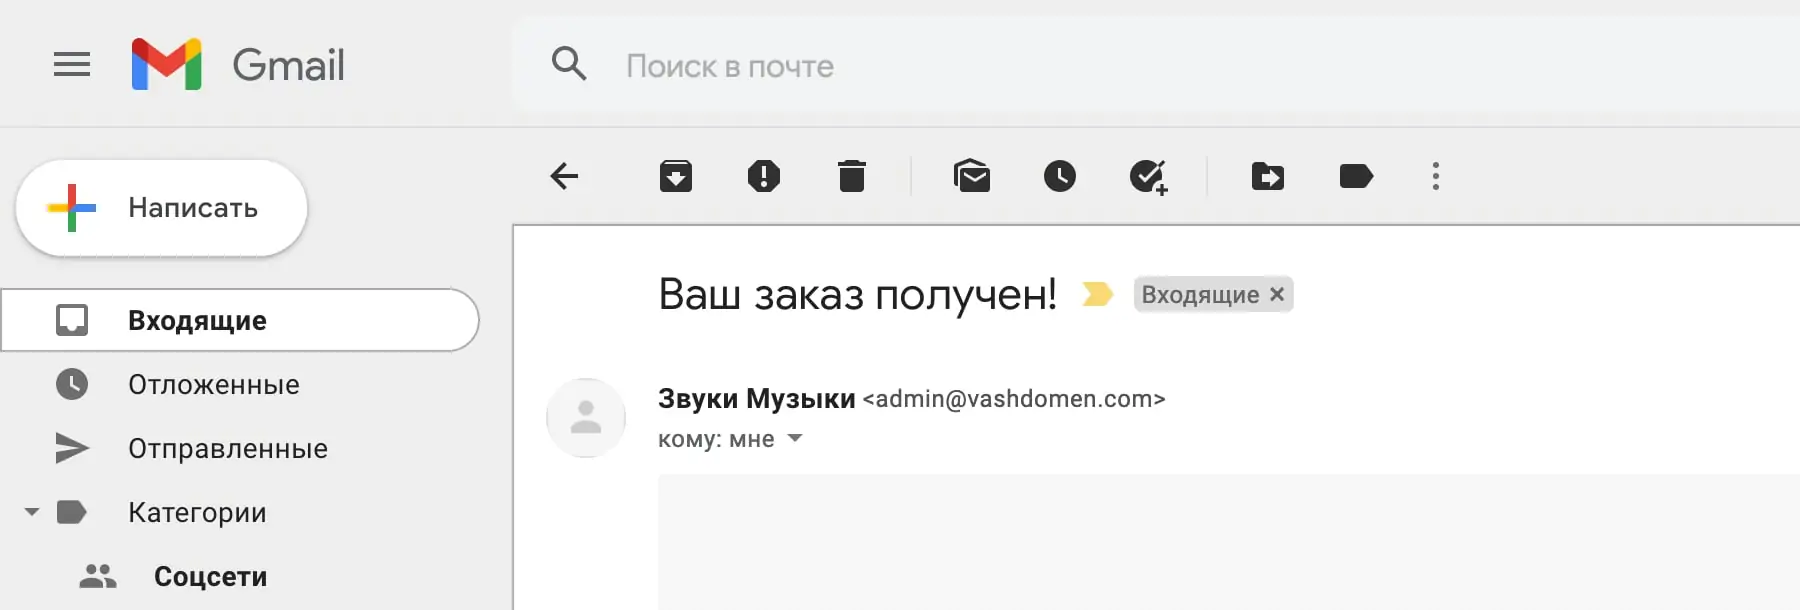
The “Email sender parameters” block contains the contents of the “From” field and the email address of the notification sender. Here's what the contents of these fields will look like in Gmail.
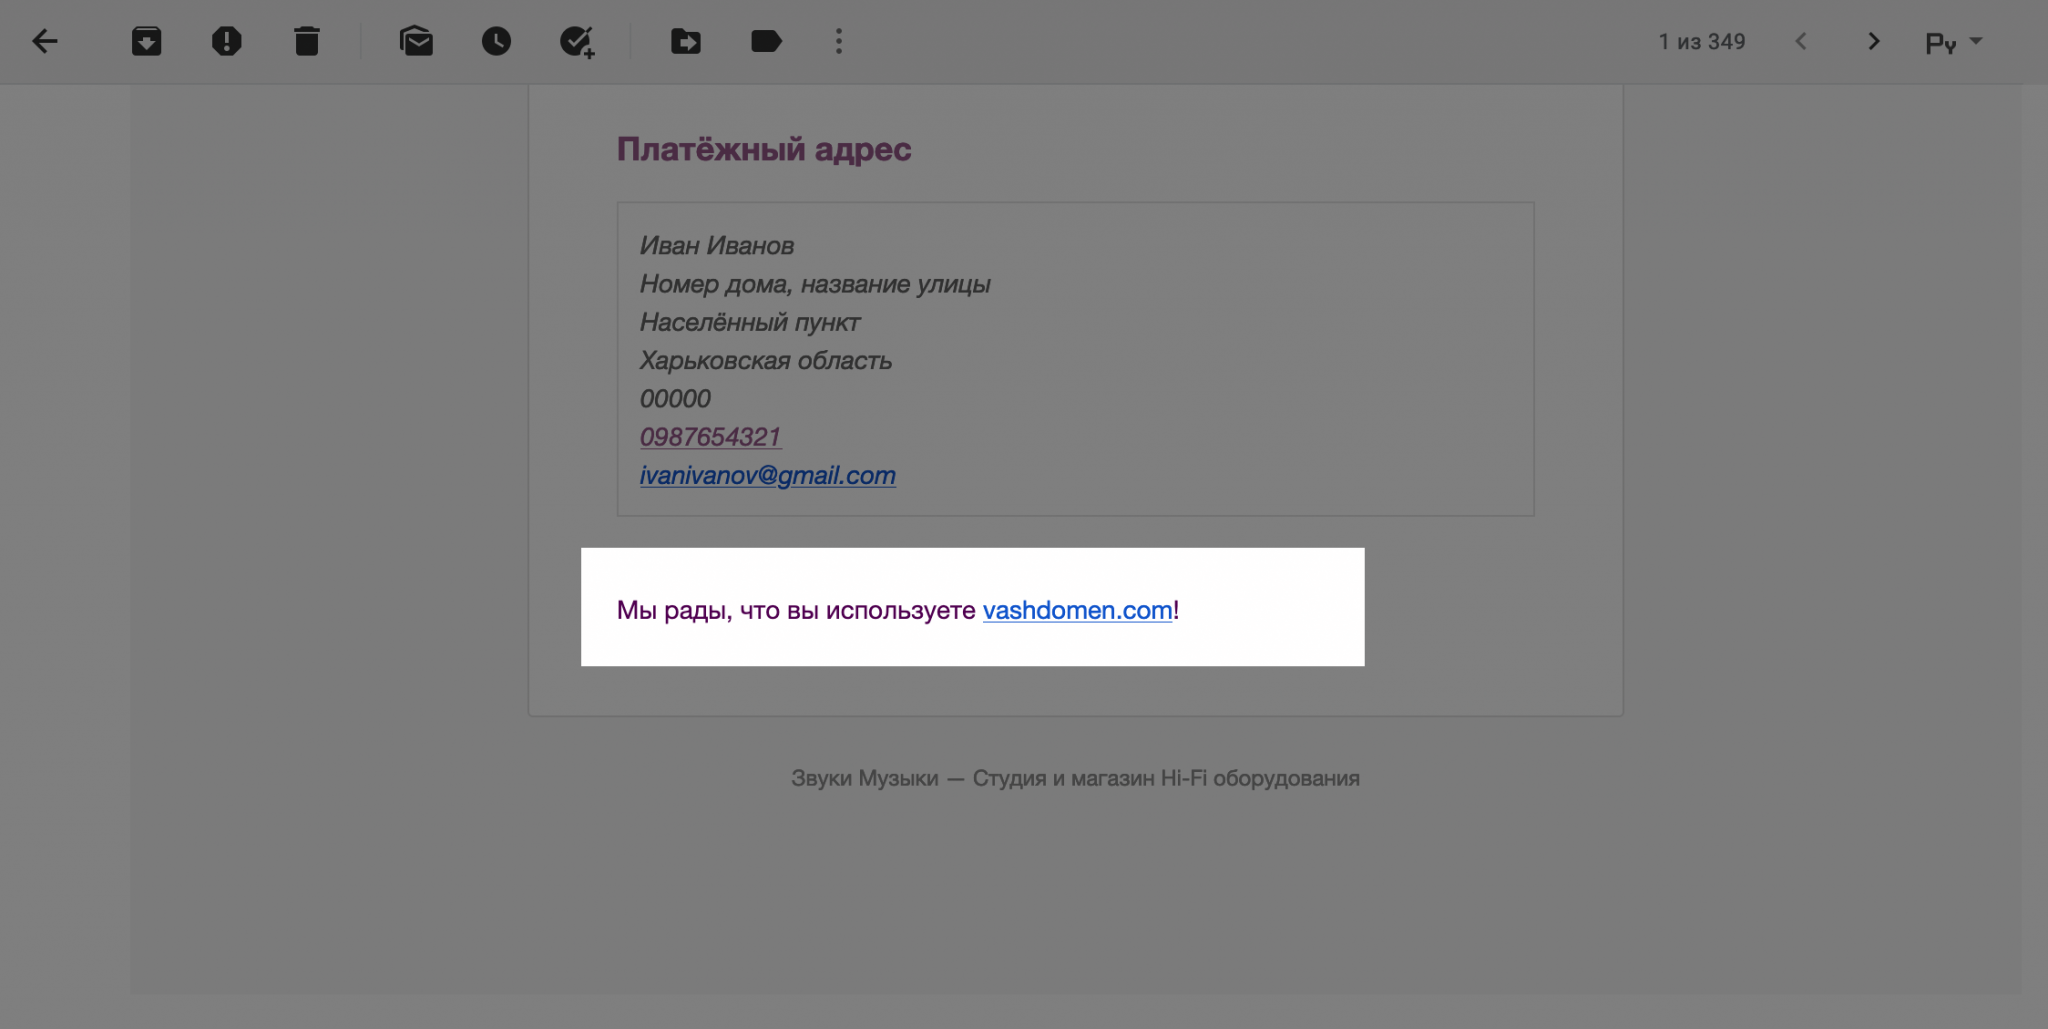
The “Email template” block contains several parameters for the appearance of the notification: template colors, footer text and a link to the image in the header of the letter. Here's what the footer colors and text look like in a real email.

Create mail on your own domain
By default, the email format [email protected] will not work; it must be created and configured manually. This is done either in the hosting control panel, or using services like Gmail or Zoho.
Adding the customer's name to the subject of the checkout email
By default, the standard WooCommerce checkout success notification does not include the customer's name, but you can force WordPress to include it in the email. Here's how to do it.

First, go to the “WooCommerce – Settings” section in the WordPress console, select the “Emails” tab and open the “Order in Process” template for editing.
In the “Subject” line, enter the text “{client_name}, thank you for your order!”, and in the “Email Header” line, enter the text “Your order on the website “{site_title}” has been completed!”. You can change the wording, but the {client_name} variable must be present.
WordPress doesn't yet understand the {client_name} variable. If you leave everything like this, the subject of the letter will not contain a name, but {client_name}. To have the engine replace the variable with the name from the customer order details, add the following code to the functions.php file in the theme folder of your site:

Adding text or HTML code to emails
WooCommerce's standard notification options include an "Additional Content" field that adds text or HTML to the end of the email. This will help make the letter more useful, but it is not a guarantee that everyone will read it to the end.
You can add special code to the functions.php file in your site's theme folder that will add additional content to all templates either before or after the order details table. The only thing is that this text must be specified with HTML tags so that everything is beautiful.
This way, you will have several places at once where you can place additional blocks: information about the current order, a promotional code for next purchases, or links to some useful materials on working with or caring for your products.
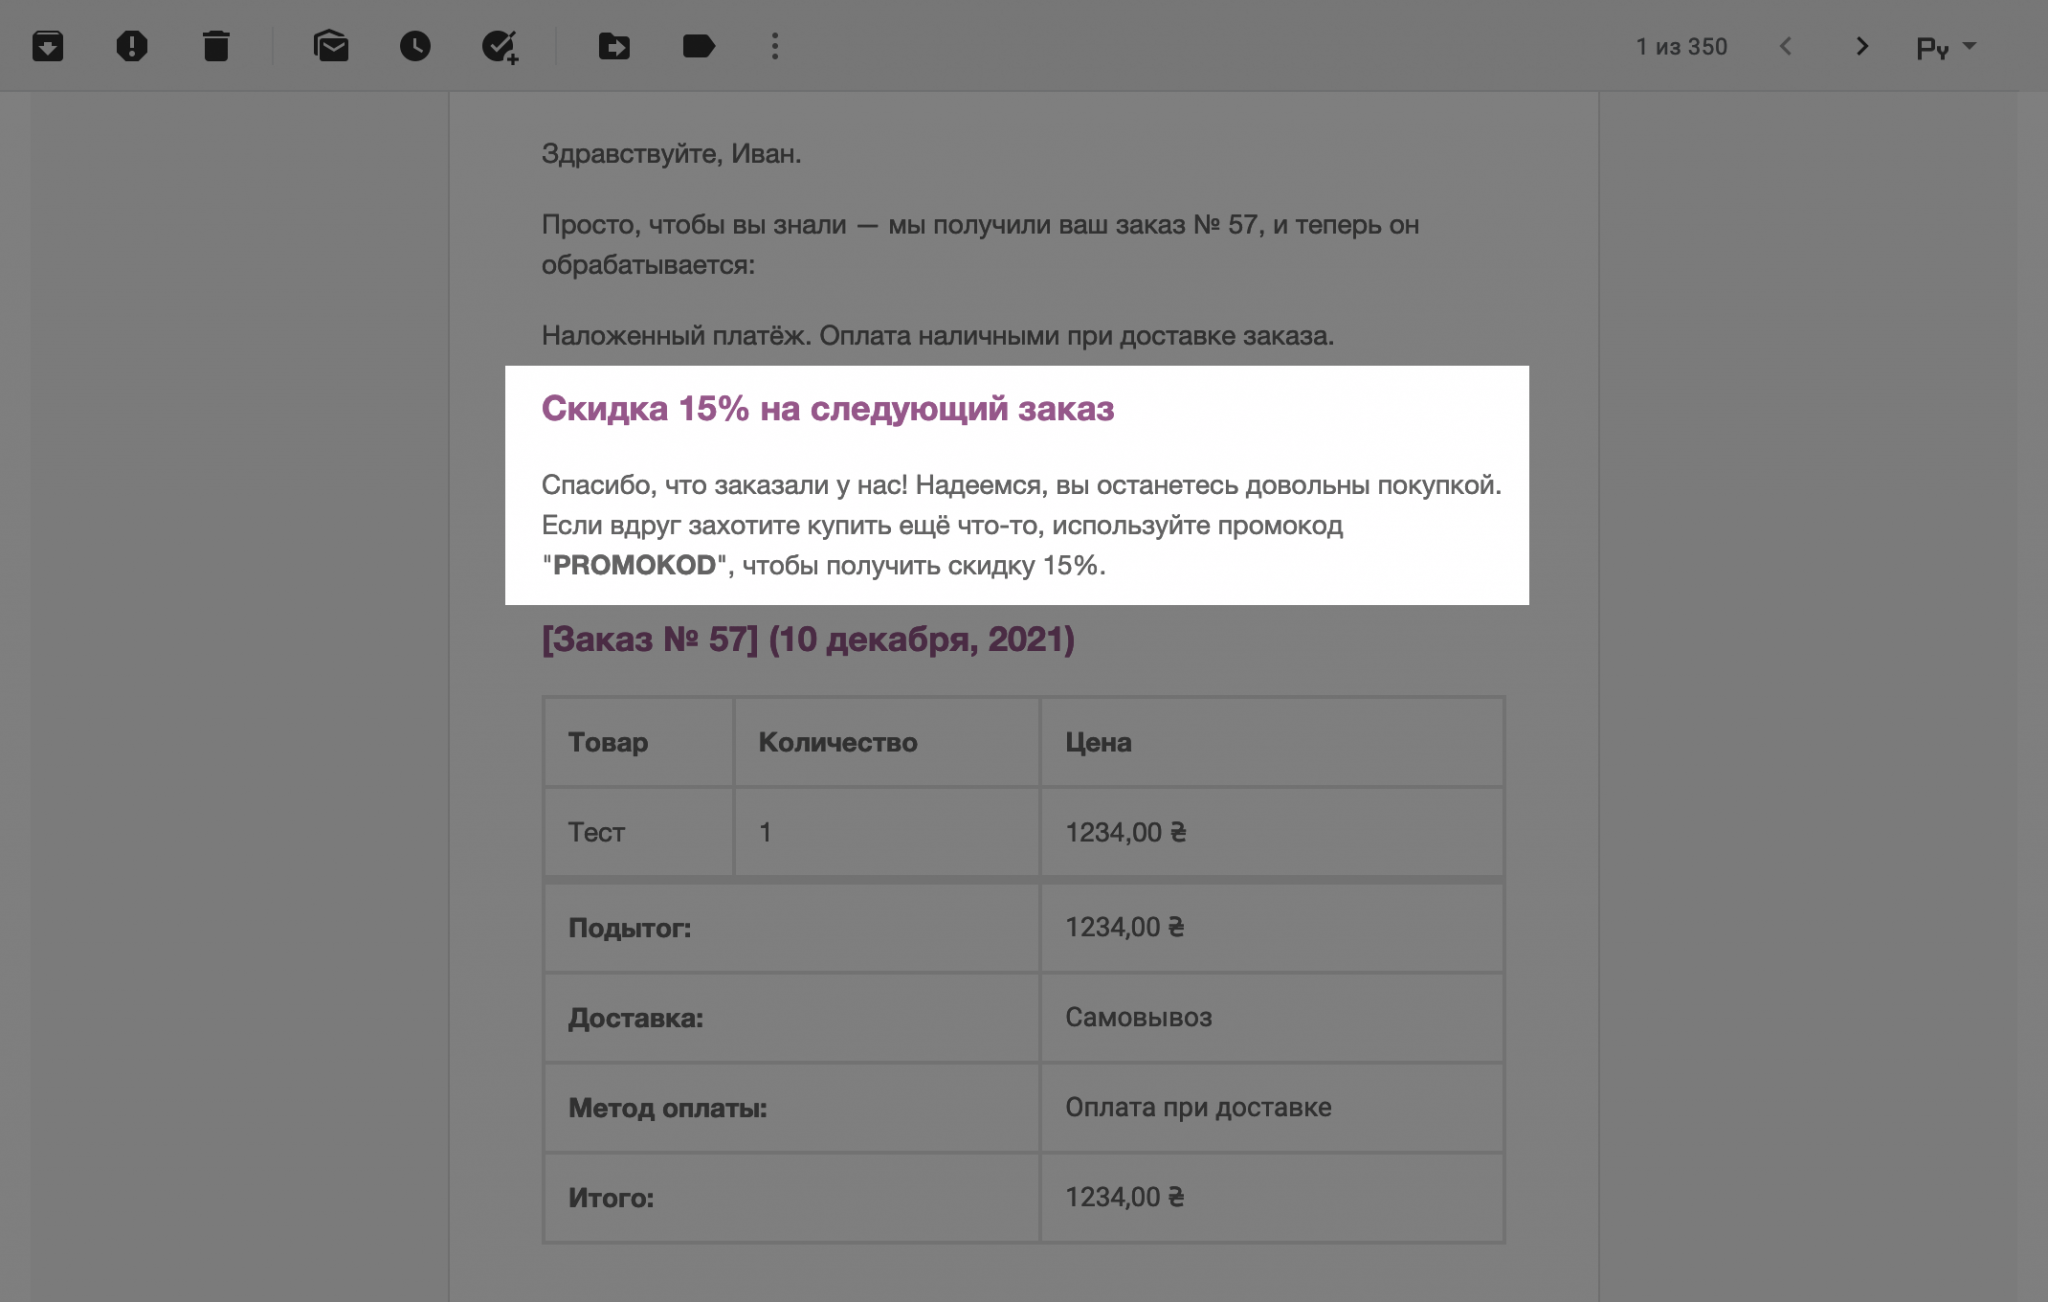
In our example, we will add a block with a coupon for the next order in front of the table. The block will have a title and one paragraph. If necessary, replace the text by analogy with something more suitable specifically for your business.
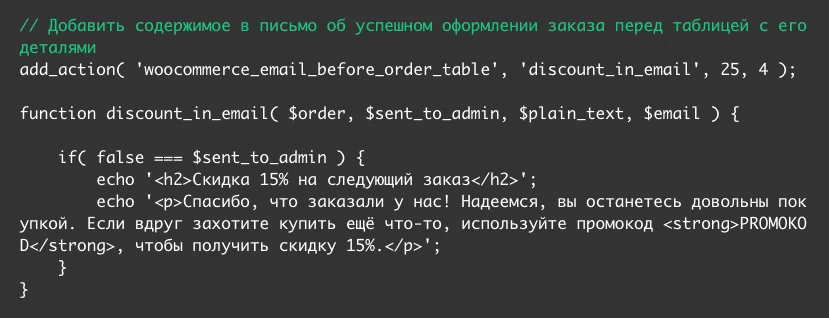
To place additional content after the order details table, replace the woocommerce_email_before_order_table hook at the beginning of the example with woocommerce_email_after_order_table.
How to add unit price to the table with order details
By default, the table will only show the total cost of all purchased items. If the client purchased several units, the price for each will have to be calculated manually. To fix this, add the following code to functions.php in your theme folder:
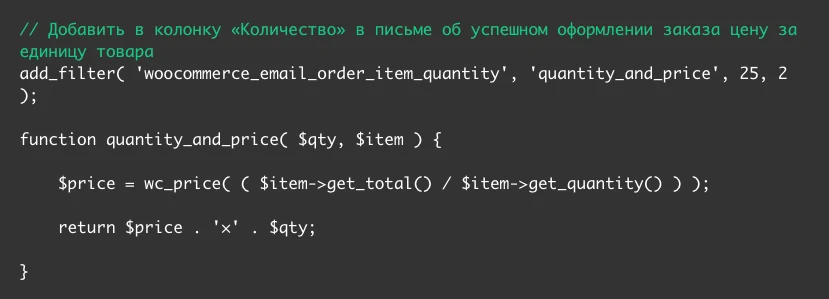
This code makes changes to the Quantity column in the order details table. Initially, it simply indicates the number of goods, but after adding the code, the cost of a unit of goods will be added there.
Statistics and reports in WooCommerce
Here you will find various reports on the performance of your store. They will help you understand which products sell most often and which generate the most income, which variations (sizes or colors) sell better, how coupons are used on the site and many other useful data, based on which you can plan how to develop your business.
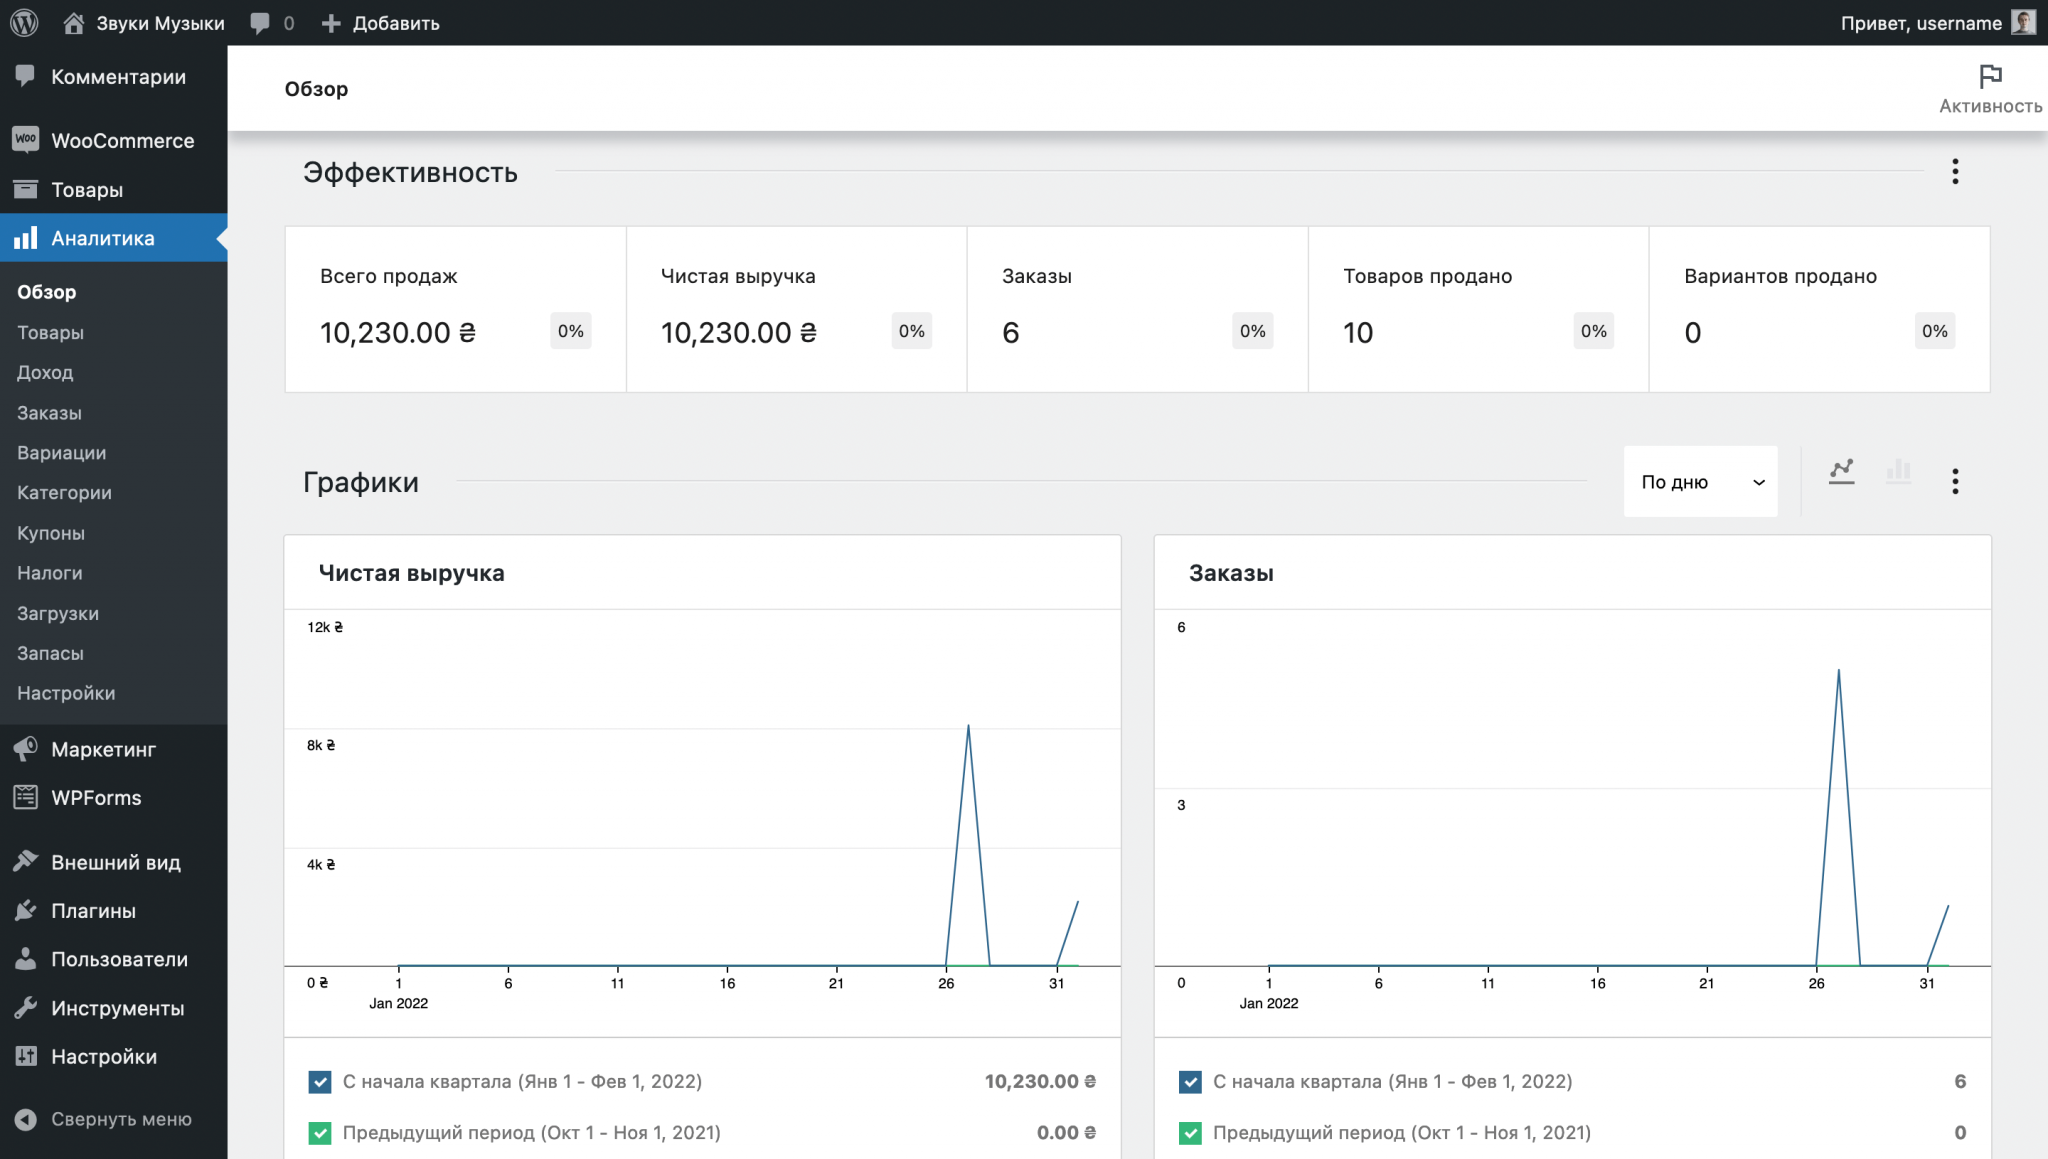
- Products - a report on sales and income from specific products for a selected period of time.
- Income - a report on site earnings with the ability to take into account how much was spent on taxes, coupons, returns, and delivery.
- Orders - a report on orders with the ability to go to the details of a specific order, as well as see the average order value and the average number of goods in the order.
- Variations - a report on sales of product variations (for example, sizes or colors), which will help you find the most popular and profitable ones.
- Categories - a report on the top selling categories, the number of products sold in them and the revenue from these sales.
- Coupons - a report on the use of coupons with detailed statistics for each of them.
- Taxes - a report on tax payments with the ability to estimate expenses separately for each of them.
- Downloads - a report on downloads of virtual goods with information about each of them (who downloaded, as part of which order, which specific file).
- Inventory - a report on the availability of goods in your warehouse.
- Settings - section where you can select a default date interval, as well as exclude some order statuses from reports.
In each of the subsections, you can compare indicators on two time periods to analyze their changes over time. For example, before and after the implementation of some changes that should have affected sales.
You can also read the articles:
- How to Set Up Event Tracking in Google Analytics 4
- How to improve the design of a product card in an online store
A source: hostiq.ua

