Advanced Google Ads Conversion Tracking. Principle of operation and setting
Author - Constantin Nacul
Visitors are increasingly refusing to accept the cookie policy when they click on an advertising link to a site, and this makes data collection more difficult. This means that you have less information to analyze the effectiveness of advertising and optimize it. As a solution, Google offers Privacy Sandbox technology. But it will appear only by the end of 2023, and now little is known about it. In the meantime, as an alternative, specialists can use a special feature of Google Ads - "Advanced Conversion Tracking".
How advanced conversion tracking works
Advanced tracking will help you record conversions more accurately. This means that it is more efficient to optimize bidding. This respects confidentiality. Secure one-way encoding algorithm SHA256 hashes customer data (such as email addresses) before sending it to Google.
You can only run the feature after setting up conversion tags.
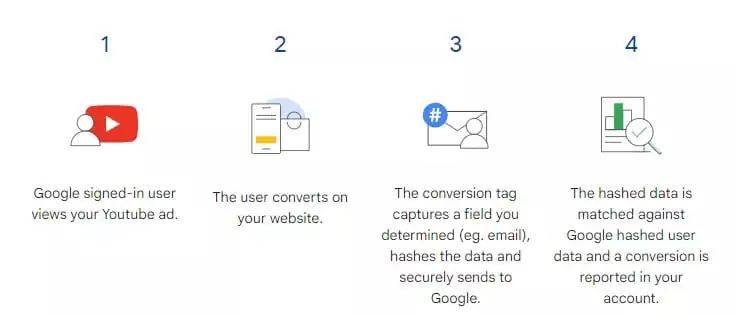
Advanced Conversion Tracking Algorithm:
- The user, being authorized in his Google account, goes to the site via an advertising link.
- Performs a target action on the site. For example, a purchase or a subscription. To do this, he must specify contact details: name, email, phone number.
- These actions capture Google Ads tracking tags. Then they hash the information and transfer it to the system database.
- The algorithm correlates information from the database with data about advertising events. That is, if a user interacted with an ad through the same account and then made a conversion on the site, the conversion will be registered.
Benefits of Advanced Conversion Tracking
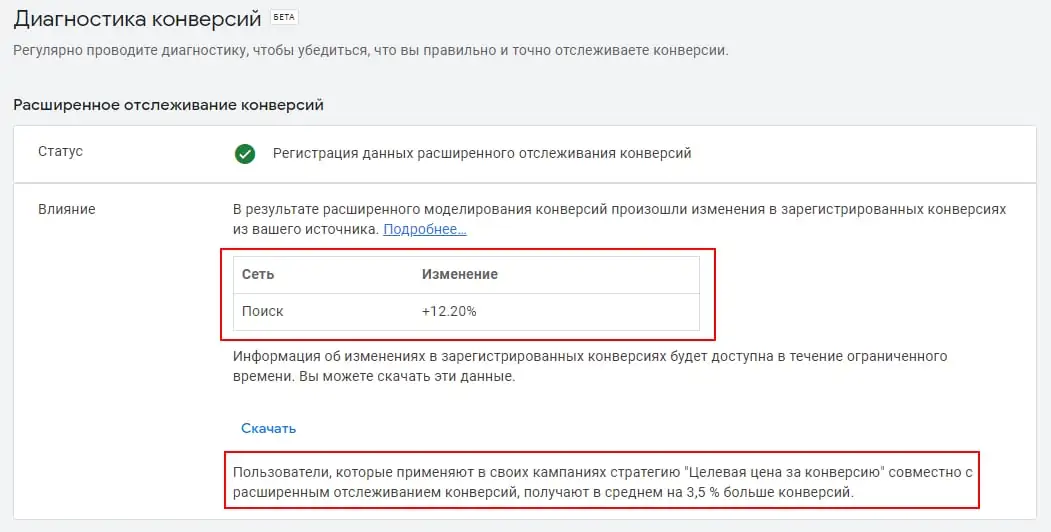
The function allows you to register conversions that would otherwise remain unaccounted for, including post-view conversions (without clicking on an advertising link). According to Google, using advanced tracking you can capture an average of 3.5% more conversions, and the share of recorded post-view conversions can increase up to 30%.
Accordingly, you will receive:
- more accurate data to optimize bidding;
- the ability to correctly evaluate results and make better strategic decisions;
- privacy protection by hashing collected customer data.
How to set up advanced conversion tracking
There are three ways to set up the feature, depending on your conversion tracking method:
- Manual setup via Google Tag Manager. If you are tracking conversions with GTM.
- Through the Google tag. If you're using a Google tag for tracking, and it's added directly to your site's pages, not in third-party tools or iframes. Then some changes in the configuration of the tag will be needed.
- Through the Google Ads API. If you want to submit data for advanced conversion tracking through the API.
I will tell you in more detail about the first method, since it is the easiest to implement and does not require any modifications in the site code.
Let me remind you that your site should already be configured with Google Ads conversion tracking using Google Tag Manager.
Important! If you're tracking conversions through Google Analytics and importing the data into your Google Ads account, this won't be enough to set up advanced tracking. To make it work, you need to create a new Google Ads conversion action using GTM or a Google tag.
Setting up advanced conversion tracking in your Google Ads account
Go to "Tools" - section "Tracking" - "Conversions".
Find and select the conversion event you want to set up advanced tracking for. At the bottom of the Advanced Conversions section, click Enable Advanced Conversion Tracking.
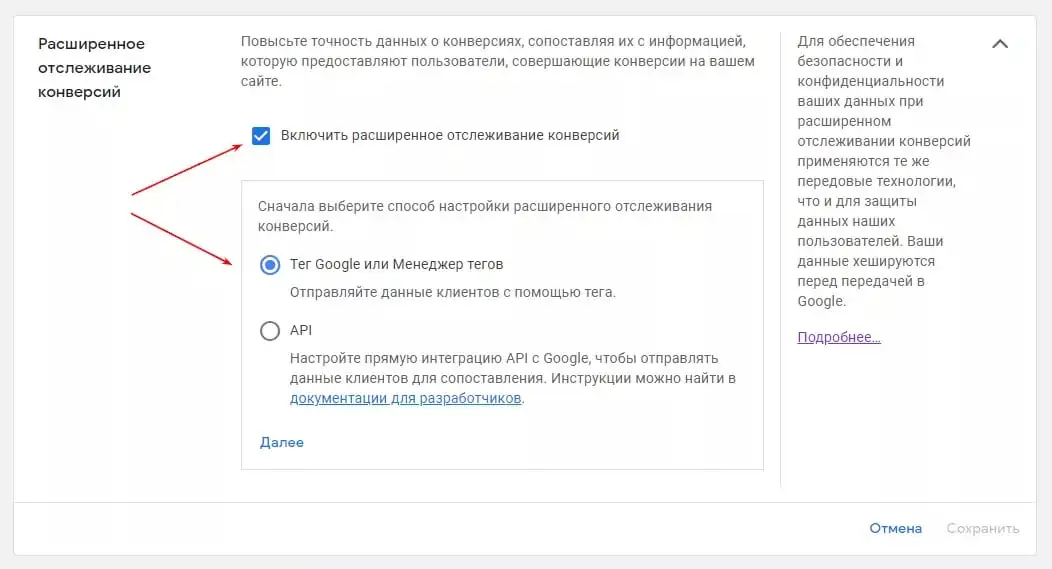
Be sure to read the Customer Data Compliance Statement and agree to the terms.
Click Check URL to check your website for the Google tag.
Further work will continue in GTM.
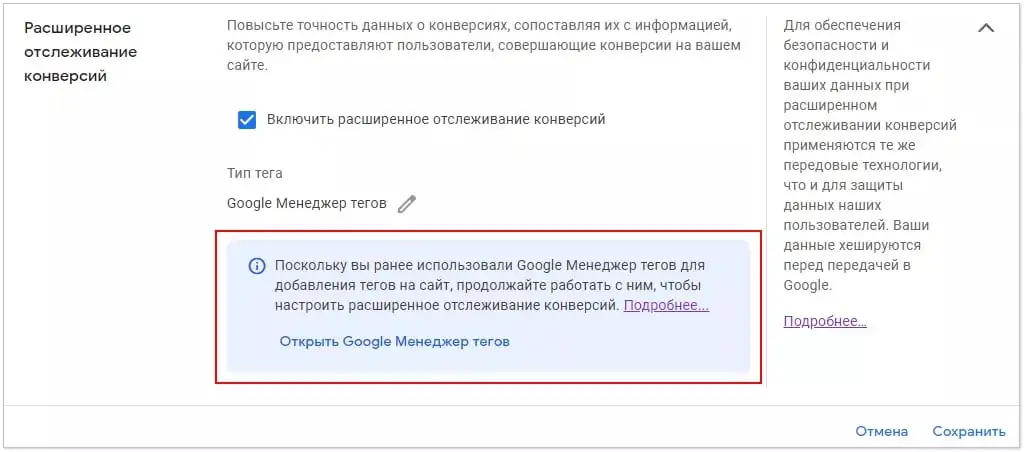
Setting up advanced conversion tracking in Google Tag Manager
Go to the Google Tag Manager interface and proceed with the setup.
There are several options:
- you already have unhashed variables in the DataLayer;
- using data level variables;
- using CSS selectors.
Find and select your Google Ads conversion tracking tag and check the "Include user-provided data from your site" checkbox.
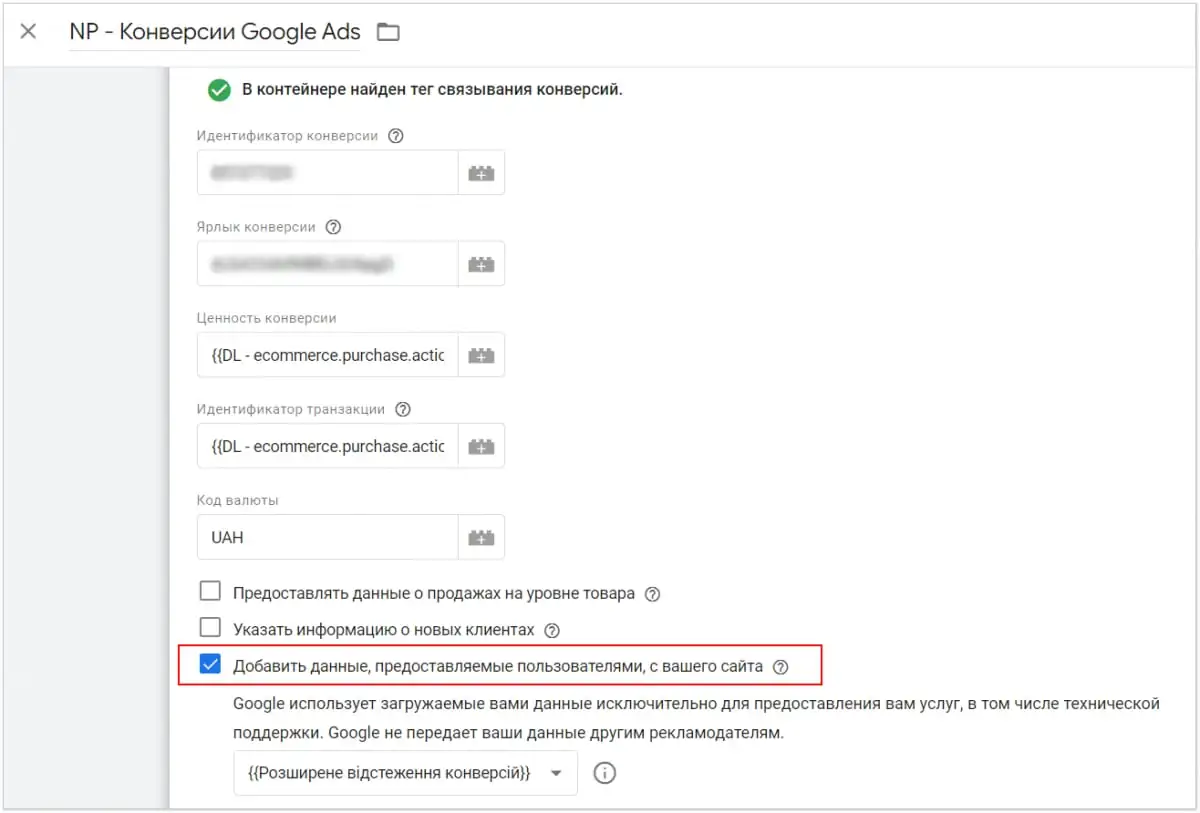
Next, you need to create a new variable.

Give a name and select the variable type (if not selected by default) "User-provided data".
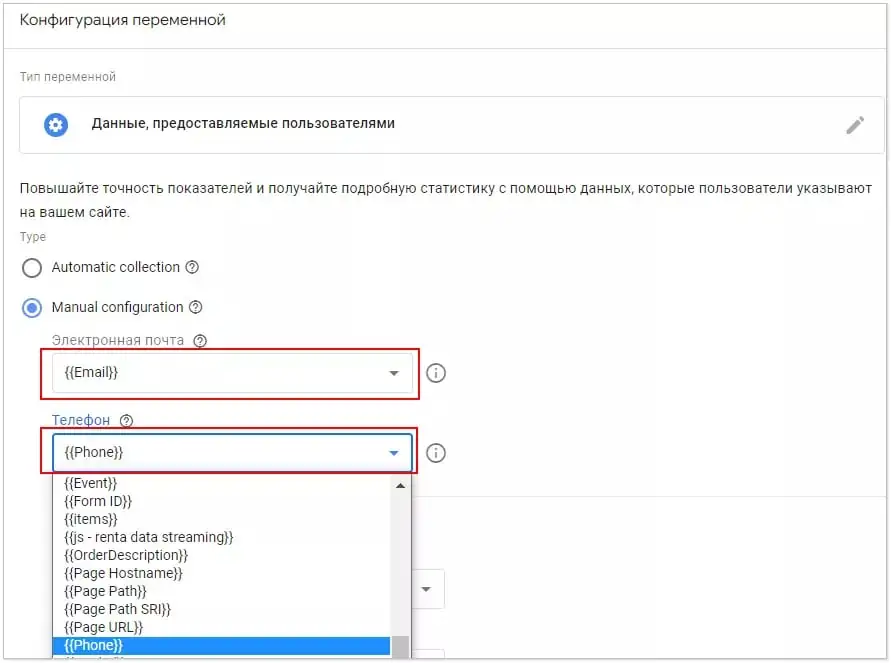
Then select Manual configuration.
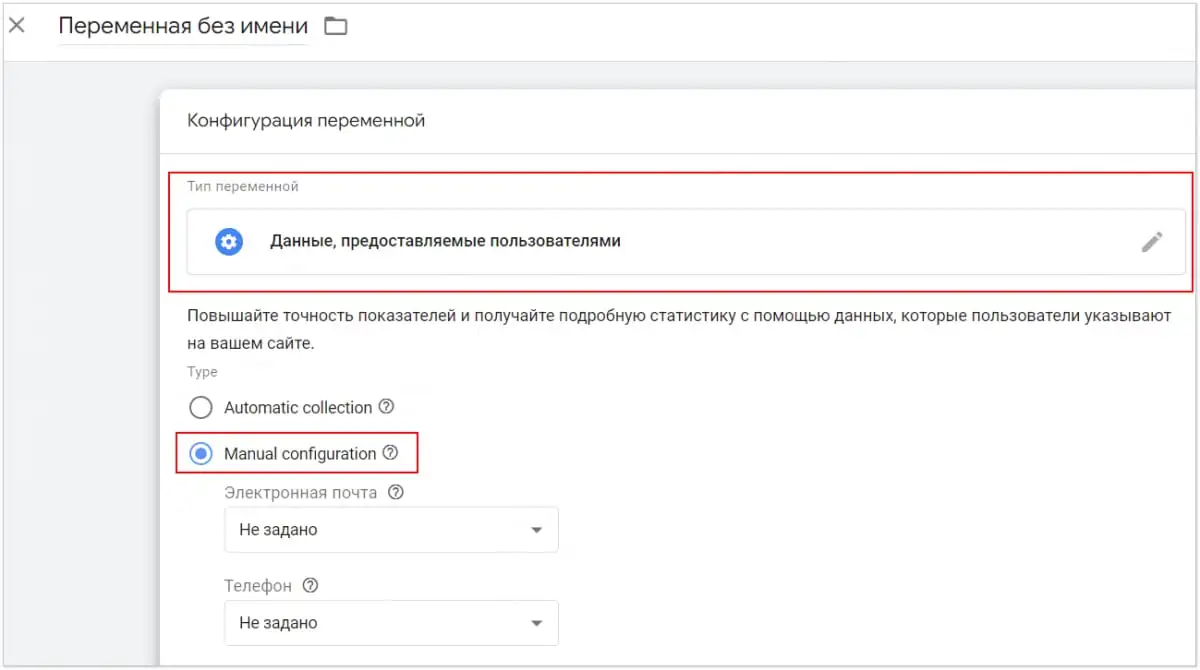
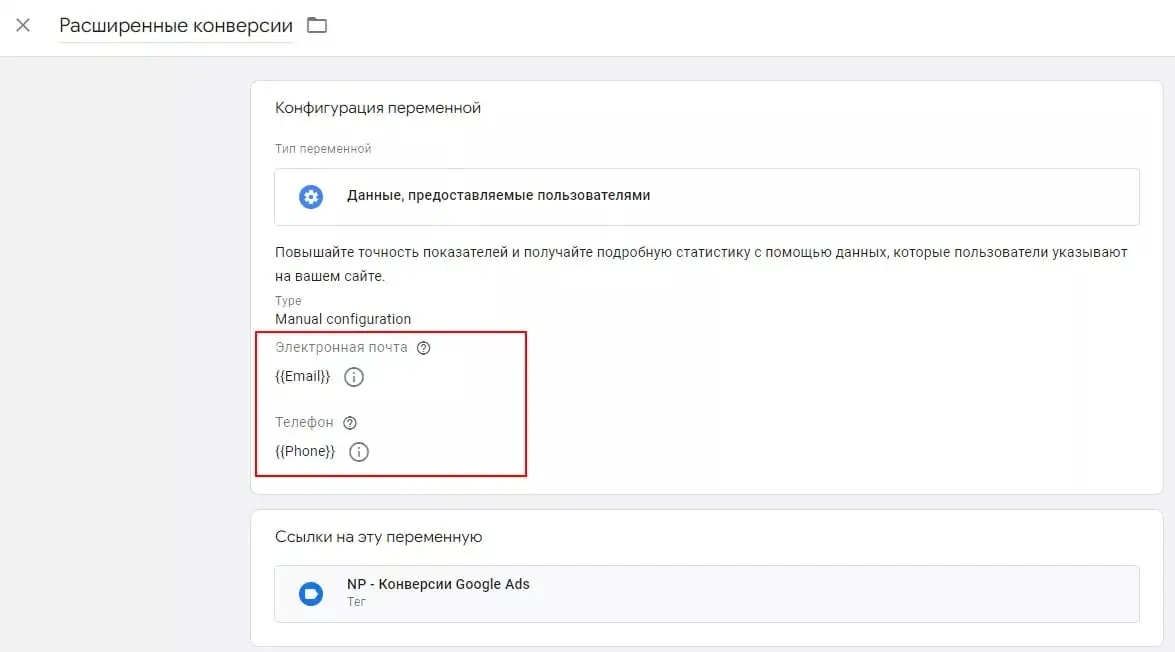
In the list below, you'll see all the user data fields that can be sent using the advanced conversion tracking tag.
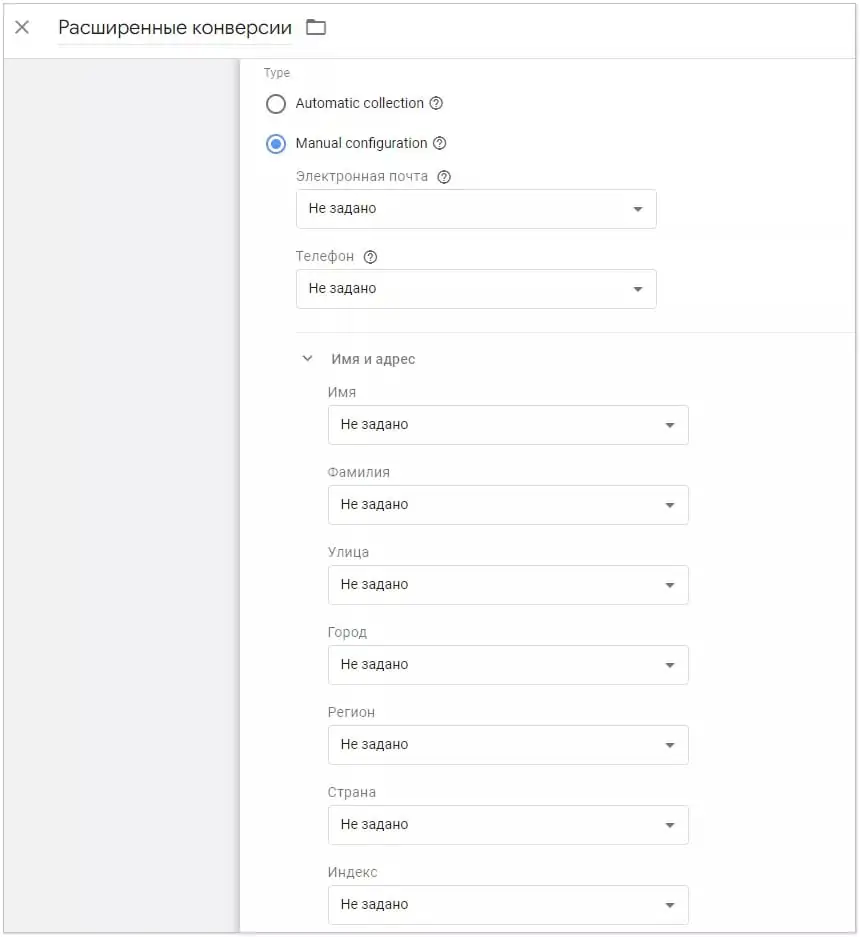
Please note that for each field whose data you want to transfer, you need to create your own variable. That is, two different variables for email and phone number. To do this, let me remind you, select "New variable" in the drop-down menu.
Customization option with DataLayer
If you already have unhashed variables in the DataLayer (whether using CSS selectors or other variable types), you can select them instead of creating new variables.
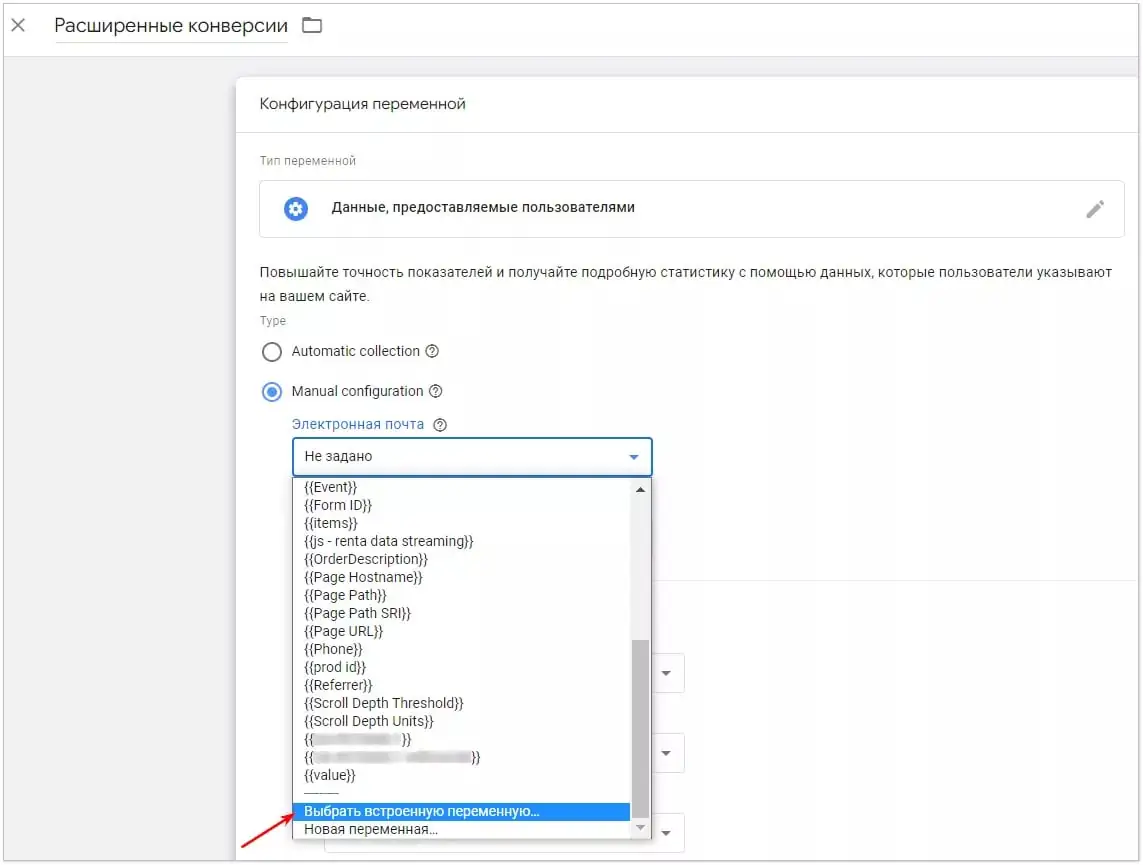
Important! If you're tracking conversions through Google Analytics and importing the data into your Google Ads account, this won't be enough to set up advanced tracking. To make it work, you need to create a new Google Ads conversion action using GTM or a Google tag.
Customization with Data Layer Variables
If you frequently change your website code, especially the formatting or CSS selectors on the conversion page, I recommend using data layer variables. Such changes may break customization of conversion tracking with CSS selectors.
If the necessary variables about user data are missing, use the following terms of reference for programmers.
Terms of Reference for Data Transfer for Advanced Conversion Tracking in Google Ads:
It is necessary to implement the transfer of additional variables on the "purchase" event. The event is fired when the user goes to the "Thank you for the order" page and a successful one-click purchase.
<script
window.dataLayer.push({
event: "purchase"
'email': 'REPLACE_WITH_STRING_VALUE',
'phone': 'REPLACE_WITH_STRING_VALUE'
});
</script
The email and phone variables must be dynamically populated with the email and phone number of the user who made the purchase.
Create variables for email and phone by selecting the Data Layer Variable variable configuration.
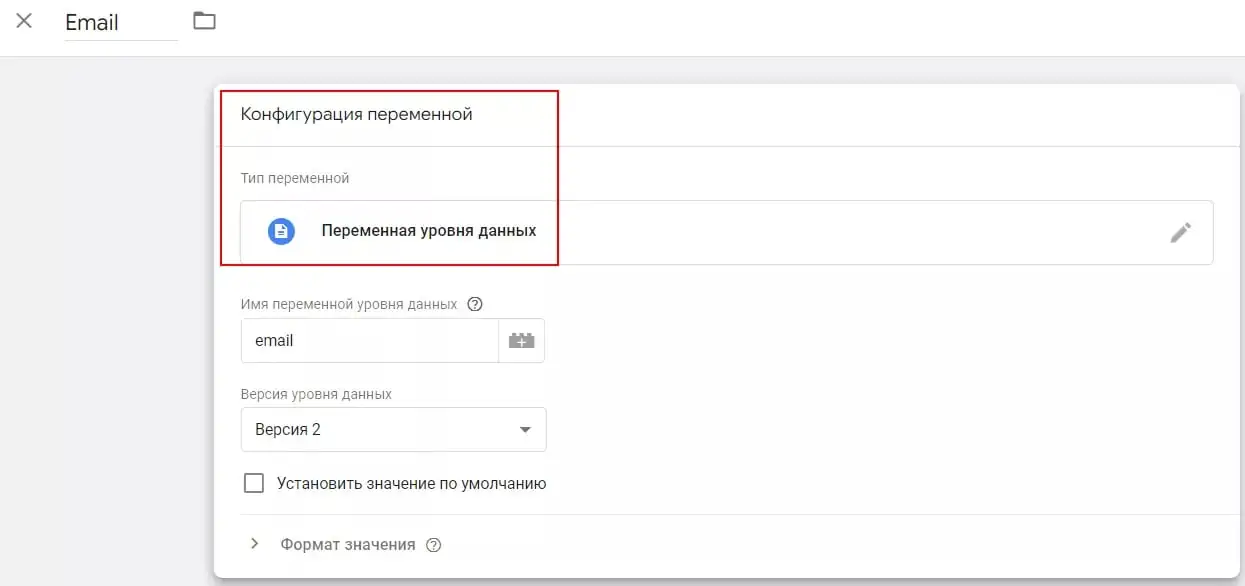
Select data layer variables when setting up advanced tracking.
Customization with CSS Selectors
If the data-level variable option isn't available to you, customize with CSS selectors.
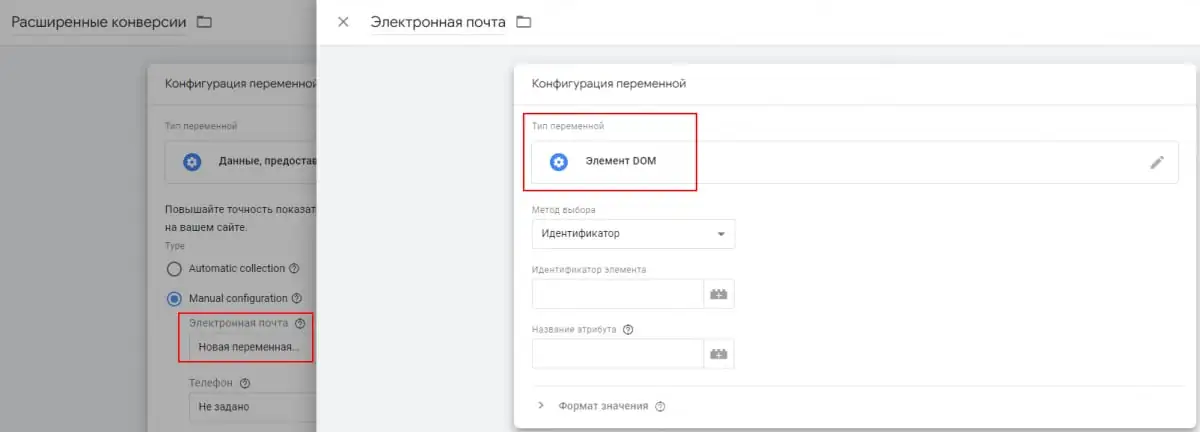
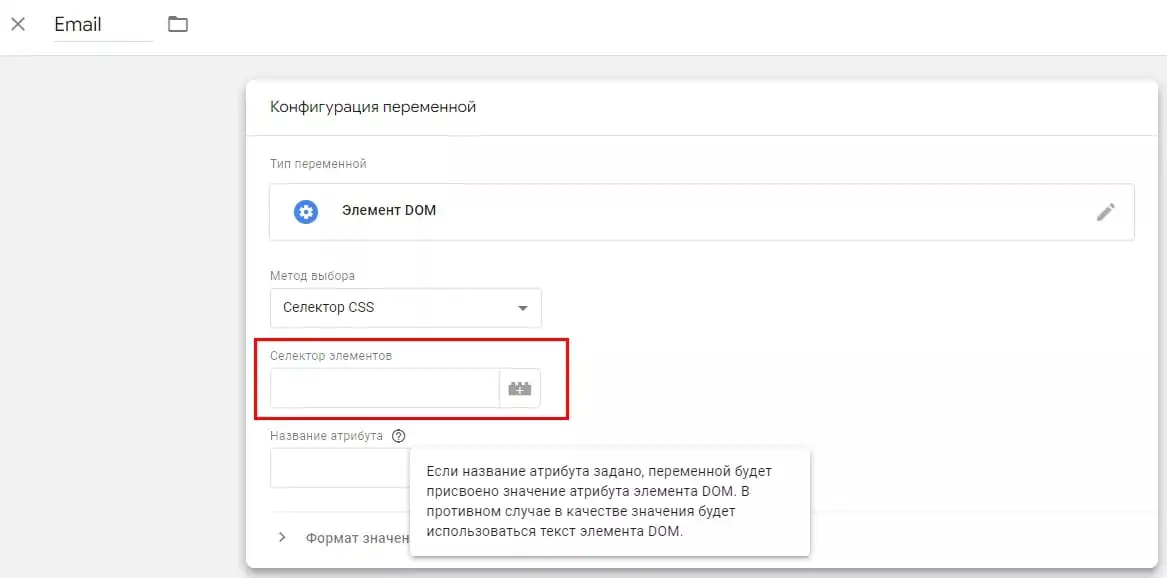
Let's go back to the stage where you started creating new variables for email and phone. After that, select the "Variable Configuration" - "DOM Element" field as the variable type.
Return to the Variable Configuration screen, in the Select Method drop-down list, select CSS Selector.
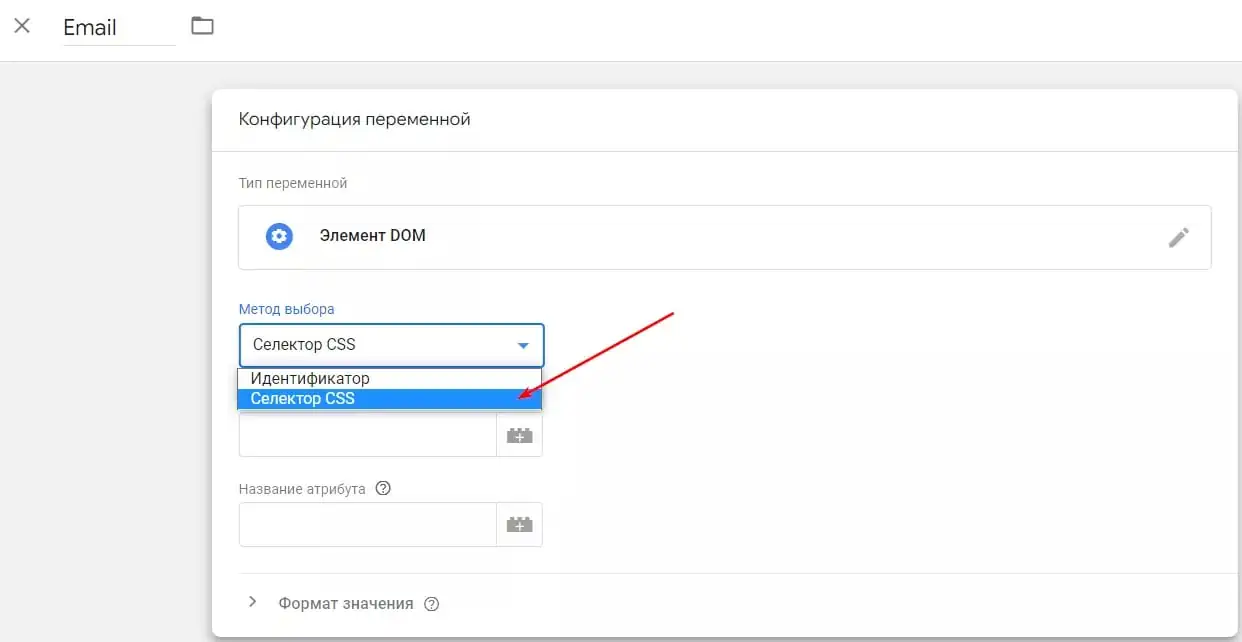
Paste a CSS selector that references your users' data into the "Element Selector" input field. The Attribute Name field can be left blank.
Here's what the variables for advanced conversion tracking will look like, regardless of the setup method you choose.
Save and publish your changes.
Checking the setting
Before publishing, check the settings through the change preview mode in GTM.
If the data is sent correctly, in case of a successful order, you will see the following information
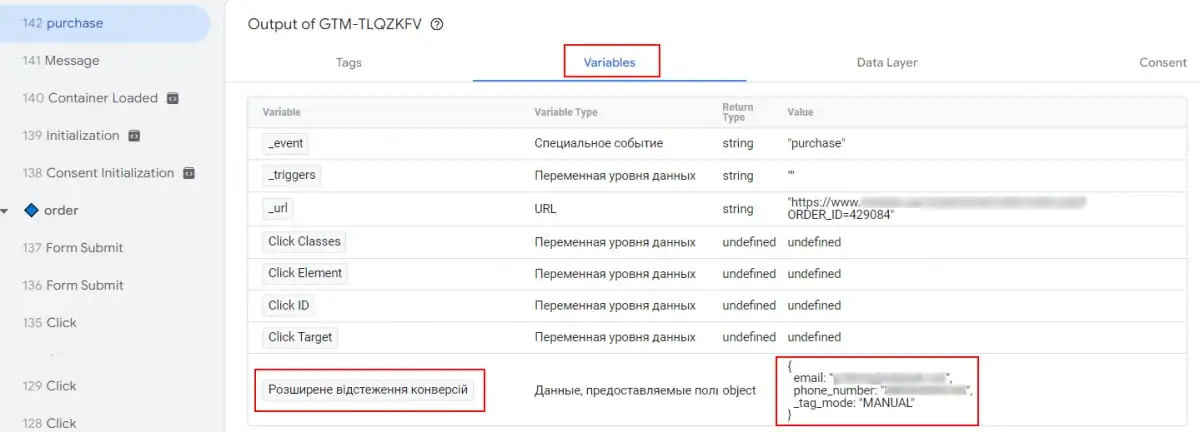
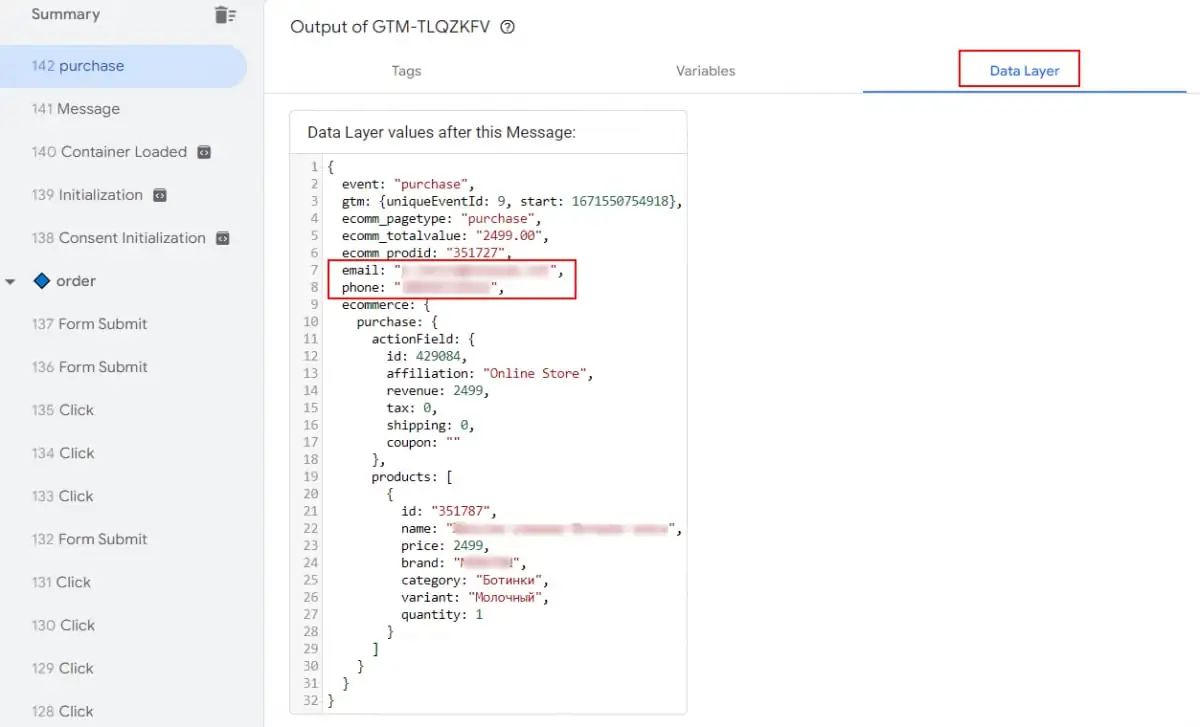
It will take some time for you to see results in your Google Ads account. The first data will enter the system in a few days, and changes in the reports will appear within 30 days.

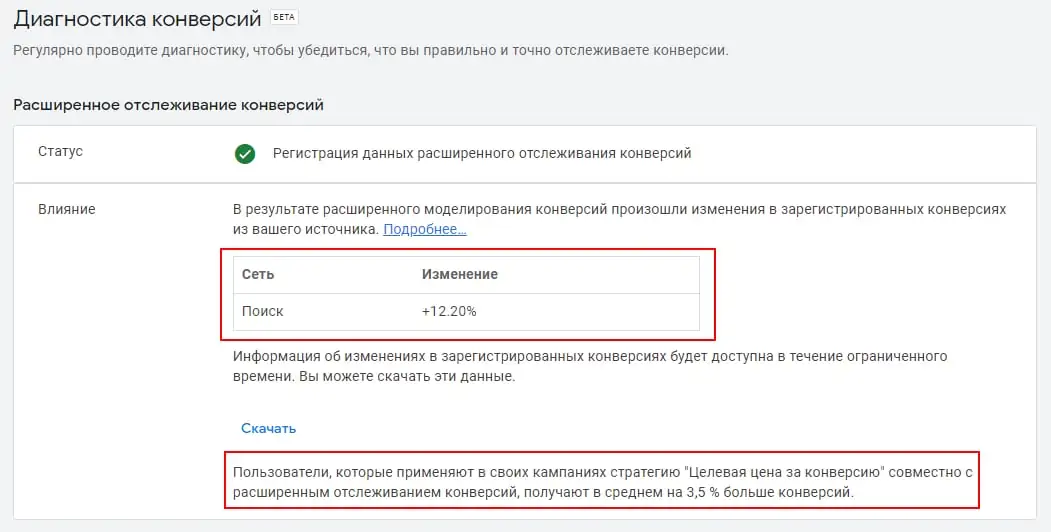
If the data is sent correctly, you will see the status "Conversions are being recorded".

When advanced conversion tracking data is processed, it will appear in reports.

You can view the impact of using this feature on the Diagnostics tab.
Сonclusions
If cookies are blocked on your site, the advanced conversion tracking tag will begin to collect more data and record conversions in your Google Ads account.
This will allow the system to improve your smart bidding strategies and track the more complex ways a visitor interacts with your site across devices.
Thus, the use of advanced conversion tracking will increase the efficiency of optimization and performance of advertising campaigns.
You can set up the function only if you have a conversions tag on your site.
A source: Netpeak.net

