How to set up and optimize dynamic remarketing.
Author - Constantin Nacul
Dynamic remarketing in Google Ads allows you to remind customers of your product, bring them back to your site, and encourage them to make a purchase. It is highly effective due to one of its main advantages—personalization.
In this article, I will explain what dynamic remarketing is, how to collect audience data for it, and provide a detailed guide on how to set up and optimize dynamic remarketing in Google Ads.
What is Dynamic Remarketing?
Dynamic remarketing is a format for displaying banner ads in the Google Display Network (GDN). It enables you to configure "reminder" ads featuring the specific products that users viewed on your site.
In dynamic remarketing, creatives are automatically generated using data transferred from your website. After visiting your site, customers will see these ads on various sites within the GDN, typically on information portals and news sites.
Here’s what dynamic remarketing ads might look like:

Example of dynamic remarketing in Google Ads.

Example of dynamic remarketing in Google Ads.
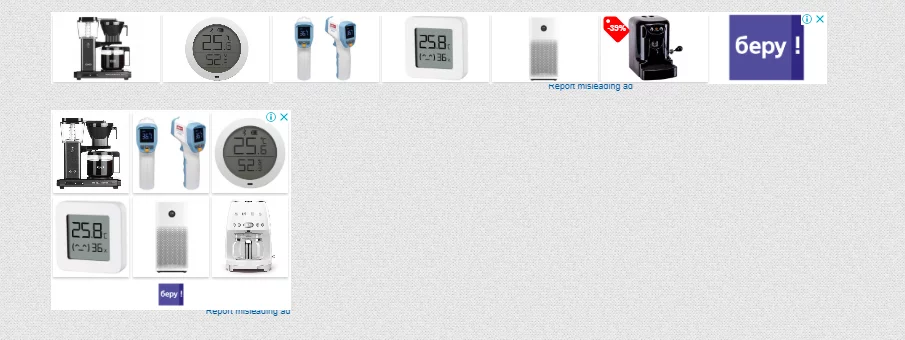
Example of dynamic remarketing in Google Ads.
Difference Between Dynamic Remarketing and Standard Remarketing
Dynamic remarketing in AdWords, unlike standard remarketing, does not display pre-prepared banners; instead, it generates creatives featuring the product that the visitor showed interest in.
For example:
- A customer visited a page with the product "Brand A Phone."
- An individual banner will automatically be created for them, featuring the name, image of the phone, its price, and possibly similar products.
- hen, the user leaves your site and goes to a site connected to the Display Network. There, they will see that same banner with the product they were already interested in.
On the other hand, if you have a standard remarketing campaign running, the user will see a pre-prepared banner displayed to all site visitors— the one you created when setting up remarketing. There’s no guarantee that in this case, the user will remember the viewed product, become interested, and return to the site to make a purchase.
Dynamic remarketing is effective, but it may not be suitable for everyone. I would recommend launching it for companies with many products or services. For small businesses, it’s better to set up standard remarketing. If there are only a few items in the store, it’s much easier to manually create audiences and creatives than to rely on the system and ask the developer to add extra code for generation on the pages.
Advantages of Dynamic Remarketing
Dynamic remarketing has several advantages, the main ones being:
- Personalization. Users always see what interests them specifically. Additionally, dynamic remarketing can notify potential customers about price reductions on products.
- Speed of creation. Setting up dynamic remarketing takes time, but the process of generating creatives and their variations is automatic—you won’t have to spend time on it. The advertising platform will also track which product to show to each user.
- Ease of optimization. There’s no need to create a separate audience or creatives—the system will handle everything for each user.
- Room for experimentation. The system will automatically create hundreds of creatives for each user, allowing you to determine which one the customer responds to best, and then use that data for optimization.
Who is Dynamic Remarketing Suitable For
Dynamic remarketing is suitable for companies where the purchase cycle typically lasts more than one day, or where more than one visit to the site is needed to make a purchasing decision. Otherwise, the sales cycle is short enough that launching dynamic remarketing on Adwords would not make sense.
To find out your purchase cycle, check the “Sequence Length” report in Google Analytics.
In this screenshot, it can be seen that 50% of users place an order on their first visit to the site. This means that the other 50% can be encouraged to return using dynamic remarketing on Adwords. Its use in this case is justified.

Report in Google Analytics "Sequence Length"
Additionally, check out the "Time to Conversion" report – it shows how many days have passed from the first visit to the conversion. This way, you'll know how many days it takes for a user to make a purchase decision.
In this example, it's shown that 64% of website users place an order on the first day of their visit. This means that, in this case, you should focus on dynamic remarketing only if the site receives several thousand visitors per day.

Report in Google Analytics: "Time to Conversion"
I recommend considering dynamic remarketing if over 40% of users make a purchase not on their first visit or if a significant portion of your audience needs more than one day to think it over.
How to Set Up Google Ads Dynamic Remarketing
To launch Google dynamic remarketing, you need to follow these steps:
- Gather your audience and transfer it to Google Ads.
- Create a feed and upload it.
- Create a dynamic remarketing ad.
Let’s go through these steps in order.
Creating an Audience for Google Ads Dynamic Remarketing
Setting up dynamic remarketing in Adwords begins with collecting audience data. You can use two tools for this:
- The Google Ads dynamic remarketing tag.
- Data transmission from Google Analytics.
Both methods work identically. If you have basic skills in using GTM and it’s installed on your site, it’s best to choose the first method. This way, you won’t need to consult a programmer.
Creating a Dynamic Remarketing Audience via Google Ads Tag
In your Google Ads account, go to “Settings,” then “Audience Manager.”

"Audience Manager" in Google Ads
Then click on "Set up audience source."
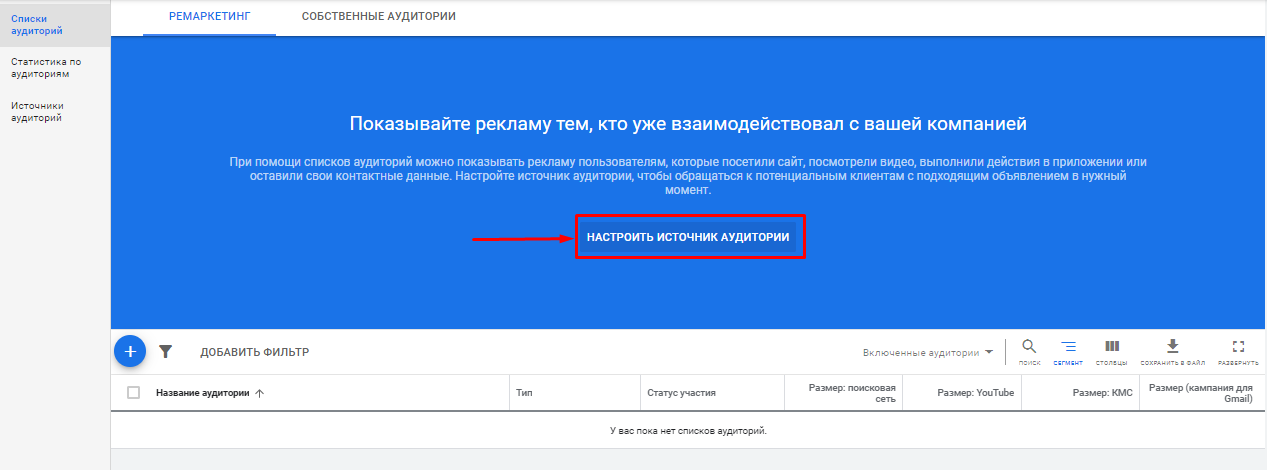
Audience Source Settings in Google Ads
Select "Google Ads Tag" and click "Configure Tag."

Audience Source Settings via the Remarketing Tag
Now, it is necessary to specify that the actions users take on the site will be transmitted. Further down, you need to indicate the type of business; in our example, it is “Retail.”
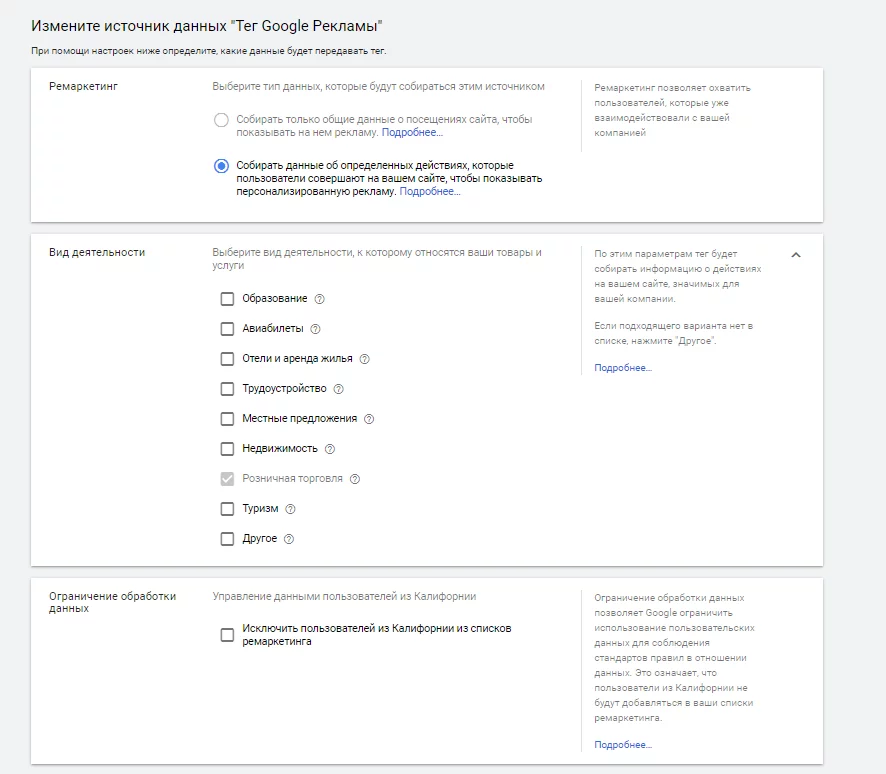
Data collection about visitors in the remarketing tag
Scroll down and click "Save and Continue."
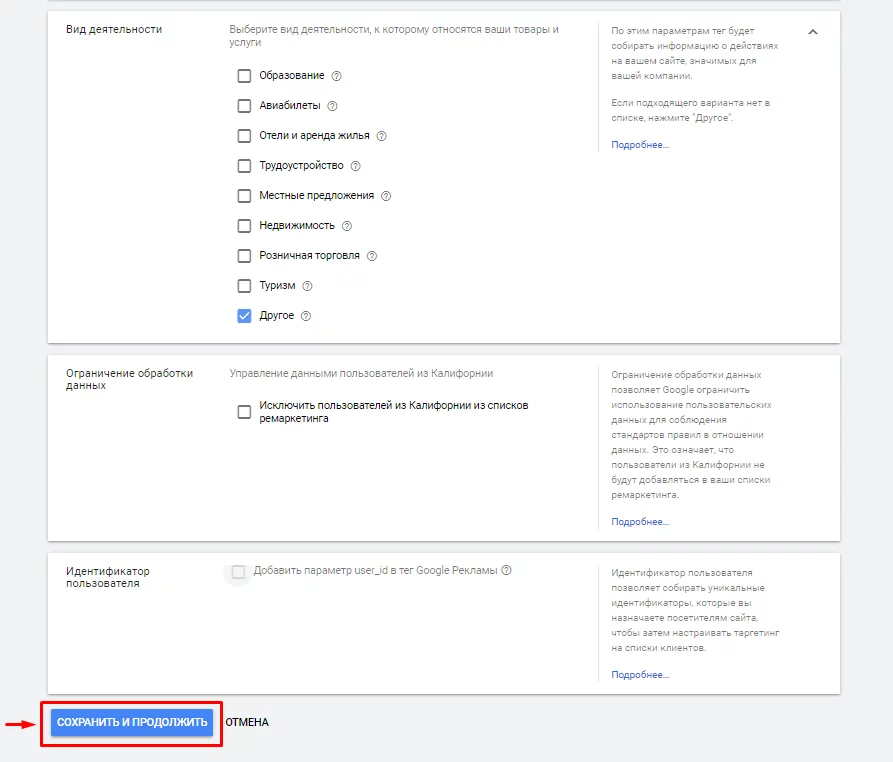
Saving Remarketing Tag Settings
The system will offer one of the methods for installing the tag; select the loading method through Google Tag Manager (GTM).
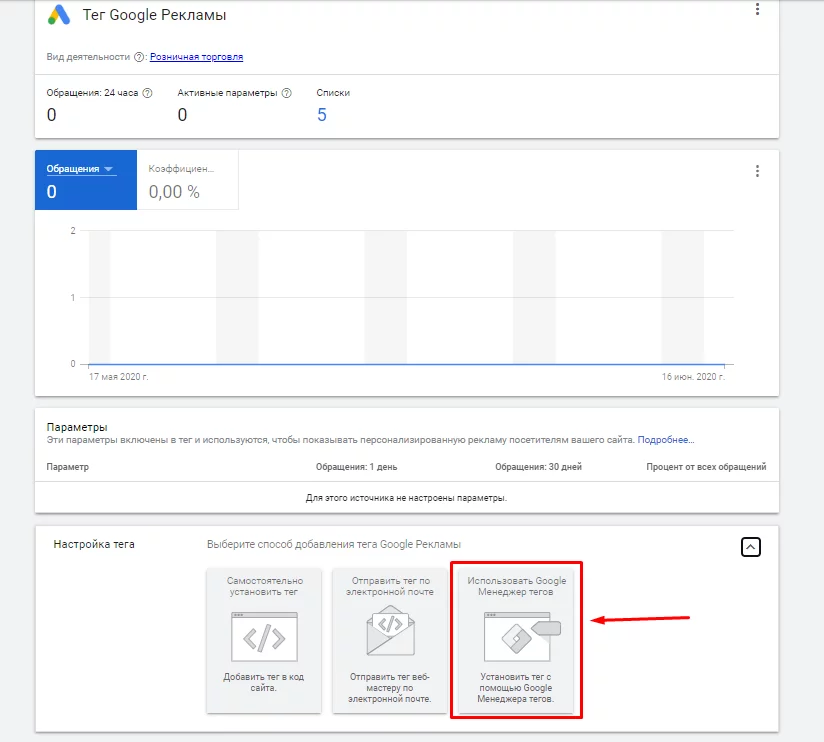
Installing the Remarketing Tag via GTM
The Conversion ID will appear—copy it.
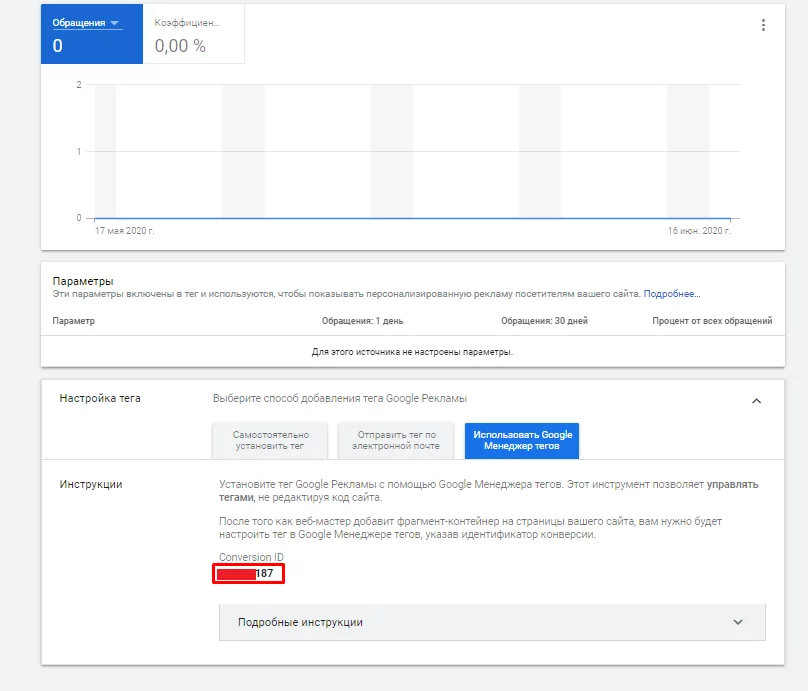
Event ID for the remarketing tag in Google Ads
Now, go to the Google Tag Manager interface. Google Tag Manager's dynamic remarketing will later load the necessary code to track product views by the user.
In the GTM interface, go to the "Variables" tab and click on "Create." These variables will transmit all the data about the product the user viewed.
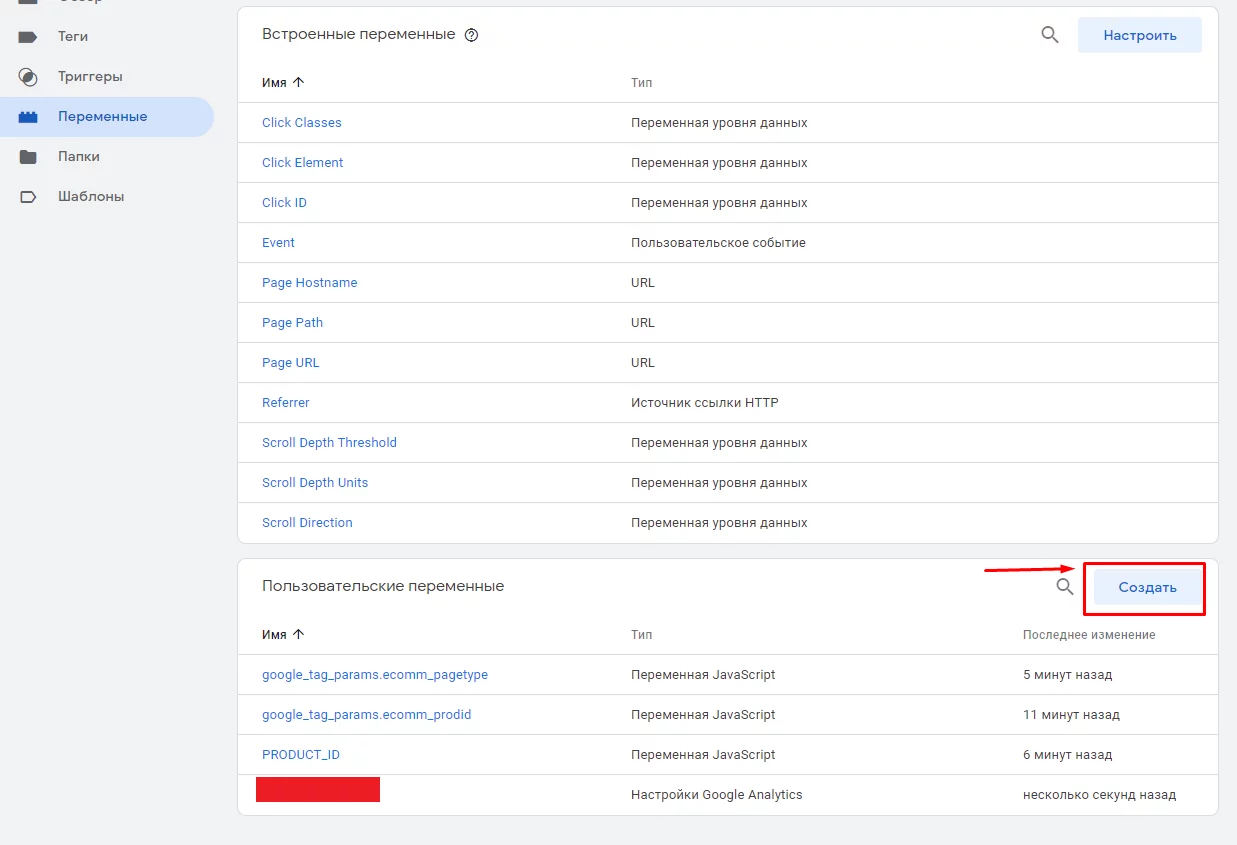
Creating a New Parameter in GTM
Give a name for the variable, I will write google_tag_params.ecomm_prodid. Then select the parameter type.
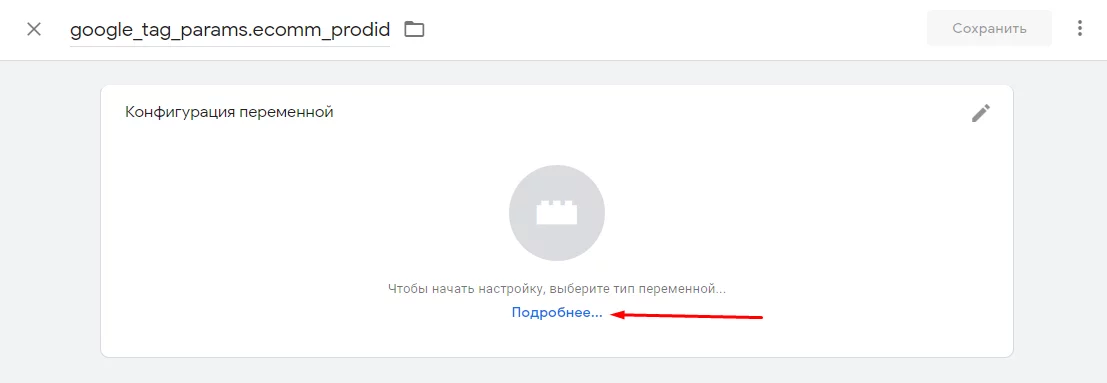
Choosing the Tag Type in GTM
Set the type to "JavaScript Variable," as only this allows you to retrieve data from the JavaScript code on the site.
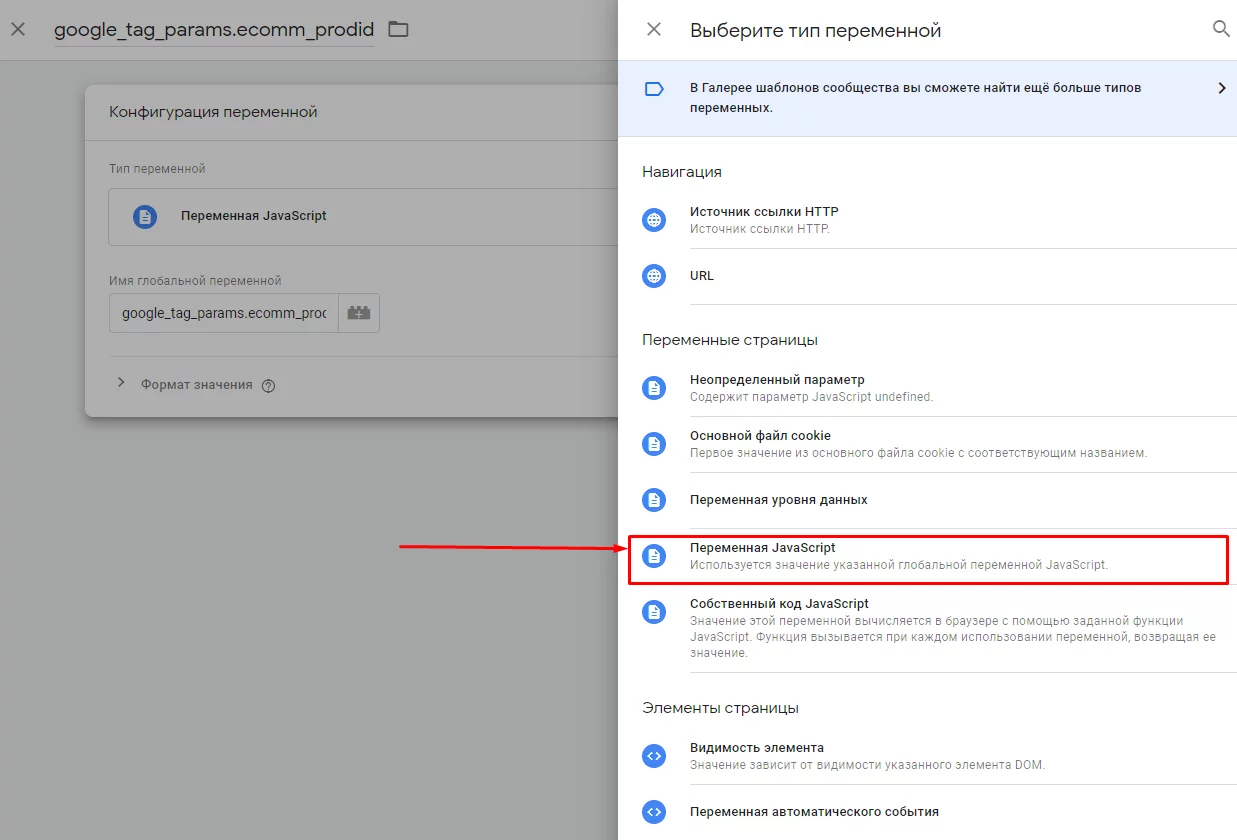
Choosing the JavaScript Variable
In the example, I set the value to google_tag_params.ecomm_prodid, which is one of the parameters intended for retail websites. As you remember, this is the type of business I chose. You can find all the necessary values in the Google Help. in the Google support documentation.
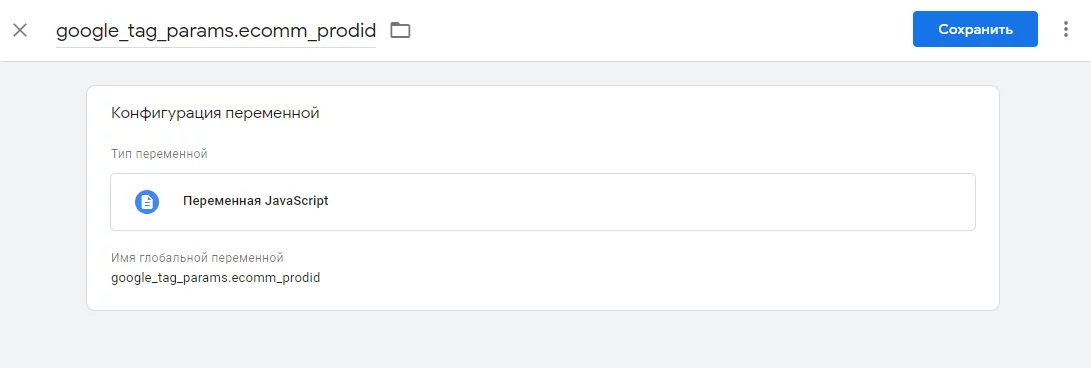
The created JS parameter in GTM
Similarly, create other variables needed to change the configuration of GTM's operation, as it does not see them by default:
- google_tag_params.ecomm_pagetype;
- google_tag_params.ecomm_totalvalue.
You can check the correctness of the created variables in preview mode. You will find it at the top of the Google Tag Manager interface.
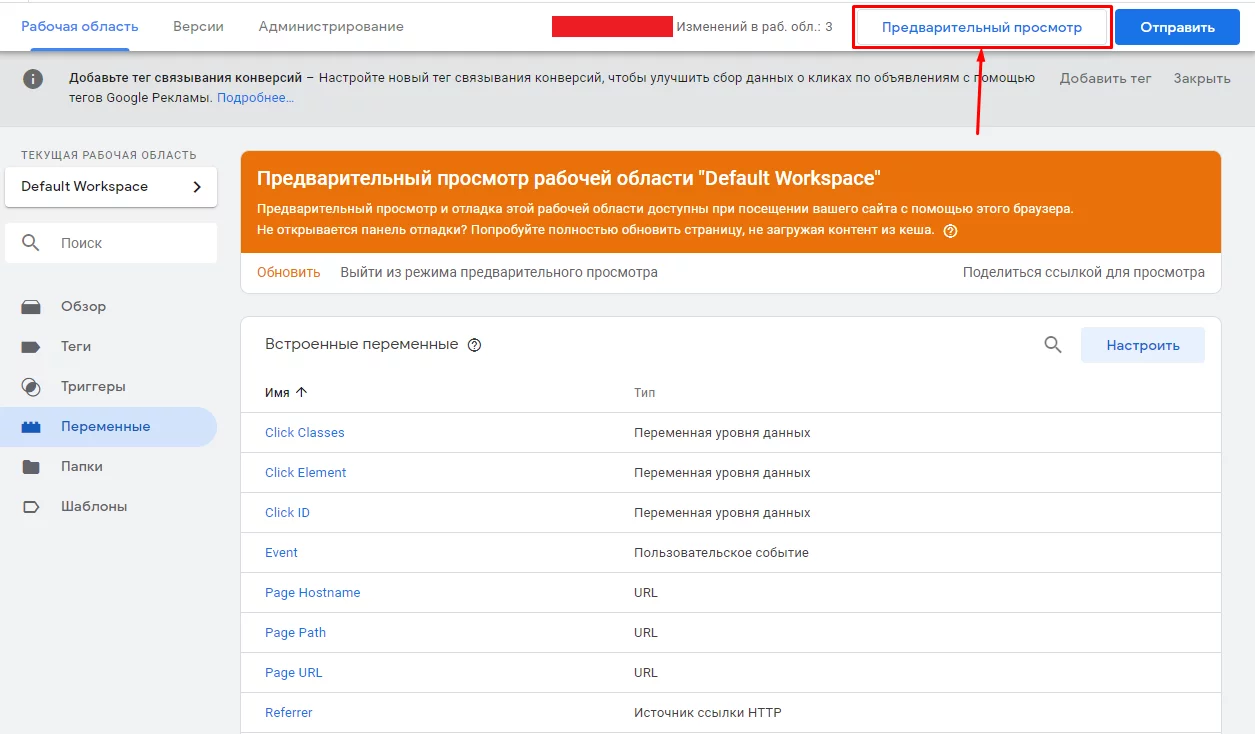
Preview mode in GTM
Go to the website and view any product. In the GTM window, under the Variables tab, you will see the necessary data and the values they transmit for that page.
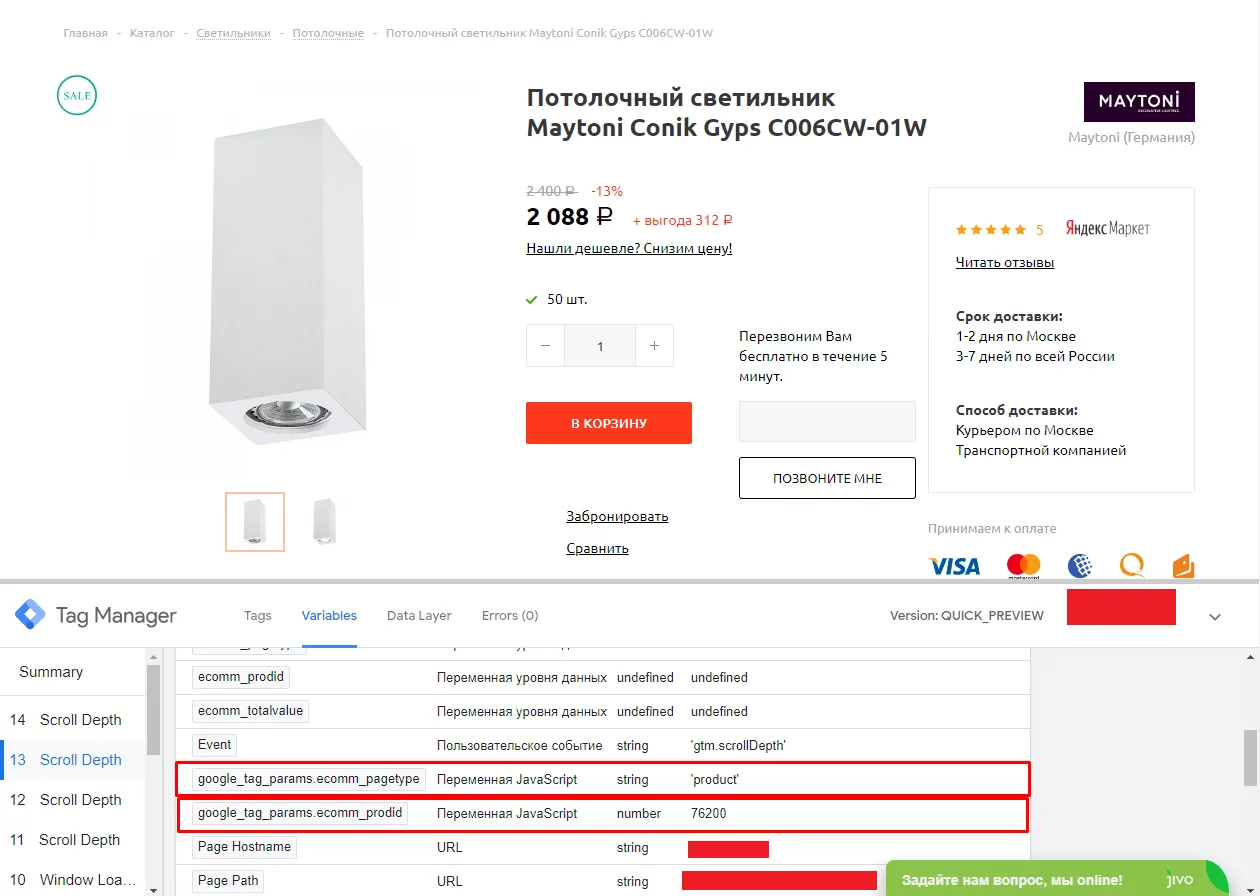
Checking the configured tag in GTM's preview mode
Congratulations, you have set up the necessary variables to capture data; now you just need to create a tag that will send this data. To do this, go to the "Tags" tab.
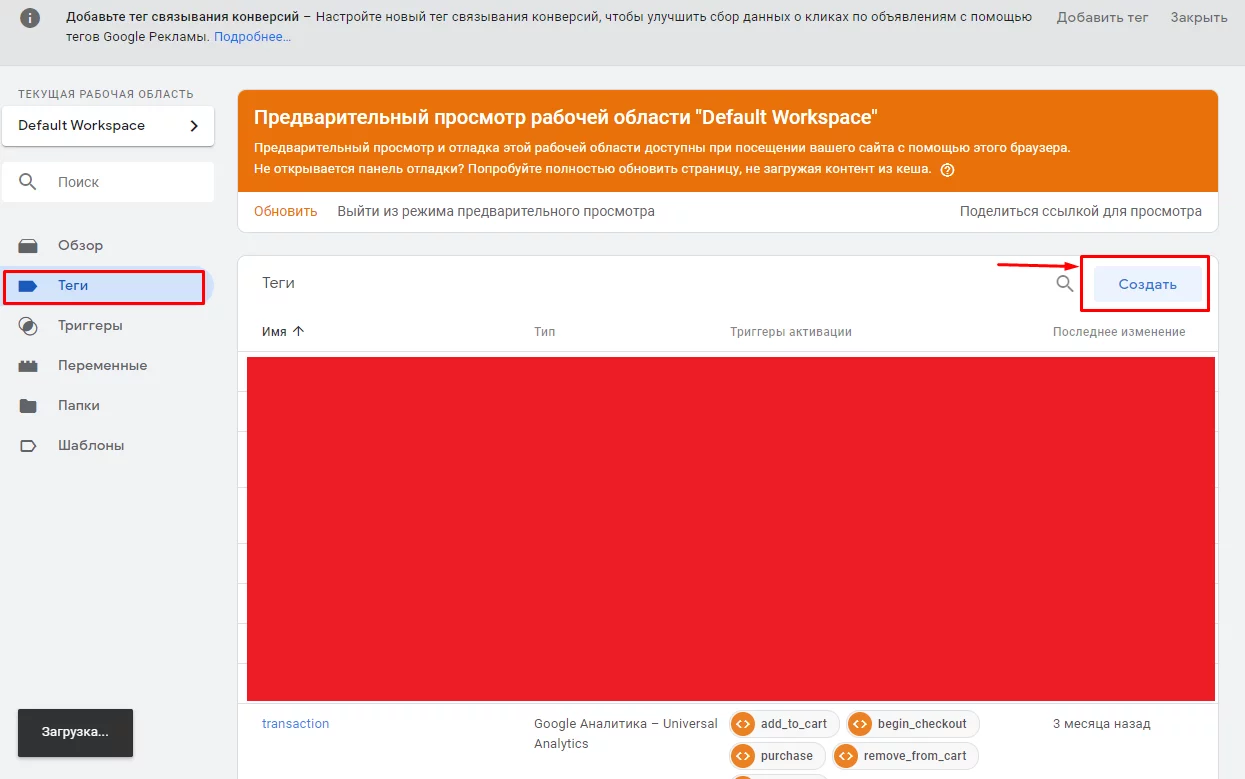
Creating a new tag in GTM
Give it a name and select the tag type.
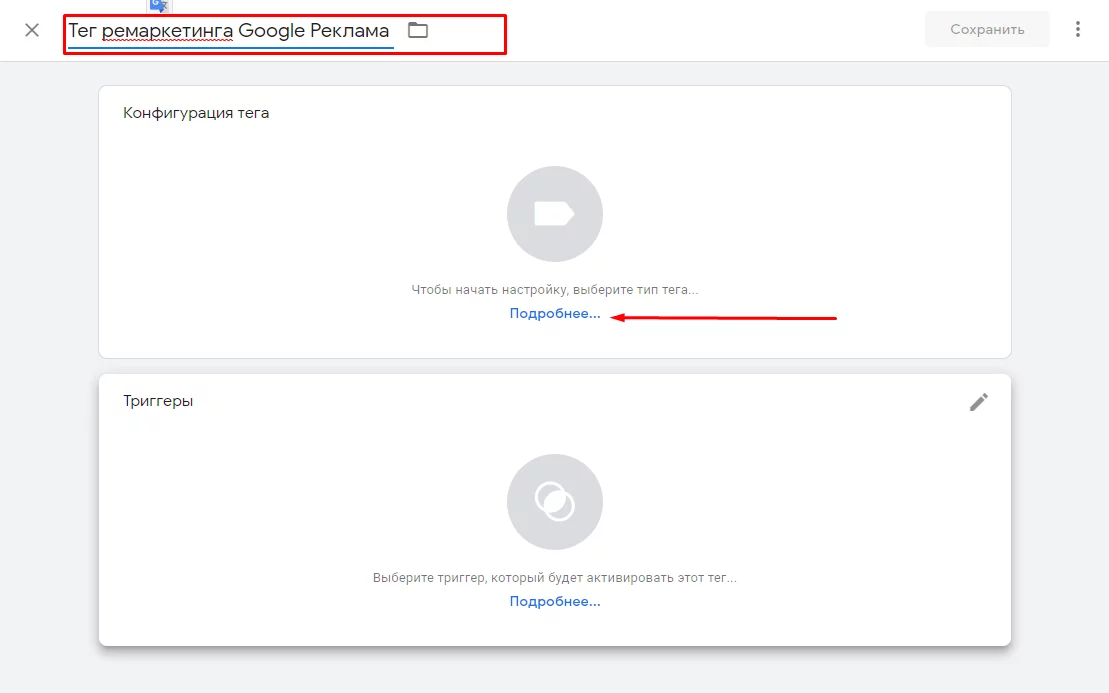
Choosing the tag configuration in GTM
Select the type "Remarketing in Google Ads."
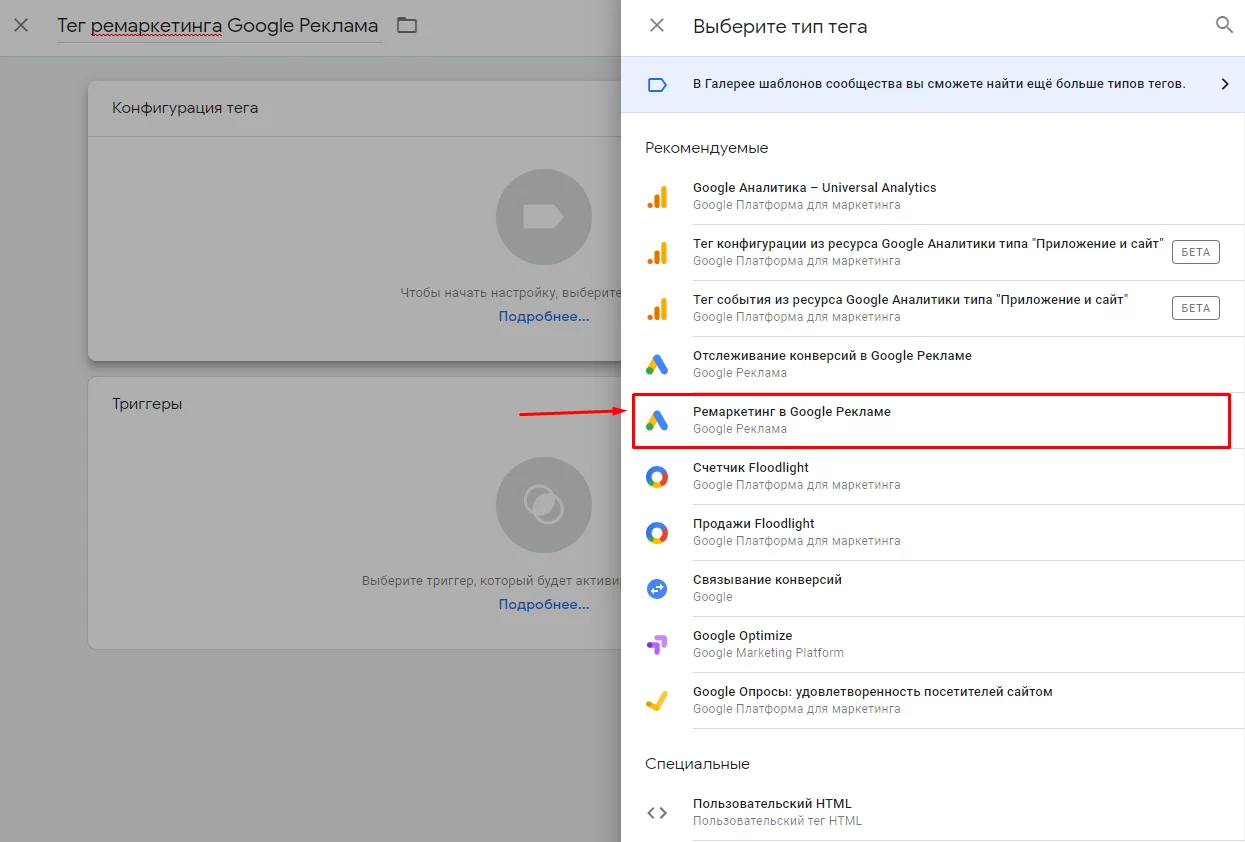
Configuring the dynamic remarketing tag in GTM
Now enter the Conversion ID you copied earlier from the Google Ads interface, and at the bottom of the settings specify the custom variables you have already set up.
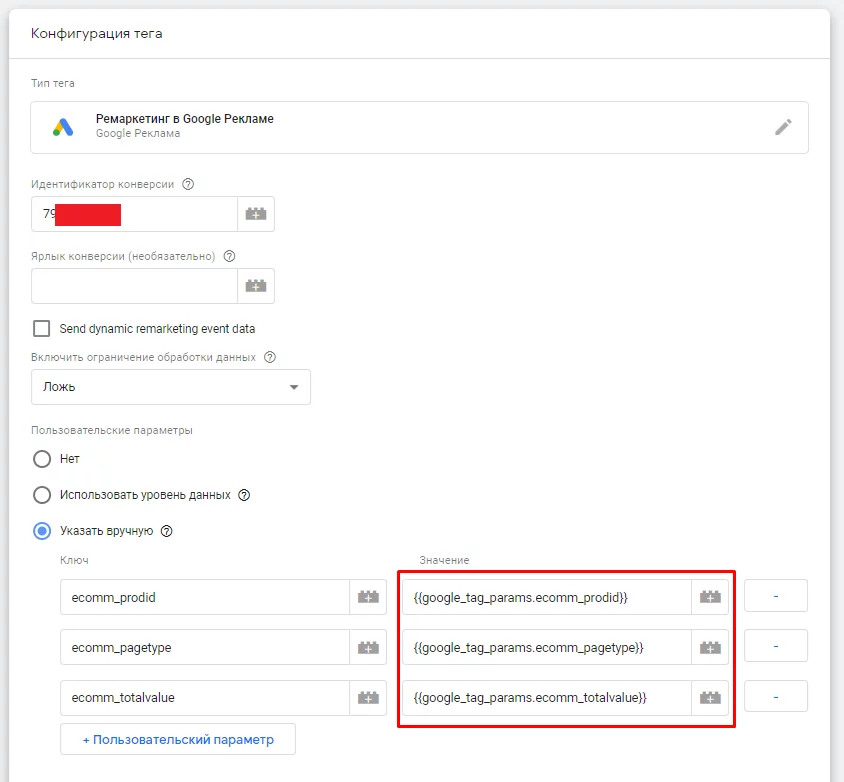
Entered custom parameters for the remarketing tag in GTM
When you enter {{ the system will suggest which variables have already been created.
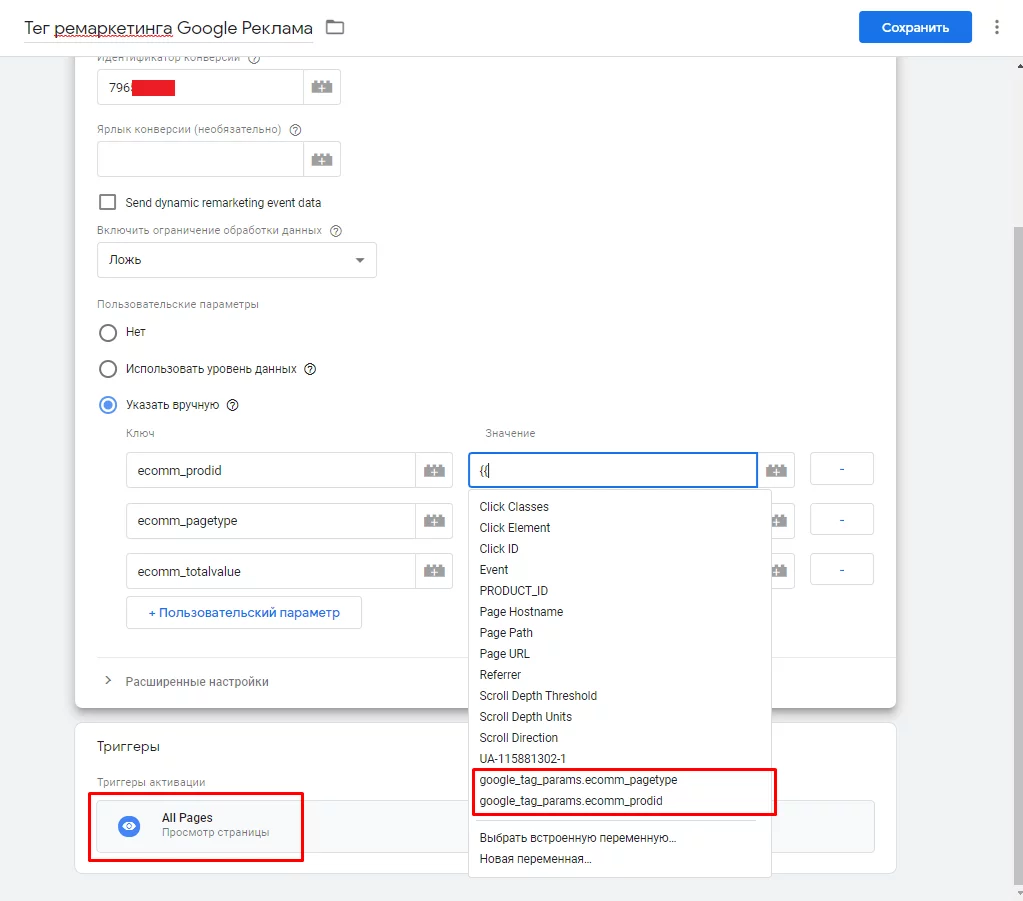
Hints for selecting variables in GTM
Select the tag “All Pages” (publishes the code on all pages of the site) and publish a new version of GTM.
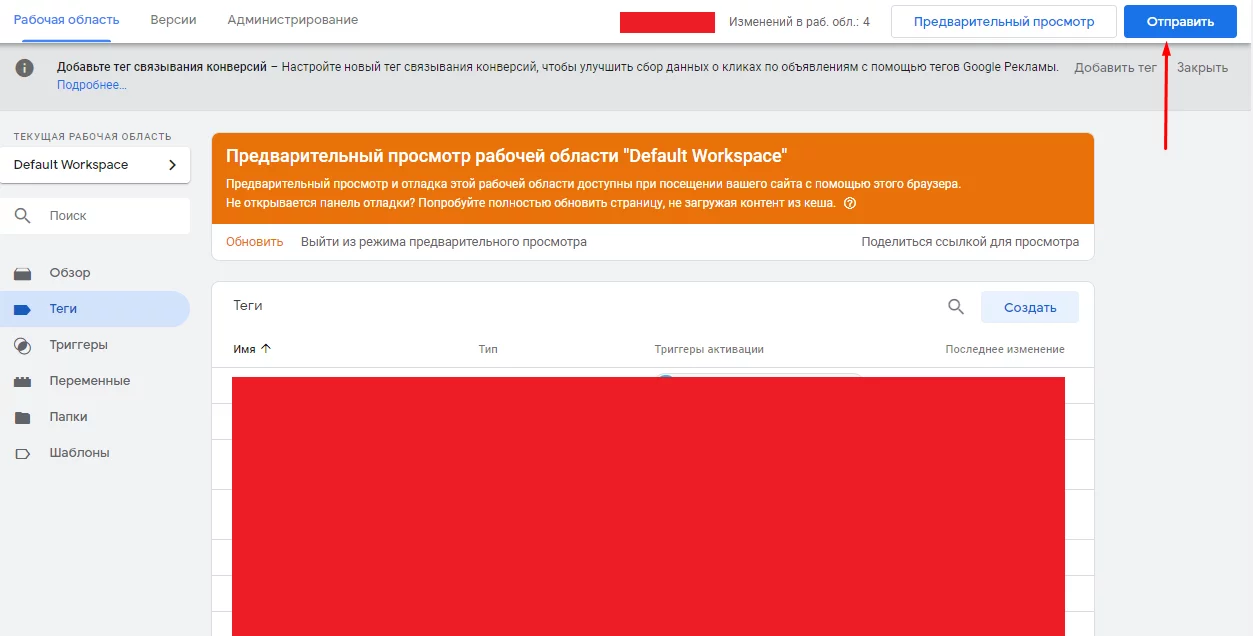
Publishing a new version in GTM
If everything is correct, the Google Ads tag will soon start capturing parameters and their values. If the data does not appear (indicated as 0 for 24 hours), you likely have an error somewhere.
A little further down, in the same tab, you can see what data the dynamic remarketing tag is receiving and use it if necessary.
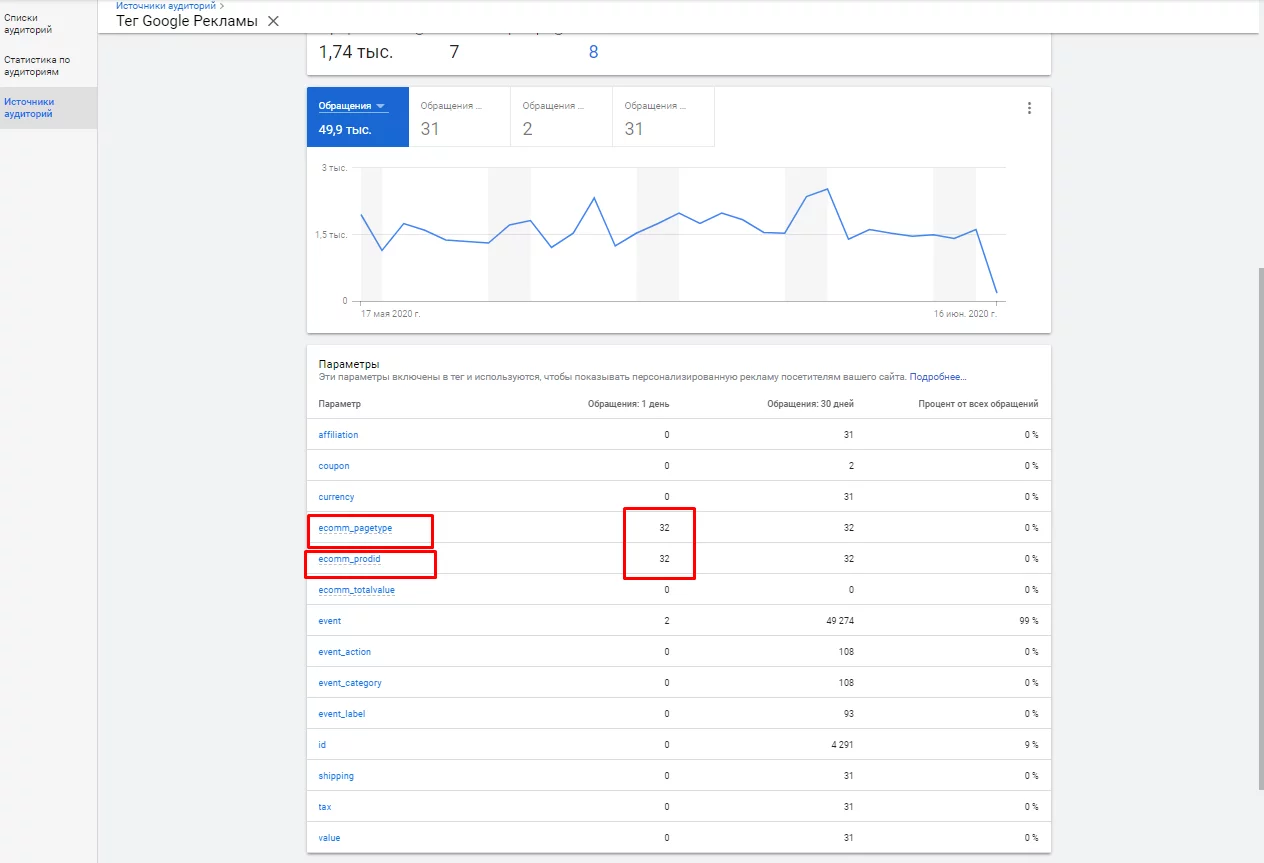
Data on product visits in the Google Ads remarketing tag
Next, in the Google Ads interface, create an audience based on this data. To do this, go to the "Audience Manager," navigate to "Audience Lists," and click “+” (Add).

Creating a remarketing audience in Google Ads
Select "Website Visitors."

Creating a remarketing audience based on the Google Ads tag
You can create a custom audience, for example, users who viewed a product within a specific period.
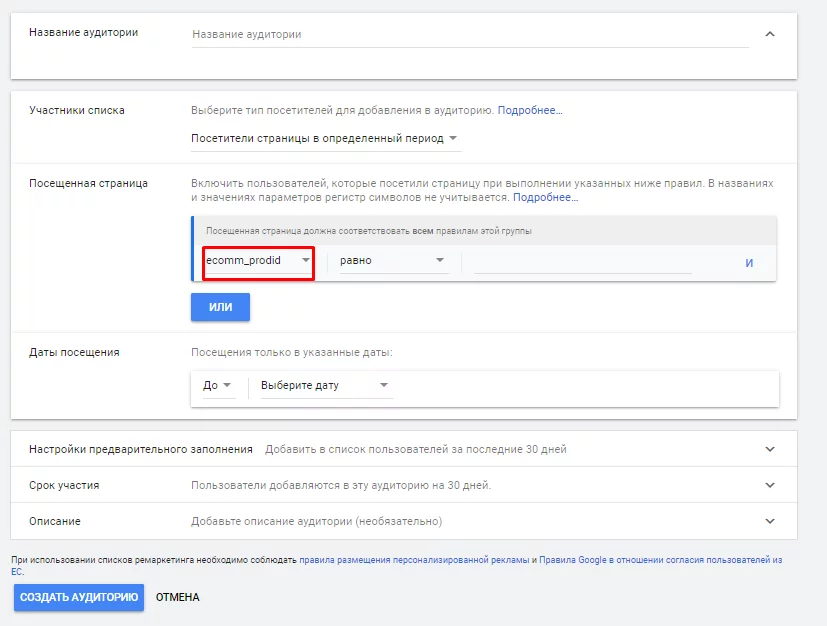
Creating an audience that visited the product with the desired ID
Everything is ready; you can proceed to create the dynamic remarketing feed.
But first, I’ll share the instructions for creating an audience using Google Analytics.
Creating a dynamic remarketing audience with Google Analytics
To transfer data from Google Analytics to Google Ads, go to the "Audience Manager," then to "Audience Source," and establish the connection by clicking the corresponding button.
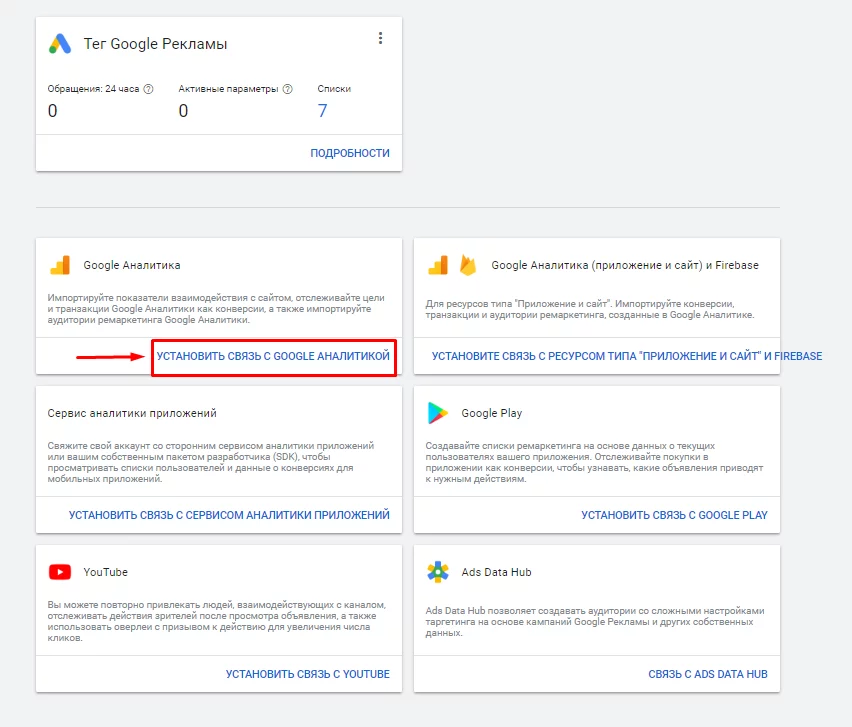
Connecting Google Ads and Google Analytics
Select "Learn more" next to the Google Analytics item.
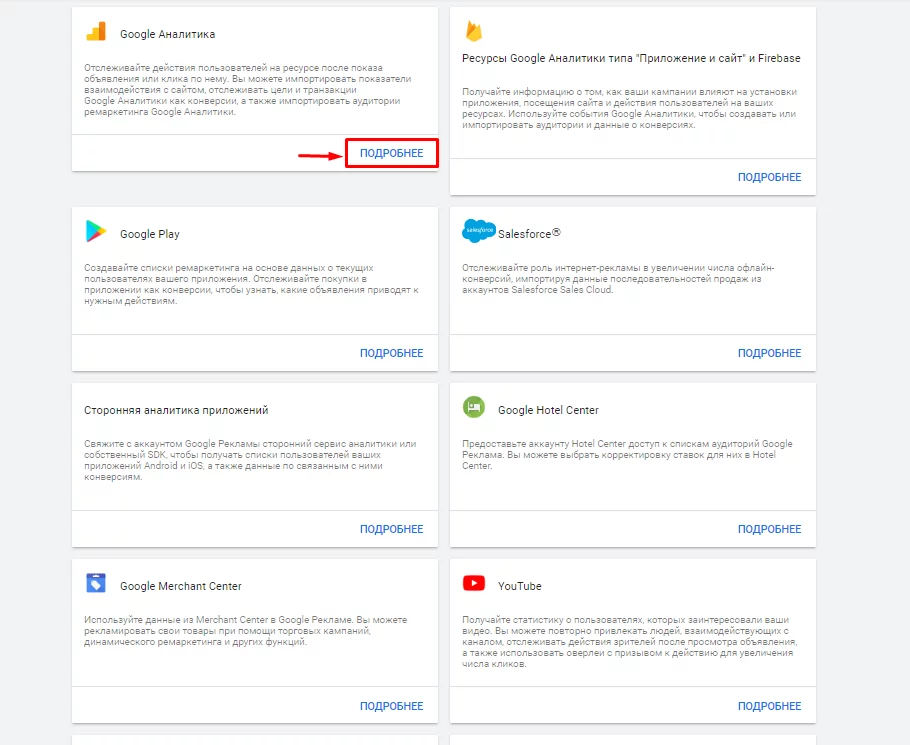
Establishing the connection between Google Ads and Analytics
Choose the desired website account — for which you want to transfer data about the audience. Link it.
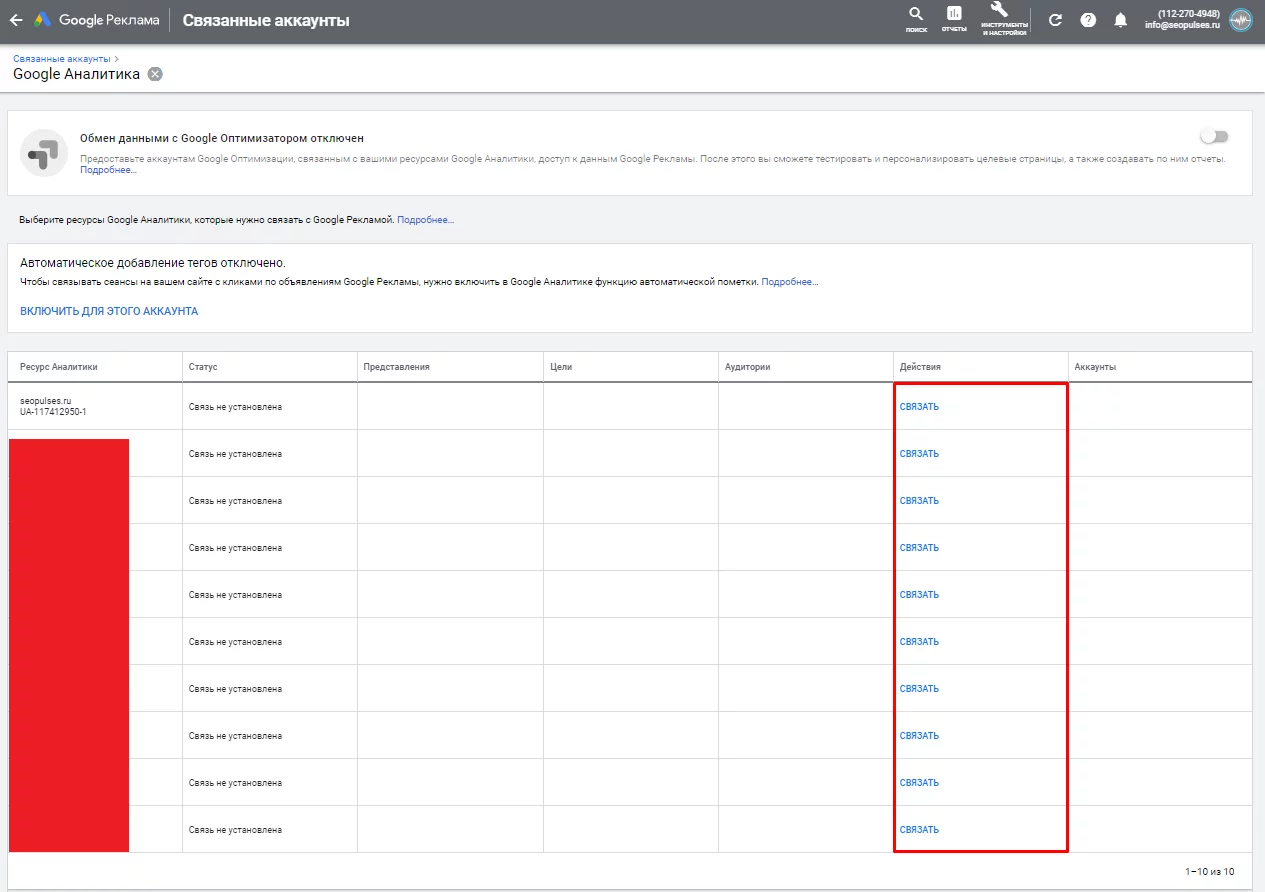
Selecting account data for connecting Google Ads and Analytics
Next, go to the Google Analytics interface. In the “Custom” tab, go to “Custom Dimensions” and click “+Custom Dimension.” This is analogous to setting up variables in GTM that help track user visits to the product page.
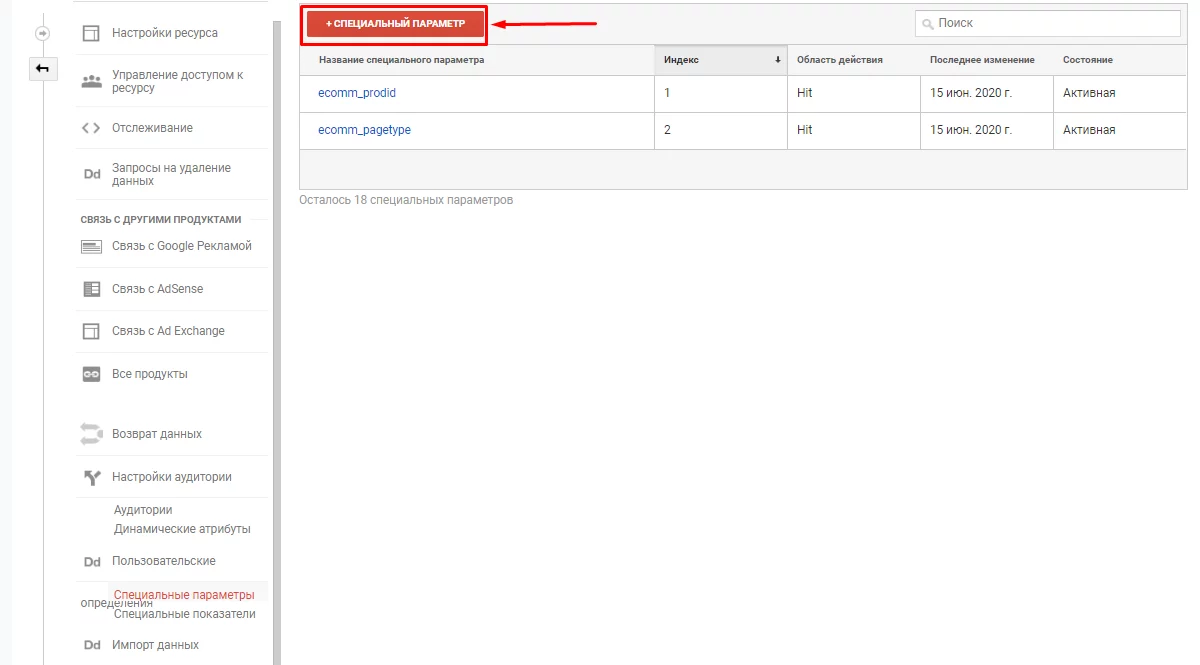
Creating a dimension in Google Analytics
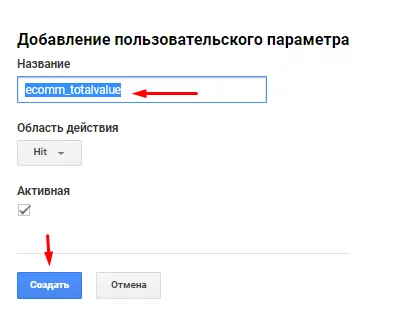
Adding a custom parameter
Add all the parameters needed for your type of business. Remember that you can find them in Google HelpI have selected retail, so I’m using the following values:
- ecomm_prodid;
- ecomm_pagetype;
- ecomm_totalvalue.

Created parameters in Google Analytics
Next, you need to add a special code to the header block on all pages of the site that will transmit these values to the site. You can find this code in Google Help.
You may ask your developer for assistance.
Now you need to create a dynamic attribute in Google Analytics — this is analogous to the dynamic remarketing tag in Google Tag Manager.
To do this, in the “Dynamic Parameters” tab, click on “+Attribute.”
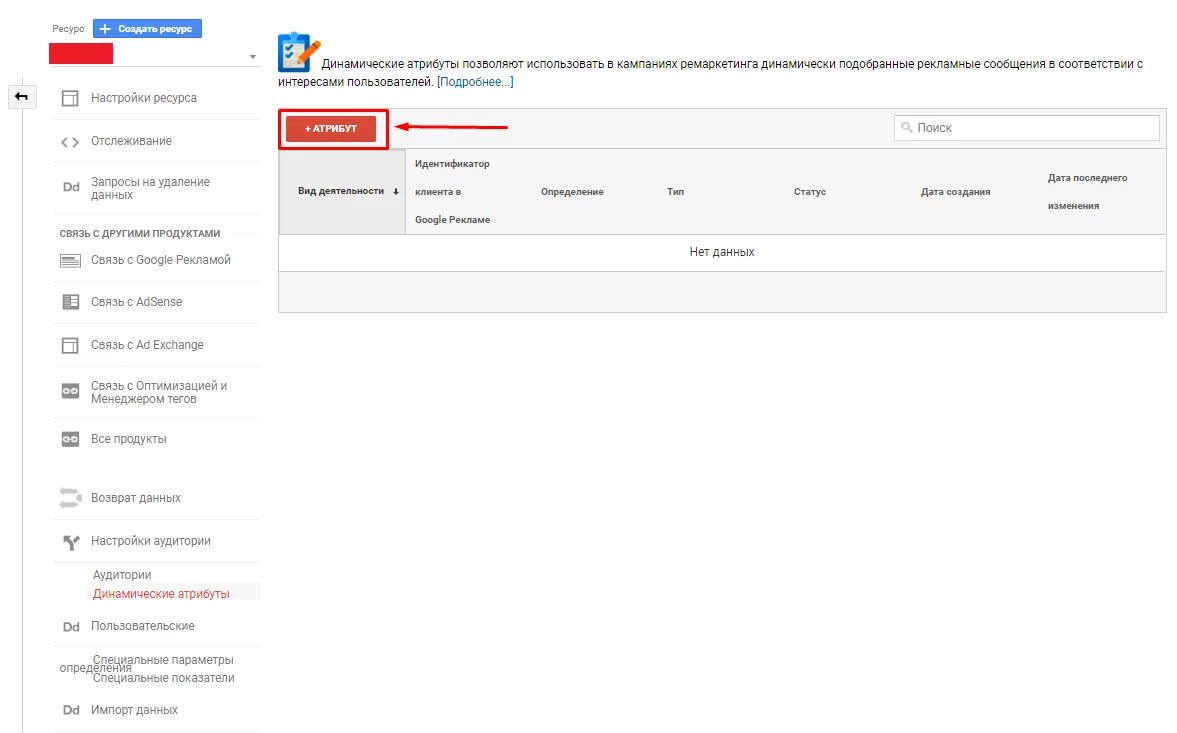
Creating a dynamic attribute in Google Analytics
A menu will open where you need to select the type of business, Google Analytics view, and target Google Ads account.
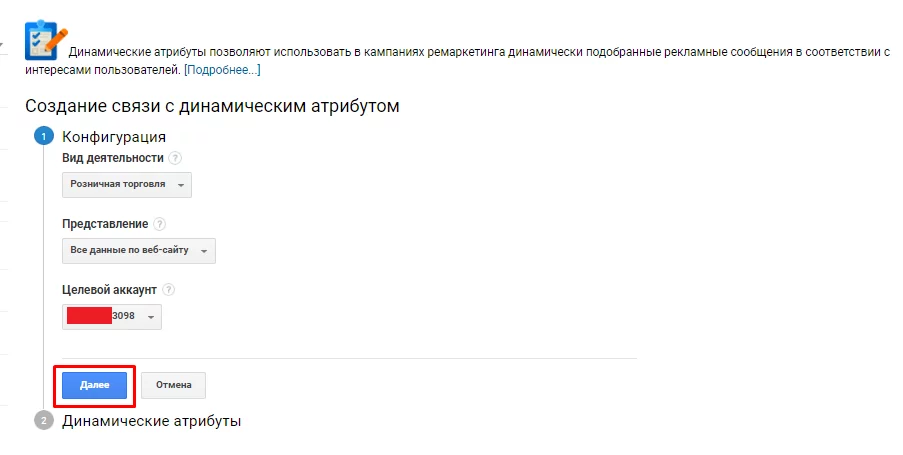
Establishing a connection with the dynamic attribute
Now, in each of the presented attributes, specify the values from Google Analytics that you have set previously. Just a reminder — ecomm_prodid, ecomm_pagetype, and ecomm_totalvalue.
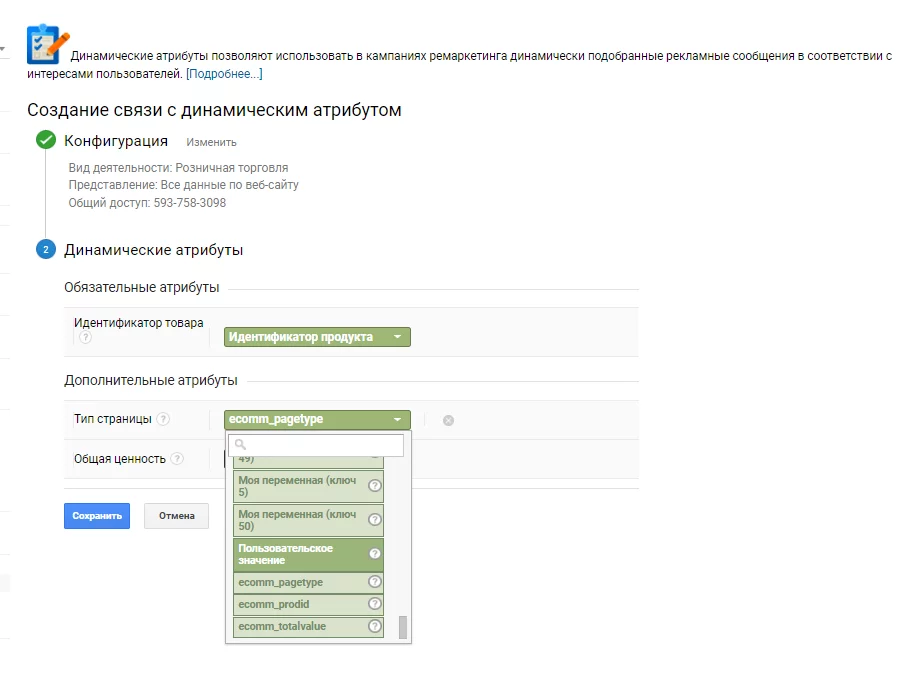
Setting up the dynamic attribute
Now, in the Google Analytics interface, go to the "Admin" tab and navigate to "Audiences."
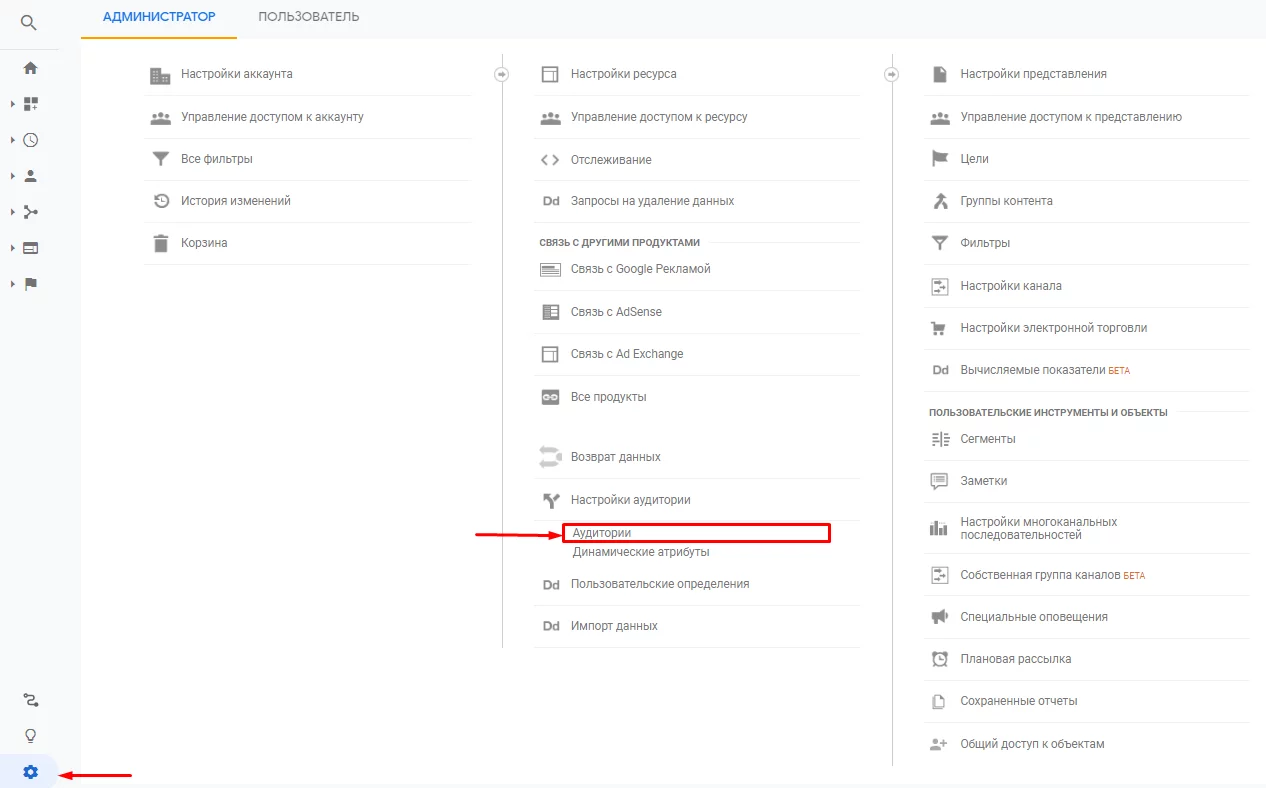
Navigating to "Audiences" in Google Analytics
You can now create dynamic remarketing audiences and choose Google Analytics as the source.
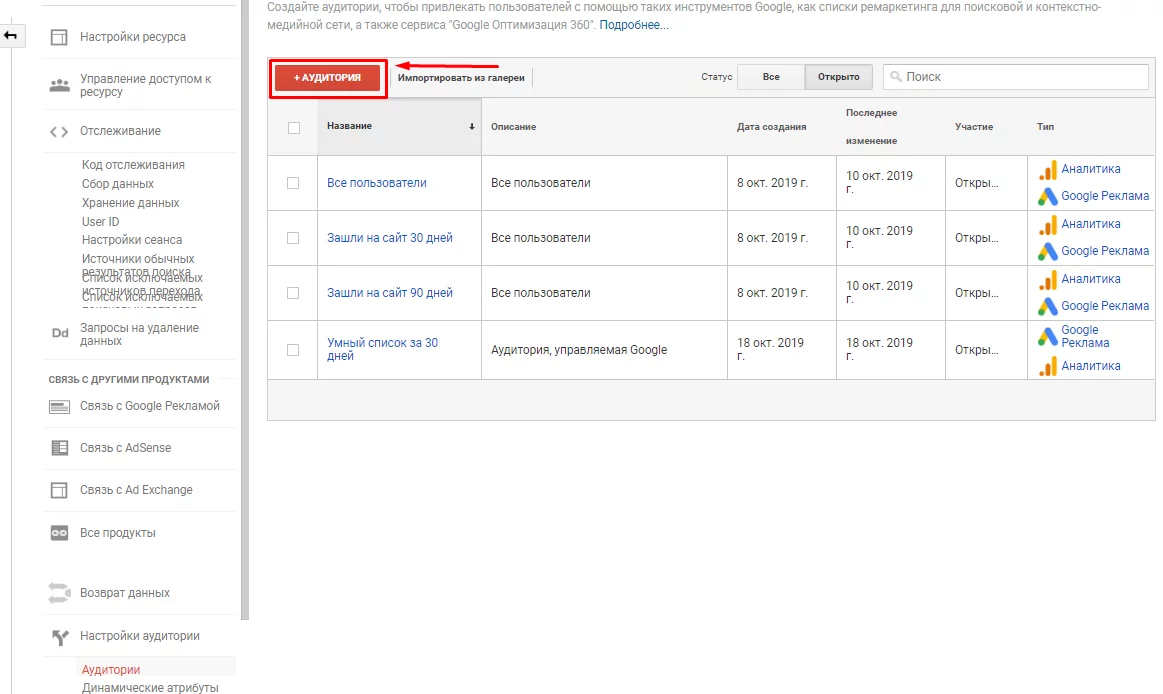
Creating a new audience for remarketing in Google Analytics
Done, you can proceed to creating a feed.
Creating a feed for dynamic remarketing in Google Ads
Setting up dynamic remarketing also involves creating a feed with product offers.
A dynamic remarketing feed is a data set that contains all the information about products/services/offers. For example: price, name, link, product image link, and more.
It can be created in two ways:
- Uploaded via a CSV file.
- Connected through Google Merchant Center..
Online stores should choose the second option, as it allows for virtually unlimited product uploads into the system.
Creating a dynamic remarketing feed via CSV file
In the Google Ads interface, go to the "Settings" tab, then "Merchant data."

"Merchant data" in Google Analytics
Click on “+”.
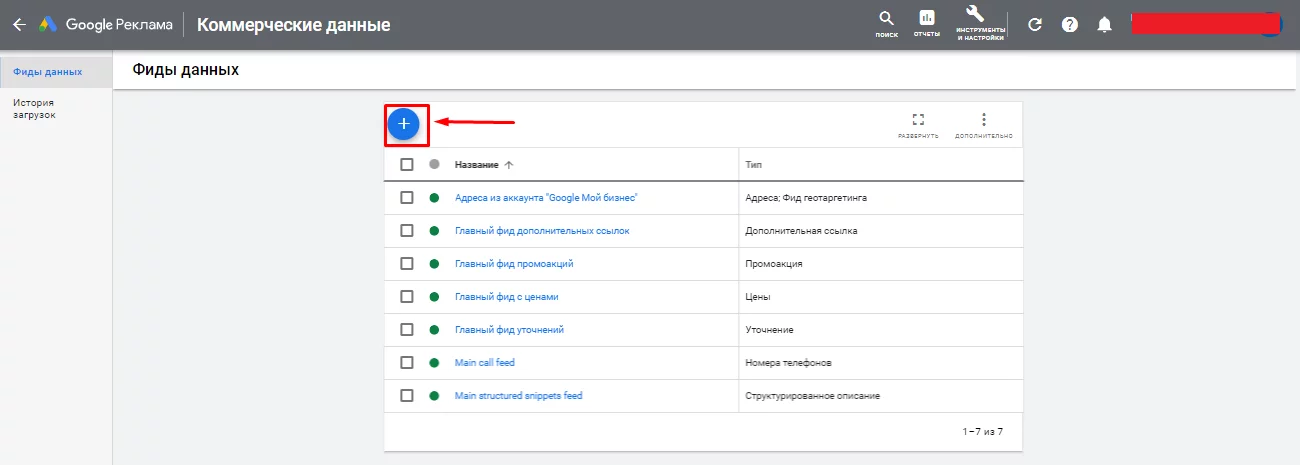
Adding a new feed in Google Ads
Hover over “Dynamic display ad feed” and select the type of business you need. For example, I will choose “User-selected.”
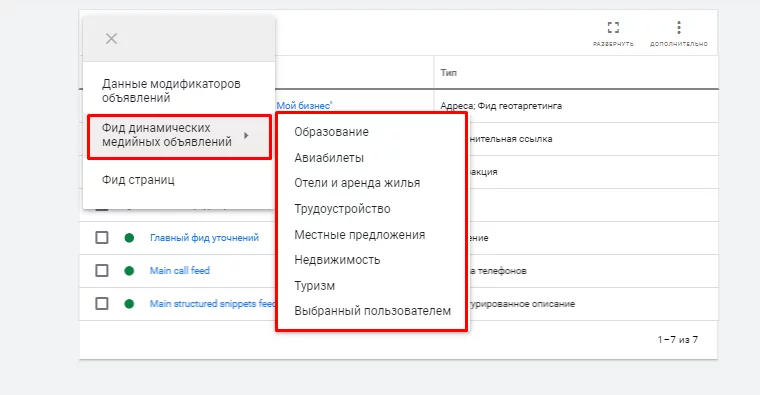
Selecting the type of business for creating the feed
Now, Google Ads will prompt you to upload a dynamic remarketing feed and give it a name. However, if you’re unsure about the required CSV file structure, it’s best to download a template and work from it. You can review the structure of all types in Google Help.
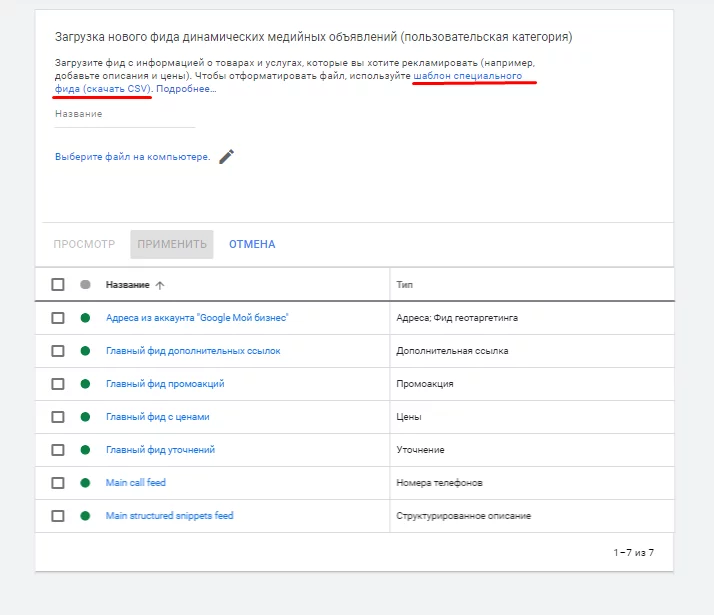
Downloading the feed template in Google Ads
Here’s what the template looks like.
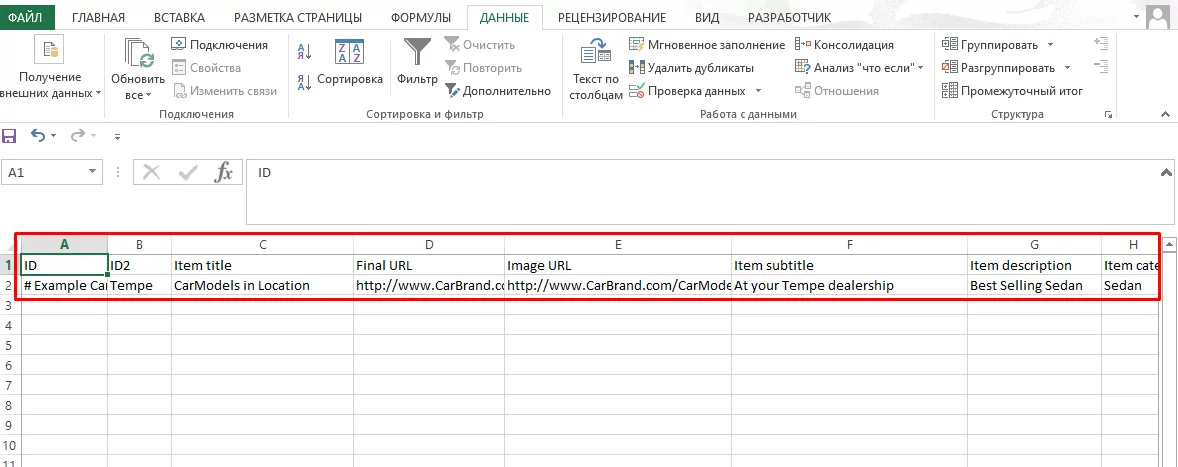
CSV file template for the dynamic remarketing feed
Fill out the table with data. I remind you that different data is required for each business category, and all of this is outlined in Google Help, where different CSV file structures are also specified.
Once you’ve filled out the table, save it in CSV format and upload it to Google Ads.
As soon as the feed passes verification (which can take from a few minutes to a couple of hours, up to a maximum of four business days), you can start creating ads.
Creating a dynamic remarketing feed through Google Merchant Center
With Google Merchant Center (GMC), you won’t need to take many additional actions — just link it to your ad account. To do this, click on “Settings” and go to “Linked accounts.”
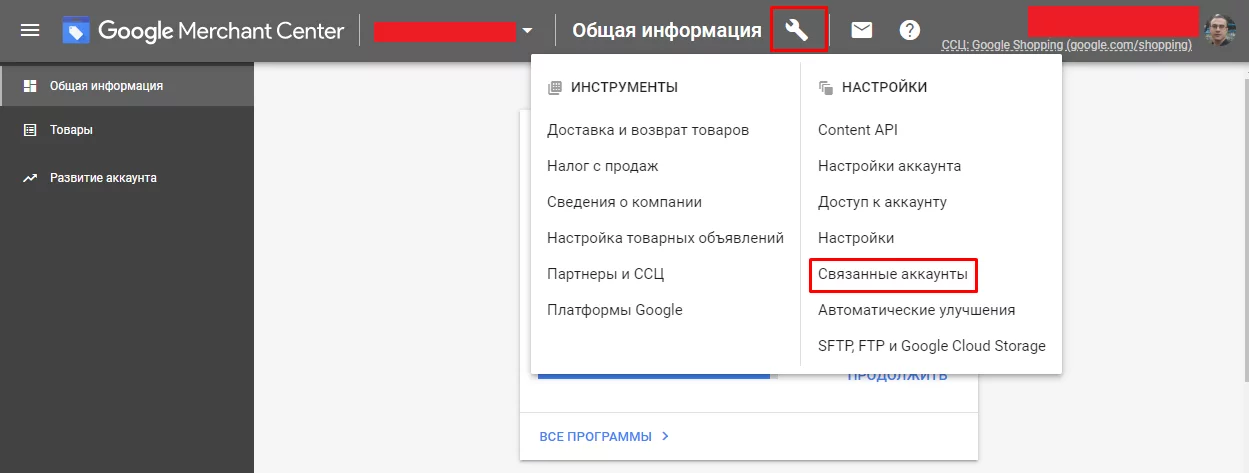
Navigating to "Linked accounts" in Google Merchant Center
Click the “Link” button.
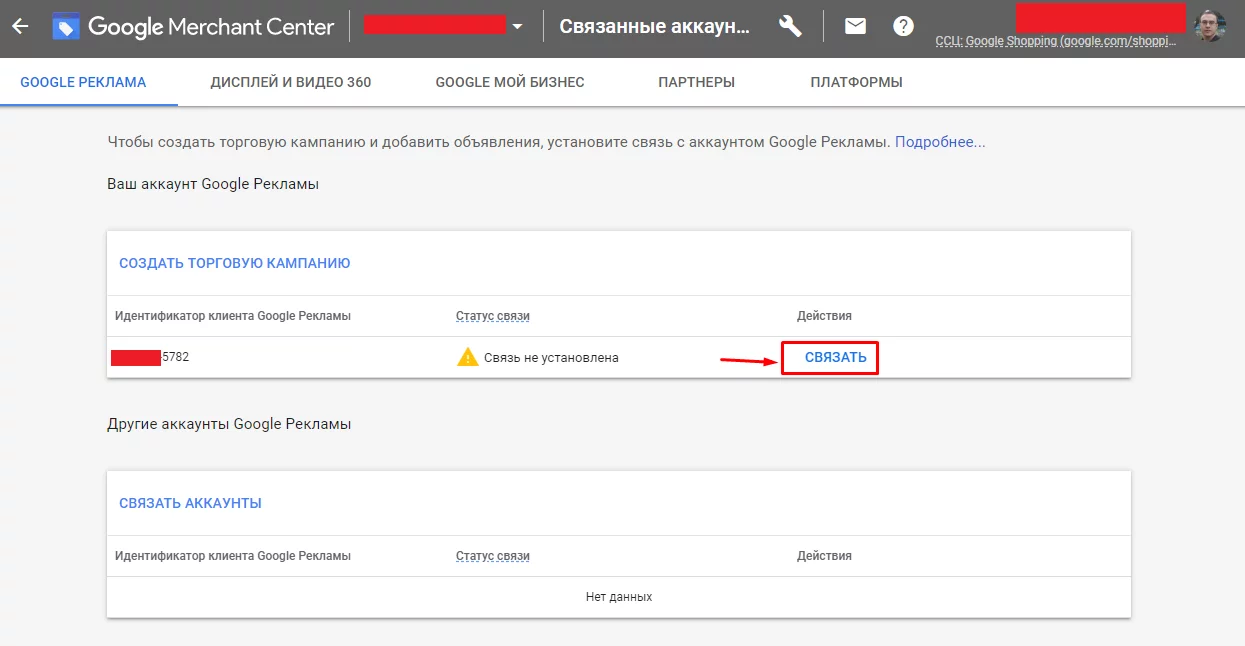
Linking your Google Ads and Merchant Center accounts
Now, log into your Google Ads account — you will see a notification requesting to link with the Google Merchant Center account.

Notification requesting to link with the Google Merchant Center account
Click the “View details” button.

Proceeding to create the link with the Google Merchant Center account
Click “Approve.”
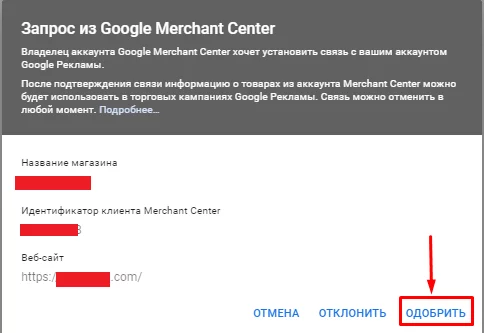
Approving the link in Google Ads
Done, you can proceed to creating ads.
Setting up dynamic remarketing: creating a campaign
Setting up dynamic remarketing: creating a campaign To launch dynamic remarketing in Google Ads, go to the “Campaigns” tab in the ad account interface and click on “+.”
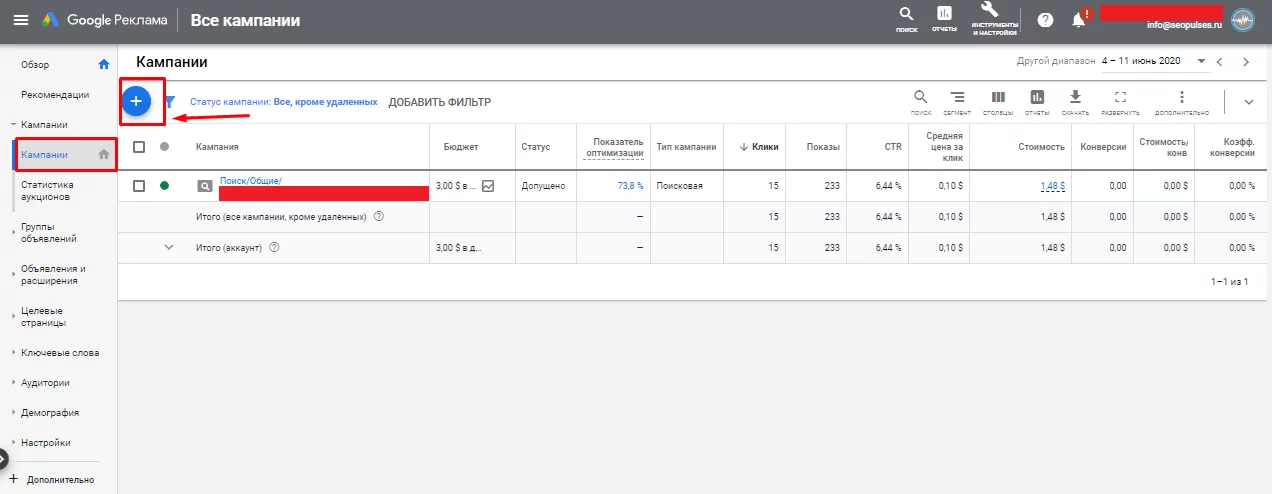
Campaign creation button in Google Ads
Select “New campaign.”

Creating a new campaign in Google Ads
Create a campaign without a goal. This will allow you to choose any type of campaign in the further settings.
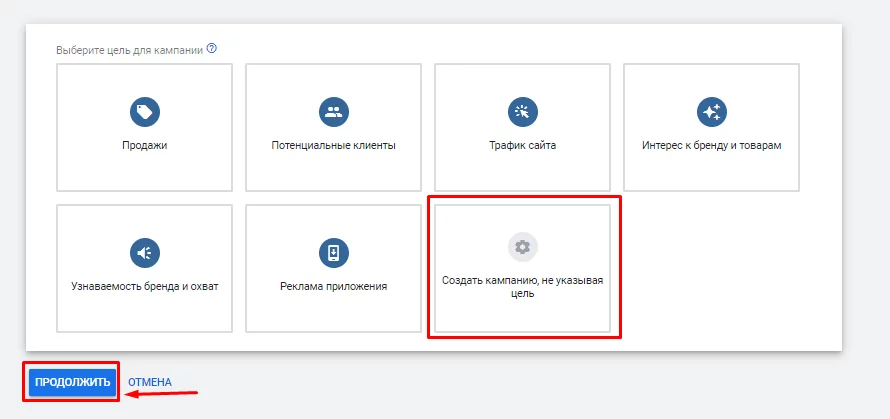
Creating a campaign without a goal in Google Ads
In the campaign type, check "Display" and click "Continue."
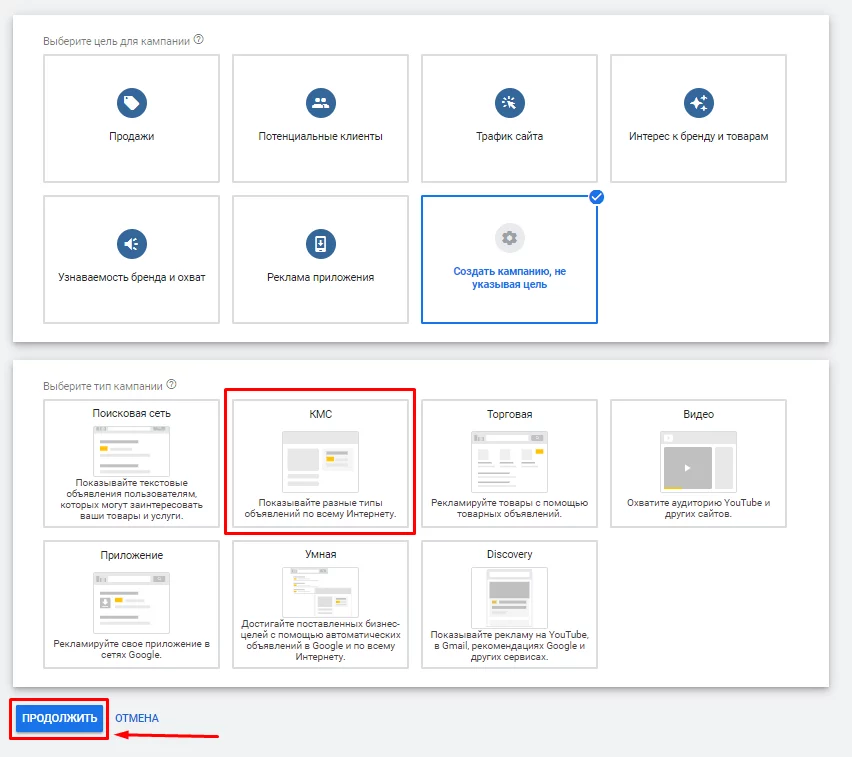
Creating a Display campaign in Google Ads
Now you need to choose what type of campaign it will be—smart or standard. If you haven't had experience with smart campaigns, it's better to choose the standard one. If you choose the smart option, you might face significant budget overspending in the first weeks. For a smart campaign to work properly, you'll need to work with conversion value, track them, and pass that information to Google Ads.
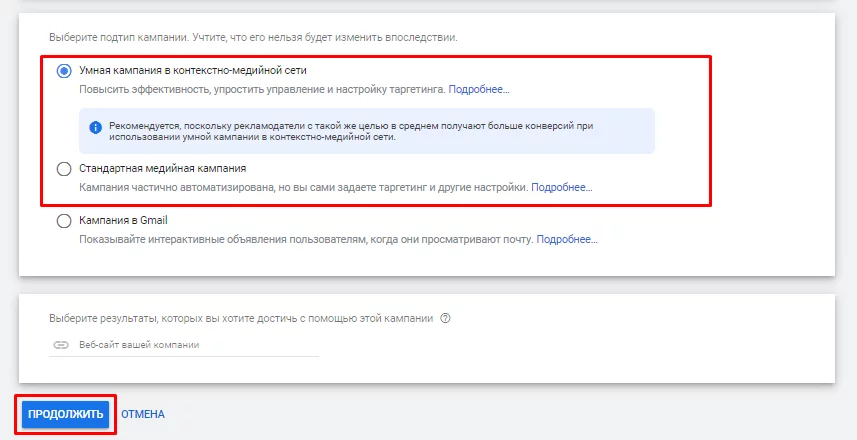
Choosing the campaign type in Google Ads
In the menu that appears, give the campaign a name and:
- Specify the region where you want to show your ads.
- Select the languages spoken by your customers.
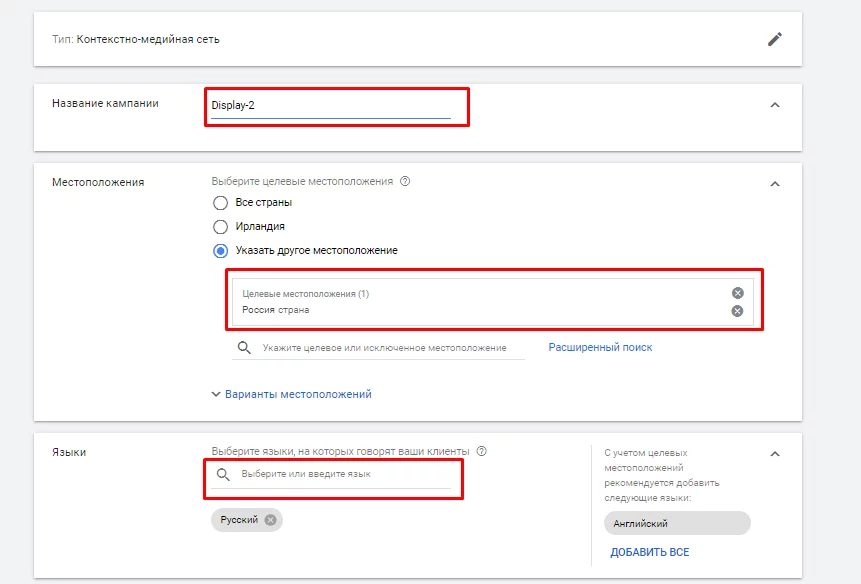
Entering the title and display region in Google Ads
Next, choose a strategy for the campaign, where the system will default to applying conversions. This can be "Maximize Conversion Value" or "Target Return on Advertising Spend."
However, if you don’t have a clear understanding of how much a conversion should cost and whether the system can execute the given strategy, it’s better to switch to "Manual Bid Management." For example, if you want to receive clicks at $1, it’s enough to set that bid, after which the system will automatically find users in the Display Network who will click on your ad, and the cost will not exceed $1.
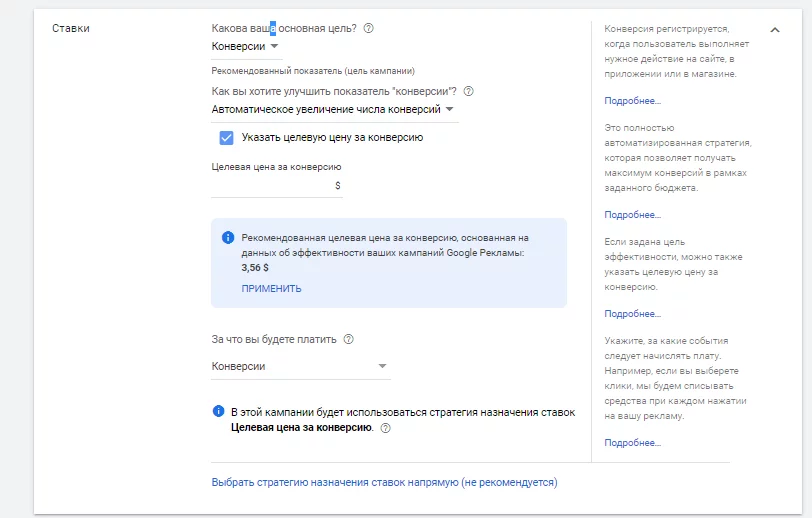
Setting up the display strategy in Google Ads
Choosing a strategy for the campaign in Google Ads
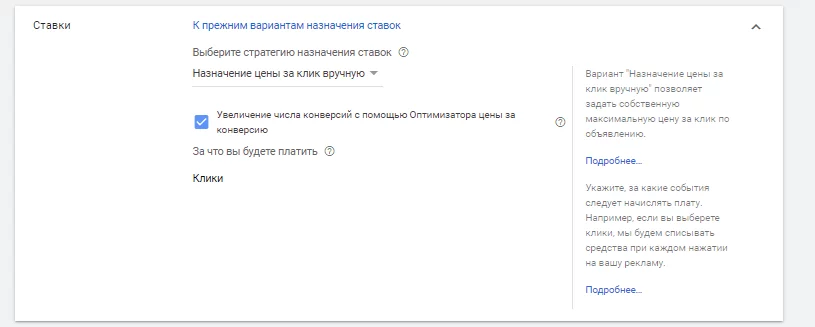
Choosing a strategy for the campaign in Google Ads
Determine your daily advertising budget. I recommend setting a minimum of two conversions. Generally, this amount is sufficient for the campaign to conduct the necessary experiments and gather the required number of conversions in the first month of operation. For example, if you want the cost per conversion to be $10, it’s better to set a daily budget of at least $20.
Proceed to the additional settings.

Navigating to the additional settings of the campaign
Here, you need to configure "Dynamic Ads." Check the box for "Use data feed for personalized advertising," as you’ve already created it above. Then proceed to select the data source.
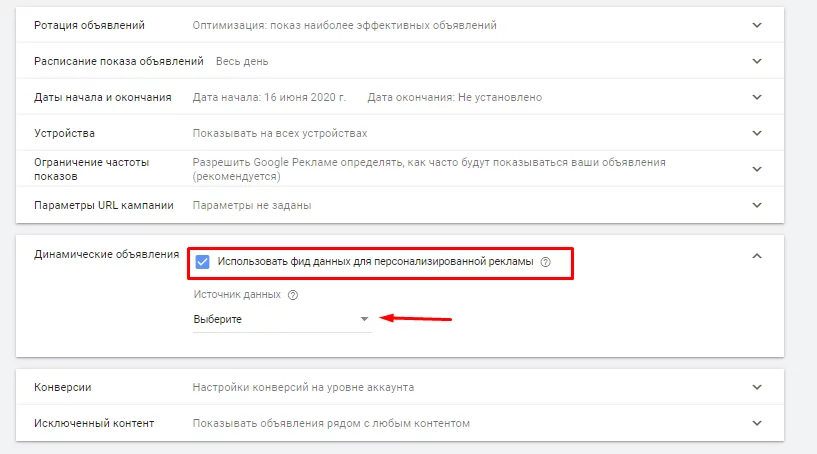
The interface for creating dynamic remarketing ads in Google Ads
The source can be a feed created in Google Ads or a linked Google Merchant Center account; in my example, it’s a Google Merchant Center account.
Select which products will be advertised by setting the filter similarly to standard shopping campaigns or smart shopping campaigns.
If you want all products to be included in the ads, select "No filters." If you want the ads to show only TVs, choose the filter "Product Type" equal to "TVs." This will help avoid displaying offers that won’t be profitable in advertising.
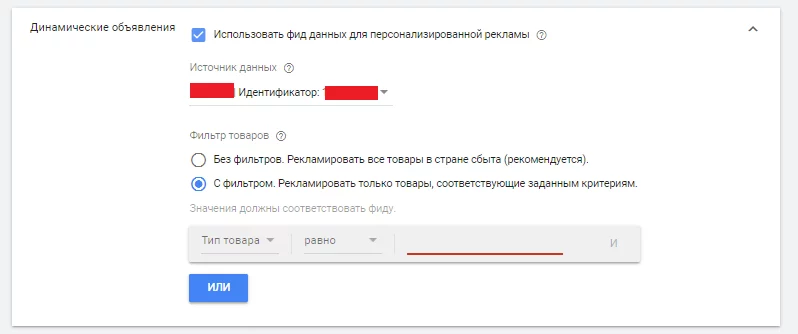
Selecting products to display during dynamic remarketing
Next, you need to create an ad group. To do this, in the "Audience" tab, go to "Overview" and open the list "How they interact with your campaign."
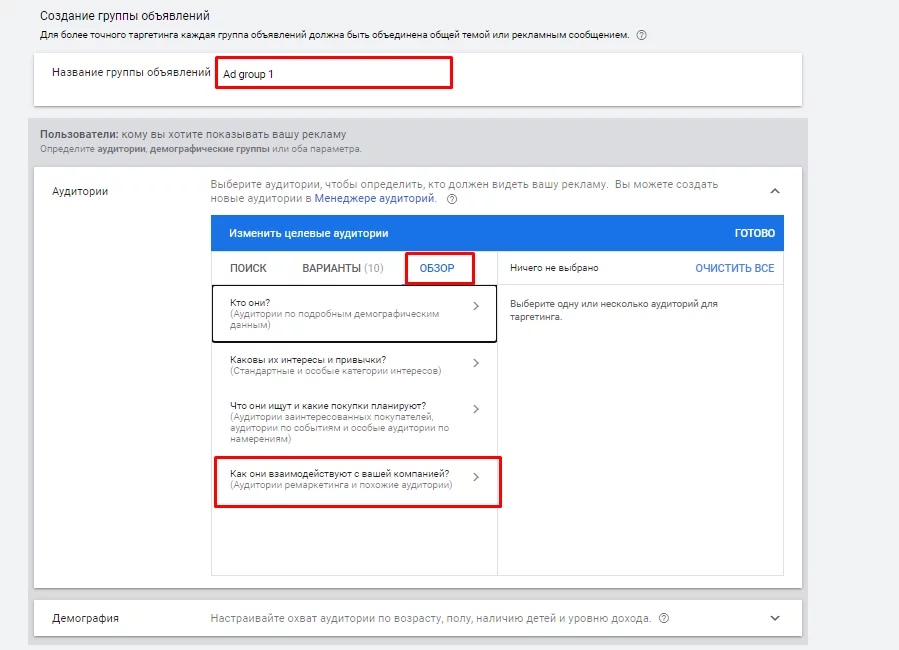
Adding remarketing audience to Google Ads ads
Select the desired user list, such as "All Visitors (Google Ads)" or "Users who visited the cart/page/contact."
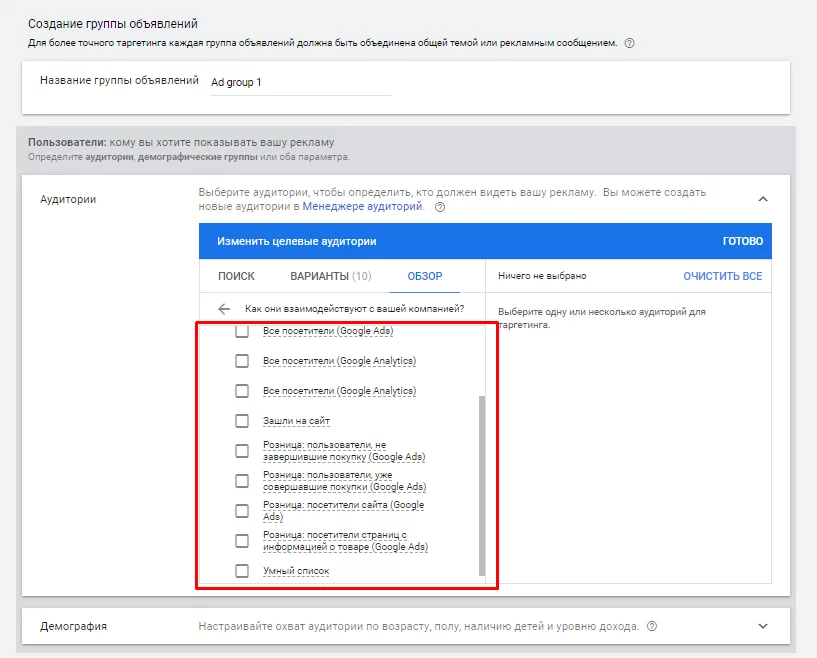
Adding the audience in Google Ads
Now, you need to create the ads themselves.
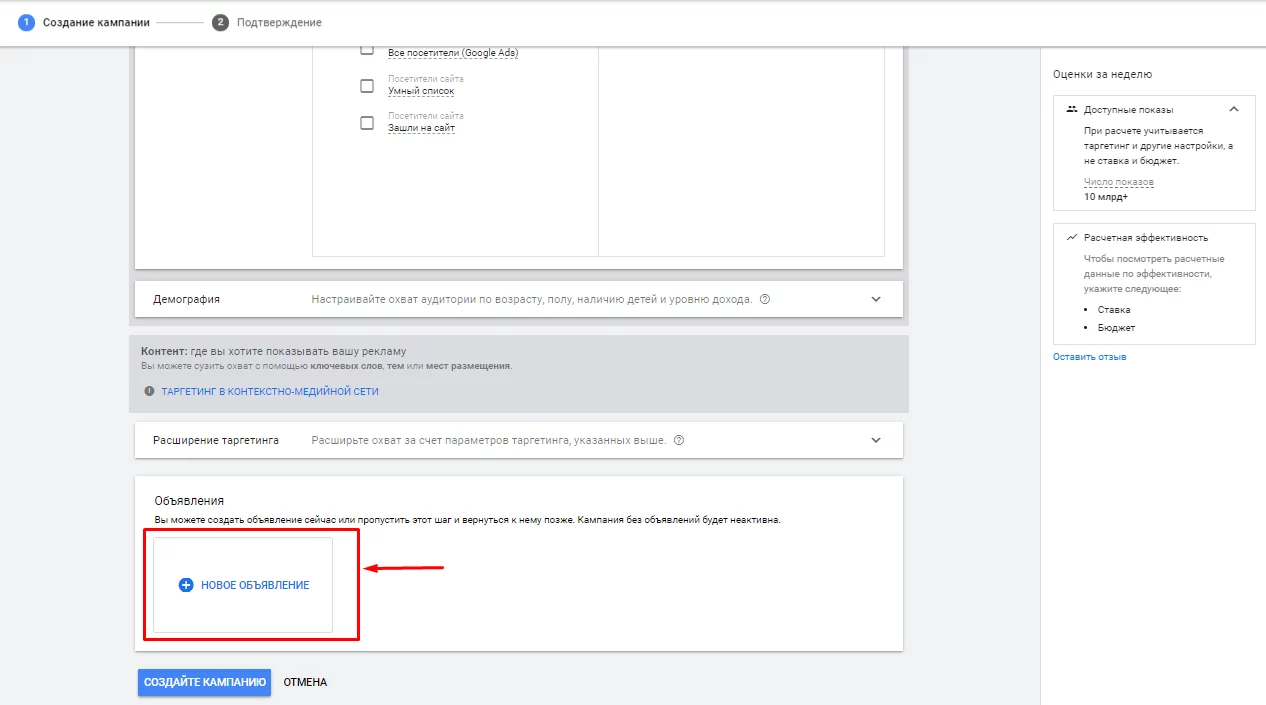
Creating a new ad in Google Ads
Among the available options, you are interested in "Responsive Display Ads."
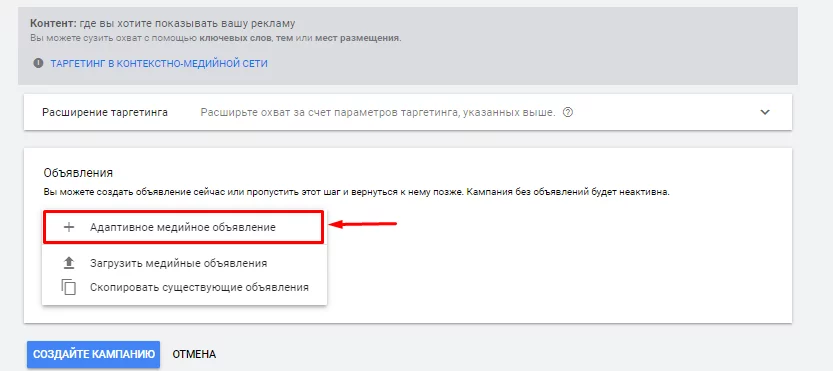
Selecting a responsive display ad in Google Ads
The system will immediately show that there are many variations of product offers.
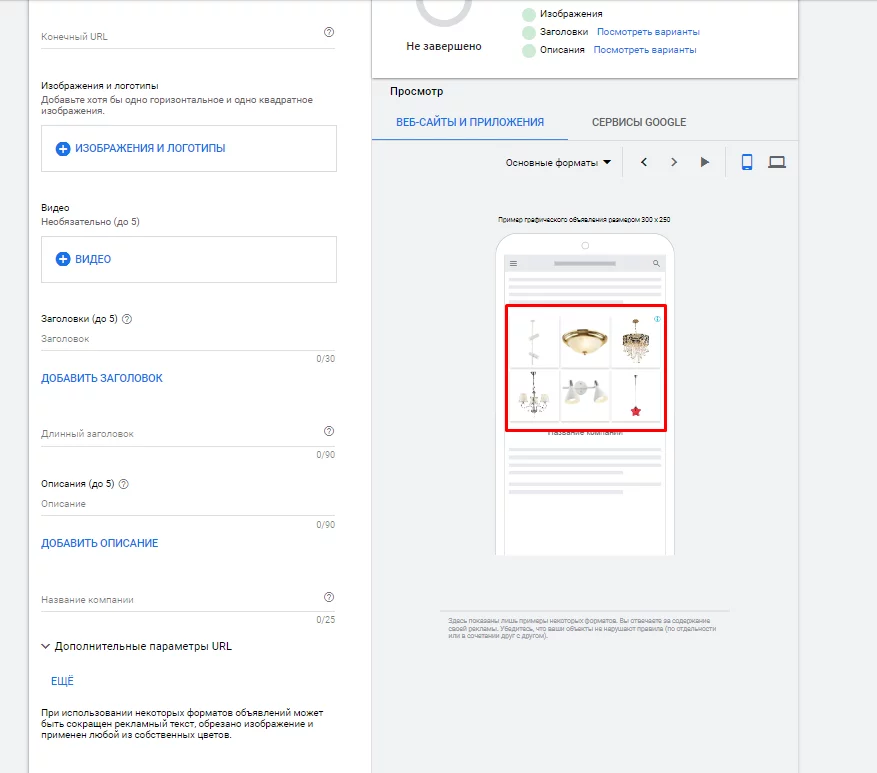
The interface for creating dynamic remarketing ads in Google Ads
In dynamic remarketing, the system will automatically optimize the display: in some cases, it will show product offers, while in others, it will show creatives. For example, if the user only visits the homepage, the system is likely to display a banner that reminds them of the company.
To set it up, you just need to fill in:
- Final URL. Users will be directed here if they click on the shown creative.
- Images and logos.
- Headline (up to 30 characters).
- Long headline (up to 90 characters).
- Description (up to 90 characters).
- Campaign name.
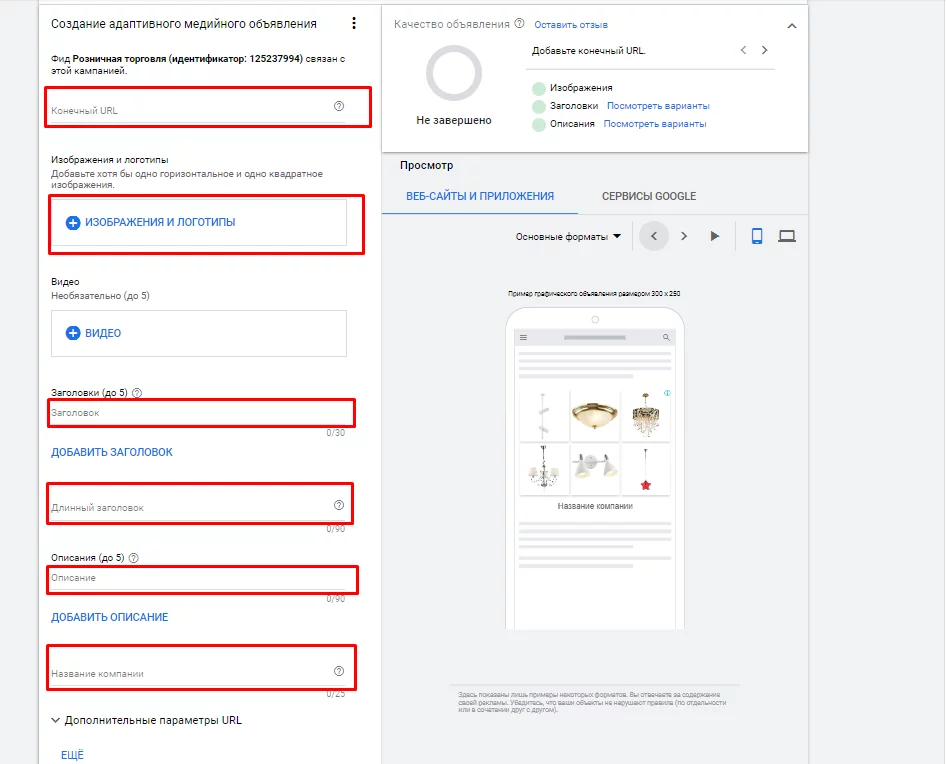
Fields required for creating dynamic remarketing ads in Google Ads
Once everything is filled out, you can save the settings.
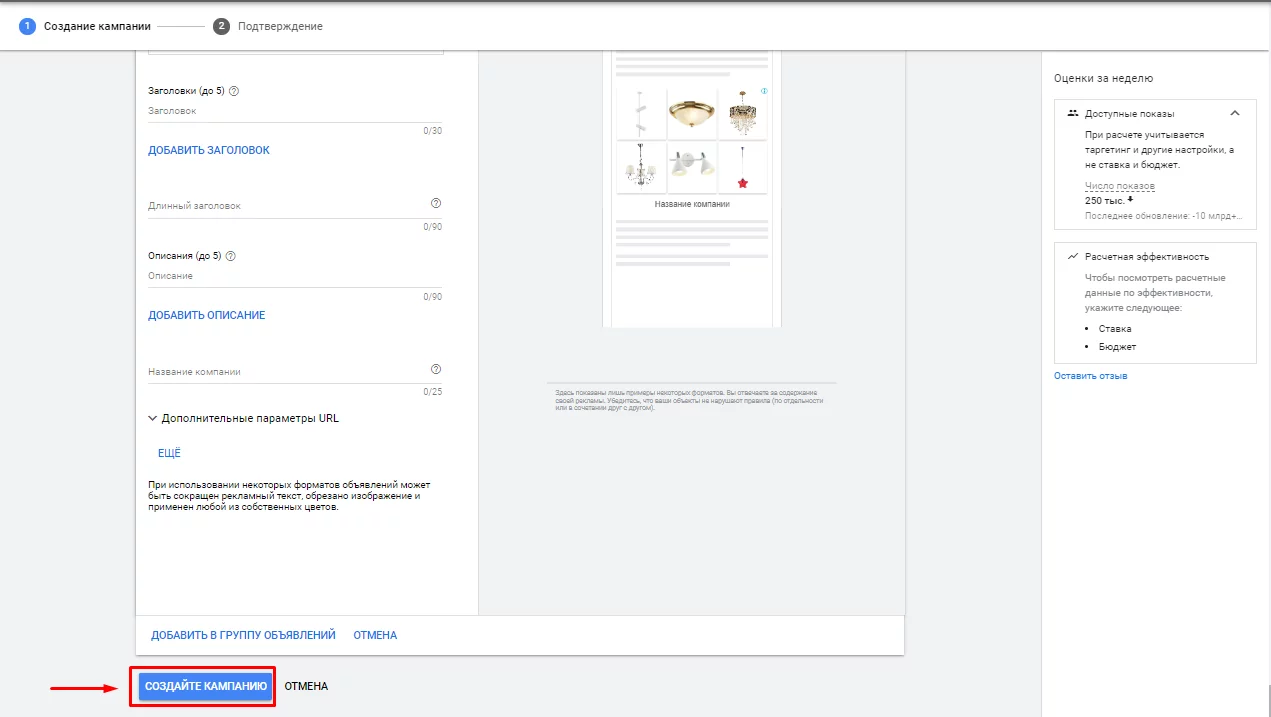
Saving ads in Google Ads
Everything is ready, dynamic remarketing has been launched.
How to optimize dynamic remarketing
To improve the performance of your dynamic remarketing campaign, you should:
- Carefully study the time from the first visit to conversion. It may be necessary to decrease or increase the ad display time to avoid wasting the budget and to not show ads to users when they are no longer interested.
- Exclude unnecessary products from display. Quite often, low-cost items do not provide the desired effect, as the decision to purchase them is made almost instantly, so it's better to "catch up" the user only with expensive items, the purchase of which is considered over a longer period.
- Test audiences. You should test several hypotheses, for example, potential customers who have taken a certain action may not respond to ads later or may not purchase the product. Therefore, they should be excluded from display.
- Test ads. Although most ads will be generated automatically, Google still allows you to set creative elements and text for ads that will participate in the generation. It's better to test several ad variations to understand what resonates well with the audience and show them the most attractive offers.
- Optimize the feed.To make the ads more appealing, you need to work on the feed, for example, by providing a discounted price, checking the correctness of product names, or replacing images.
Examples of dynamic remarketing effectiveness.
In the example below, the effectiveness of standard and dynamic remarketing is compared (the first and second, respectively). Dynamic remarketing allowed a 30% reduction in CPA for a luxury clothing online store.

Example of dynamic remarketing effectiveness.
In the next example, even with the rapid launch of dynamic remarketing for a grocery online store, a ROI of 3045% was achieved, indicating that for every dollar invested, the company earned $30 in revenue.
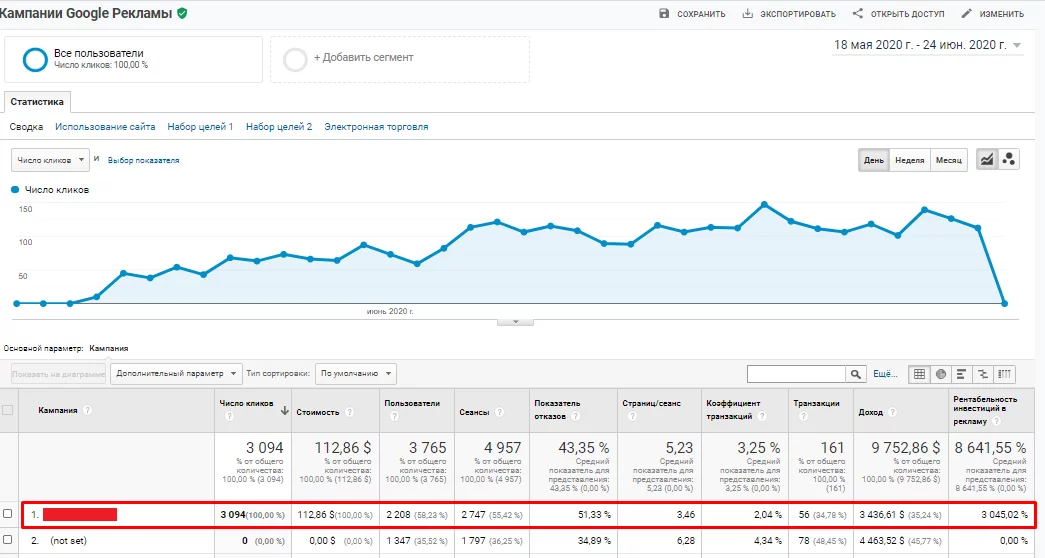
Example of dynamic remarketing effectiveness.
Dynamic remarketing is a powerful and effective tool for generating sales, which, through personalization and engagement with the existing audience, allows businesses to retain customers and increase sales.
This type of advertising is essential for companies with a wide range of services and a long sales cycle.
A source: SendPulse


