
Website migration is always a complex process that requires careful preparation, otherwise it can lead to catastrophic consequences. We’d like to share a real-life case study that clearly demonstrates the problems that can arise if the approach isn’t taken correctly.
In the case of our client, an online store selling home appliances, prior to the migration, website traffic consistently ranged from 8,000 to 14,000 visits per month, the site ranked high for key search queries, and had a high DR score. We built the online store on the WordPress platform using WooCommerce and supported two language versions.
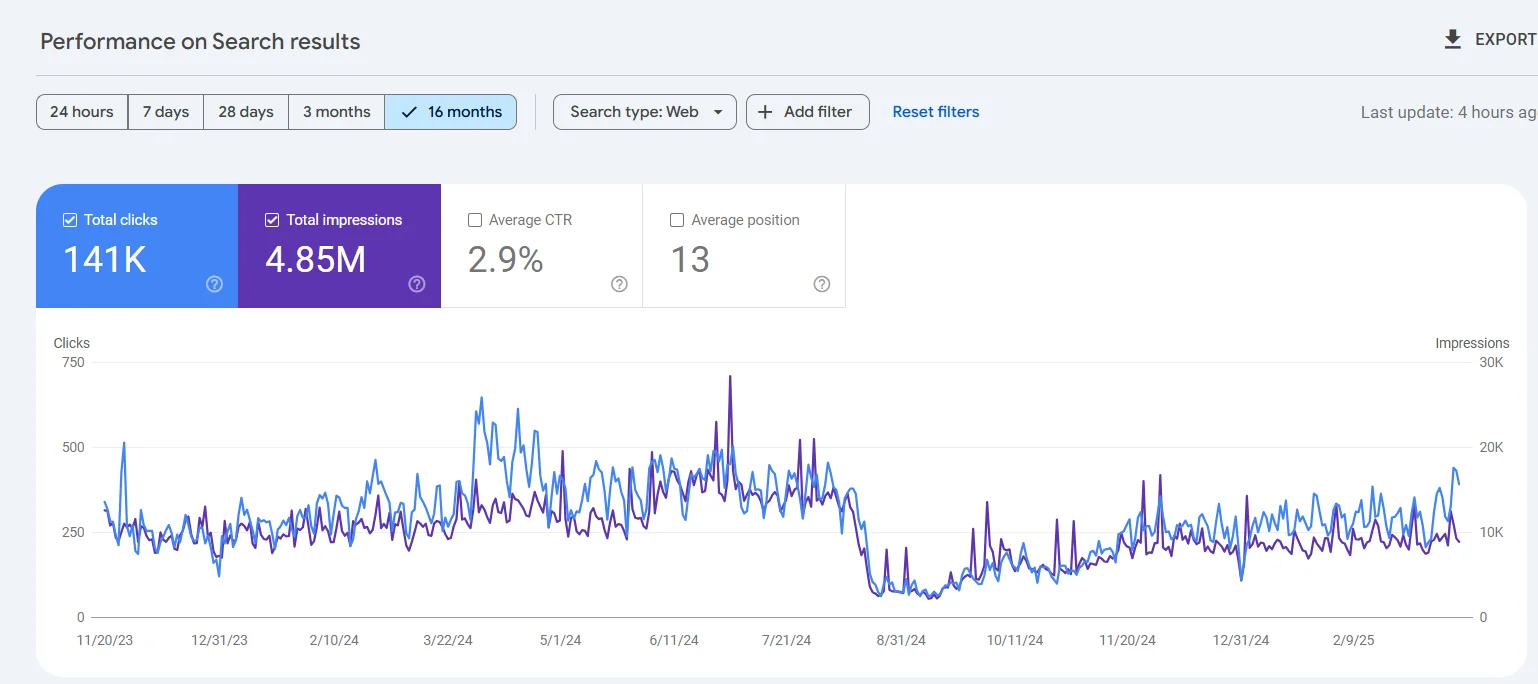
However, for corporate reasons, the decision was made to migrate the site to Shopify . Problems arose when the client failed to coordinate the migration with us, and the preparation for the process was insufficient. As a result, products were simply uploaded to the new site via an XLSX file and launched.
The result was catastrophic: a sharp drop in traffic and conversions, practically to zero , partial loss of data in GA4 analytics , a complete loss of configured events in GTM, and a decline in search engine rankings. Furthermore, we lost the pages we had previously created targeting local search queries by city, which had generated stable traffic for key product categories. We also experienced significant problems with advertising campaigns (they weren’t stopped during the migration) due to significant URL changes and the inability to track conversions. As a result, we are facing a protracted recovery process for an already functioning online store, which requires significant effort from our content managers and SEO specialists .
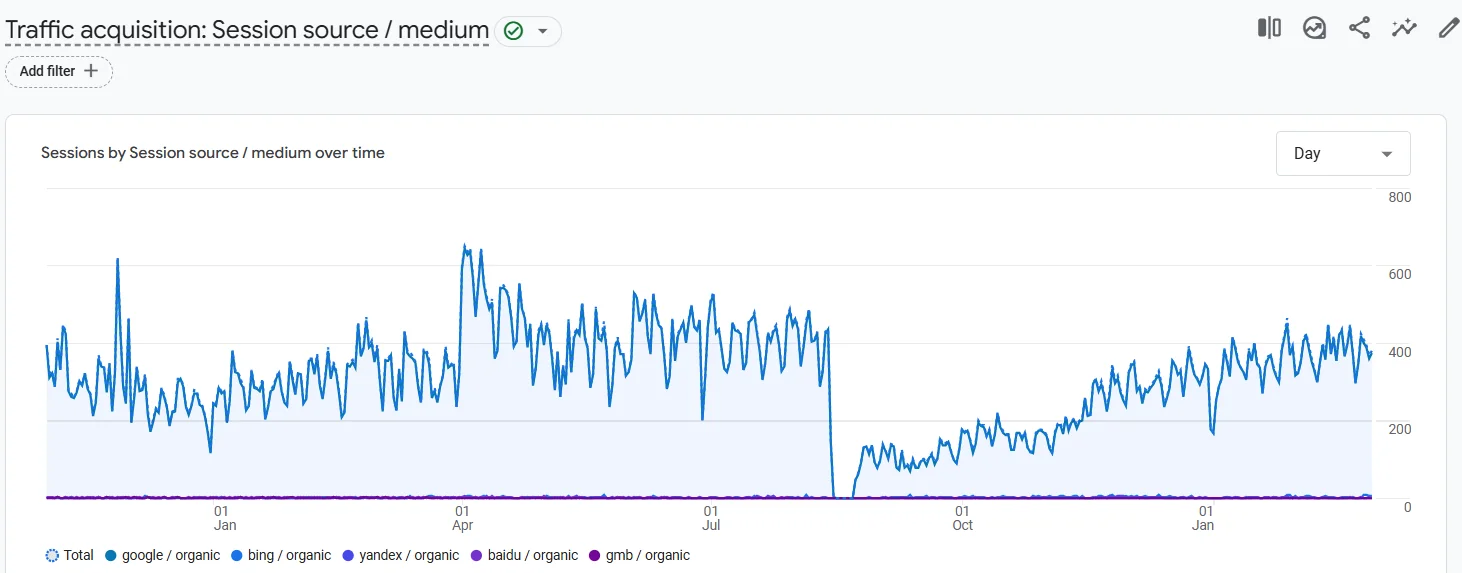
- What mistakes were made during the website transfer:
- What you need to do to ensure your website transfer goes as smoothly as possible:
- Preparing to migrate your website to a new version:
- What to pay attention to after migrating your website to a new version
- Checking the site after migrating to a new version
What mistakes were made during the website transfer:
- Page URLs were not saved, and redirects were not created —old links were not redirected to new pages, which led to a drop in traffic and a loss of search ranking.
- Meta tags, texts, and translations were not transferred —without correctly transferring metadata and texts for both languages, important SEO data was lost.
- The blog wasn’t migrated —content blocks, articles, and useful materials remained on the old site, which also impacted SEO.
- Analytics and event/conversion tracking systems were not migrated —the analytics system used on the old site was not integrated into the new one, which resulted in data loss.
- All internal linking was lost —the connecting links between the site’s pages disappeared, which worsened navigation and search engine perception of the site.
- Pages created for local queries were lost – as a result, a significant portion of traffic for local keywords was lost.
- Robots.txt not configured – The robots.txt file was not configured properly, which made it difficult for the site to be indexed.
So, what needs to be done to ensure that the website transfer goes as smoothly as possible without such problems?
“The fewer structural changes there are during the move, the higher the chances of maintaining the previous position.”
What you need to do to ensure your website transfer goes as smoothly as possible:
- Make a backup copy of the old site
Before any transfer, be sure to create a full backup of your old website and save it for at least a month after the transfer. It’s a good idea to keep the old version of your website accessible from a different IP address (or the old one) so you can quickly revert to it if SEO issues arise. - The unpublished new version of the site must be closed from indexing.
The test domain hosting the new version of the website should be blocked from indexing by search engines. This can be done using the robots.txt file, server settings, or the website’s admin panel. It’s best to block the test site with a banner or add password protection. - Minimizing structural changes
The fewer structural changes there are on the new site, the higher the chances of maintaining the same positions in search engines.
Preparing to migrate your website to a new version:
- Page URLs:
- If possible, keep old URLs for pages and categories.
- If URLs have previously changed on the old site, transfer all redirects to the test site.
- If saving URLs is not possible, set up new URL generation templates using Latin characters and avoiding dates in addresses.
- Create a 301 redirect table and add them to the new site. If some pages won’t migrate, set up redirects to similar pages on the new site.
2. Content transfer:
- Transfer the main content, including text, graphics, and video, to the corresponding pages of the new site.
- If the new site adds new pages that weren’t on the old one, they should be hosted and populated on the test domain, which will increase visibility in search engines.
3. Transferring metadata:
- Transfer metadata (title, description) from the corresponding pages of the old site to the new one.
- If you are planning new pages, create metadata for them in advance.
4. Basic technical recommendations:
- Optimizing pages for loading speed.
- Optimizing images and setting up server response codes.
- Setting up canonical links and micro-markup.
- Setting up 301 redirects.
5. Robots.txt:
- Create a new robots.txt file to ensure proper indexing of your site.
- After the audit, configure robots.txt to close dynamic pages from indexing.
6. Sitemap.xml:
- Generate a new Sitemap.xml file and check its contents (pages, categories, posts).
- Set up sitemap updates.
7. Analytics setup:
- Implementation of tracking code (Google Analytics, Google Tag Manager) and transfer of statistics counters to the new site.
- Setting up tracking of required events.
8. Comprehensive testing of the test version of the site:
- Conduct a technical audit of the test site and correct all errors.
- Check the design, usability, functionality, and mobile version of the website.
9. Notification to advertising specialists:
- Alert your advertising team about URL changes and target settings.
What to pay attention to after migrating your website to a new version
- Backing up the old site
Before moving, you should create a backup of your old website and save it for at least a month after the move. It’s a good idea to keep the old version of your website accessible from a different IP address (or the old one) so you can quickly revert to it if serious SEO issues arise. - Advertising Specialist’s Warning
Notify your advertising specialist about the website transfer so that they can check your advertising account and update your advertising campaign settings to reflect the new URLs. - Closing the old version of the site from indexing
The old version of the website should be blocked from indexing by search engines. To do this, disable indexing via the robots.txt file or through server settings and the website’s admin panel. It is also recommended to block the old website with a banner or make it password-protected to prevent it from being indexed.
Checking the site after migrating to a new version
- URL Check:
Check all URLs on the new site. Make sure no pages are missing, and there are no duplicate or broken links. Also, check that the URLs are formed correctly. - Checking Redirects:
After the transfer, check that the 301 redirects are working correctly. Visit the main pages of the site and selectively check pages in each category. - Robots.txt:
Check your robots.txt file. The site should be open for indexing, but junk and technical pages must be blocked. After the audit, add the necessary rules and update the file in Google Search Console. - Permission for website indexing by search engines:
Search engines must be allowed to index the site in the website admin panel. Check the robots meta tags on each page type to ensure they are configured correctly. - Sitemap.xml:
Check the sitemap.xml file for functionality. Ensure it contains no links to the test site. Update the sitemap to include the main site’s pages and configure it to update automatically once a day. Ensure that the sitemap does not contain any redirected pages. - Checking forms, phones, messengers:
Check that all forms, phone numbers, and messengers on the website are working correctly to ensure everything runs smoothly. - Internal links:
Check that internal links (menus, interlinking) do not point to the test site. Ensure that canonical links are relevant and do not point to the test site. - Analytics:
Check that analytics are working correctly. Ensure that statistics counters have been transferred correctly and that all events are being tracked correctly. - Website audit:
After the transfer, conduct a technical audit of the new website. Make sure everything is working properly and there are no technical errors. - Sitemap.xml in Google Search Console:
Once your site is live and everything is verified, update your Sitemap.xml file in Google Search Console to help search engines index your site faster.
Website migration requires careful preparation to avoid traffic loss, a drop in search engine rankings, and other unpleasant consequences. If you follow the proper process, the transition to the new platform will go smoothly, and the site will continue to grow while maintaining its rankings and traffic.