
A filter in Google Analytics 4 is a tool that automatically filters incoming data by a specific parameter. Setting it up is crucial, as it excludes the actions of the project team from analytics and allows you to analyze the actions of real users.
- What types of data filters are there?
- What is the internal traffic filter in GA4?
- What is the Developer Traffic data filter in GA4?
- Filter states in GA4
- How to set up an internal traffic filter in GA4?
- How to set up a traffic filter for developers?
- Filter Limitations in GA4
- Conclusions
- Frequently Asked Questions
What types of data filters are there?
GA4 currently has two types of data filters:
- “Internal traffic” – cuts off employee traffic.
- “Developer Traffic” – excludes traffic coming from debug devices.
Let’s consider both types in more detail.
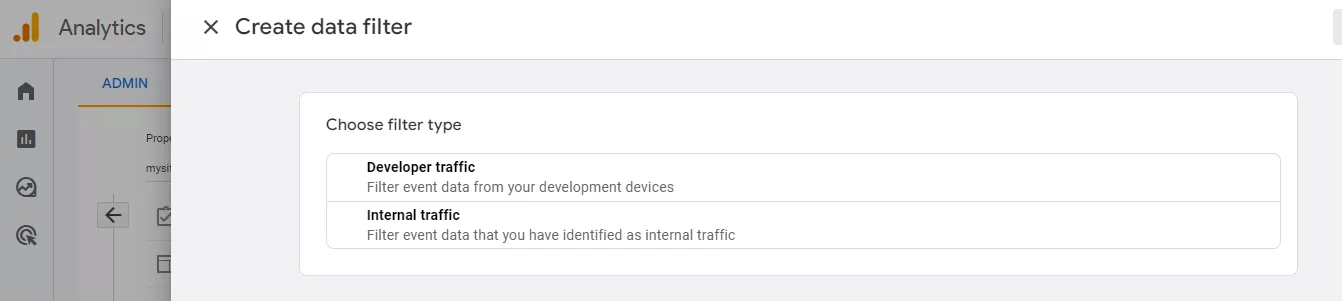
What is the internal traffic filter in GA4?
Internal traffic is generated when copywriters, suppliers, managers, SEO specialists , and others visit the site. These users are not the target audience, but if the team is large, the traffic volume will be significant and will distort the data in the reports. A corresponding filter has been created to exclude this traffic.
What is the Developer Traffic data filter in GA4?
Developer traffic comes from users configuring or monitoring a resource in debug mode, allowing them to test the site’s settings. It also affects report metrics, so it needs to be filtered. When using this filter, this data is only included in the DebugView report, which is essential for testing and allows you to validate each change before deploying it to production.
Filter states in GA4
Filters can be in one of three modes: testing, active and inactive.

Testing
Applying filters permanently changes your data: by filtering out some data, you’ll no longer be able to see it in Analytics. Therefore, you should test filters before activating them.
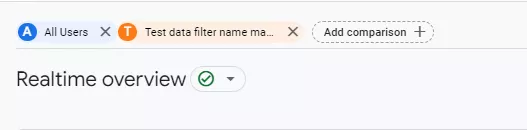
However, the filter in “Test” mode doesn’t make any permanent changes and allows you to analyze its correct operation. To do this, add a comparison to the report using the “Test Data Filter Name” parameter.
Actively
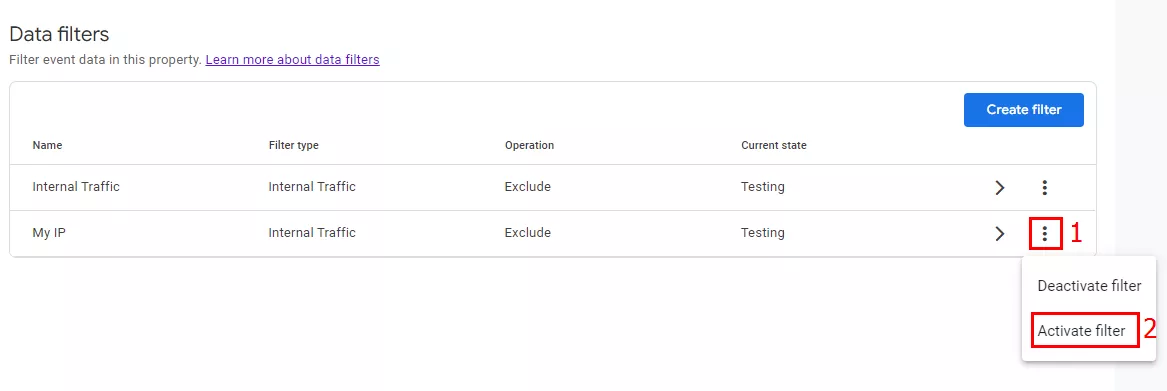
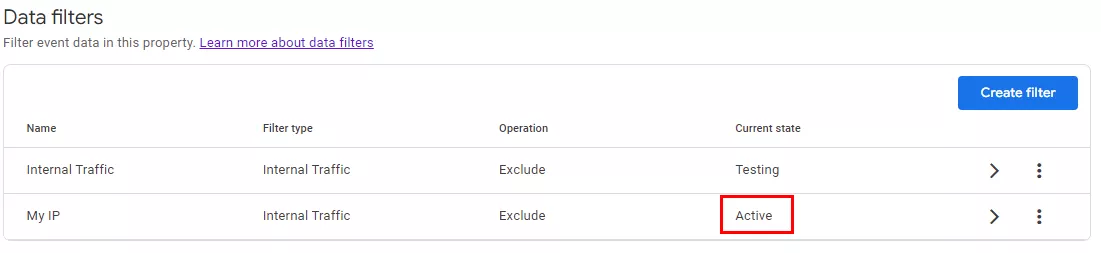
In this state, the filter irreversibly modifies the data. To activate it, click the three dots in the line containing it (1) and select “Activate Filter” (2).
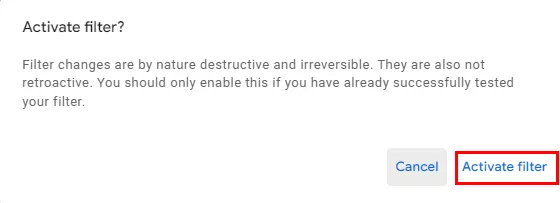
After this, Analytics will display a warning that the filters are irreversible. Confirm activation to apply the filter.
Inactive
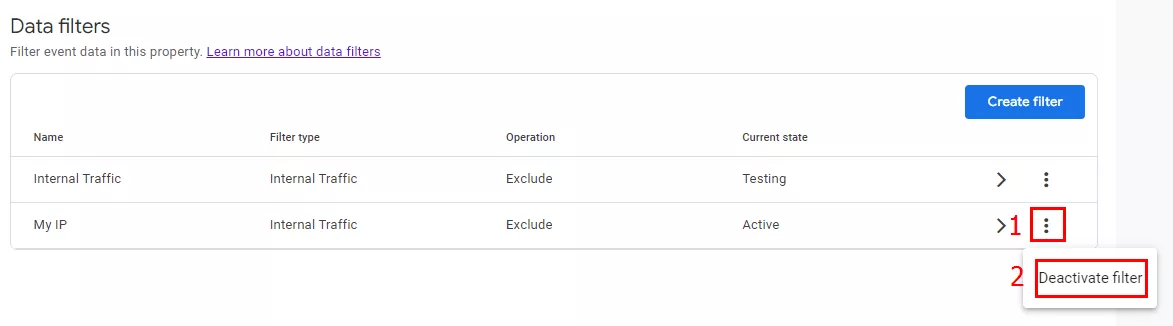
In this mode, the filter does not change the data. To deactivate a filter, click the three dots in the line containing it (1) and select “Deactivate” (2).
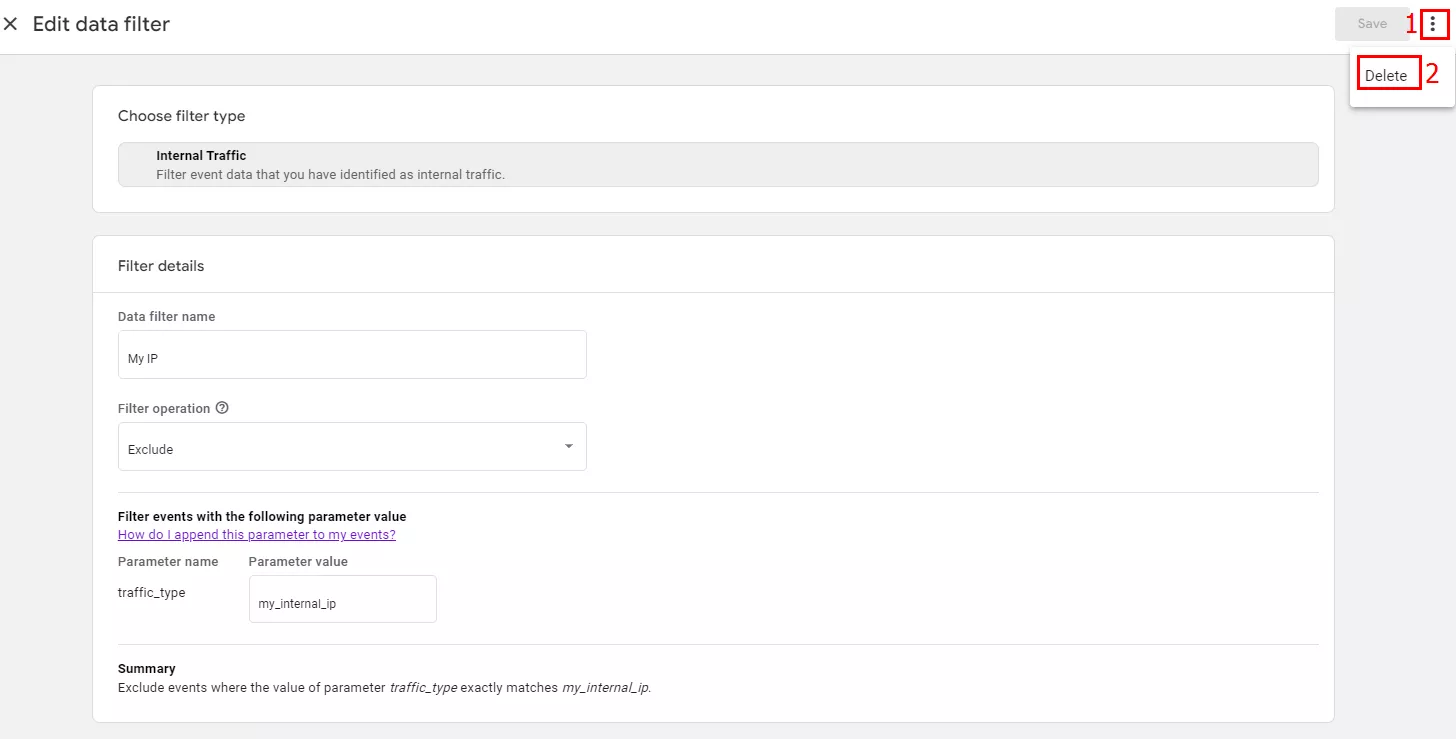
Filters can also be deleted. To do this, on the filter editing page, click the three dots (1) and then “Delete” (2).
How to set up an internal traffic filter in GA4?
Before setting up filters in Analytics, check your permissions—you’ll need editor or administrator access for the resource.

Definition of internal traffic
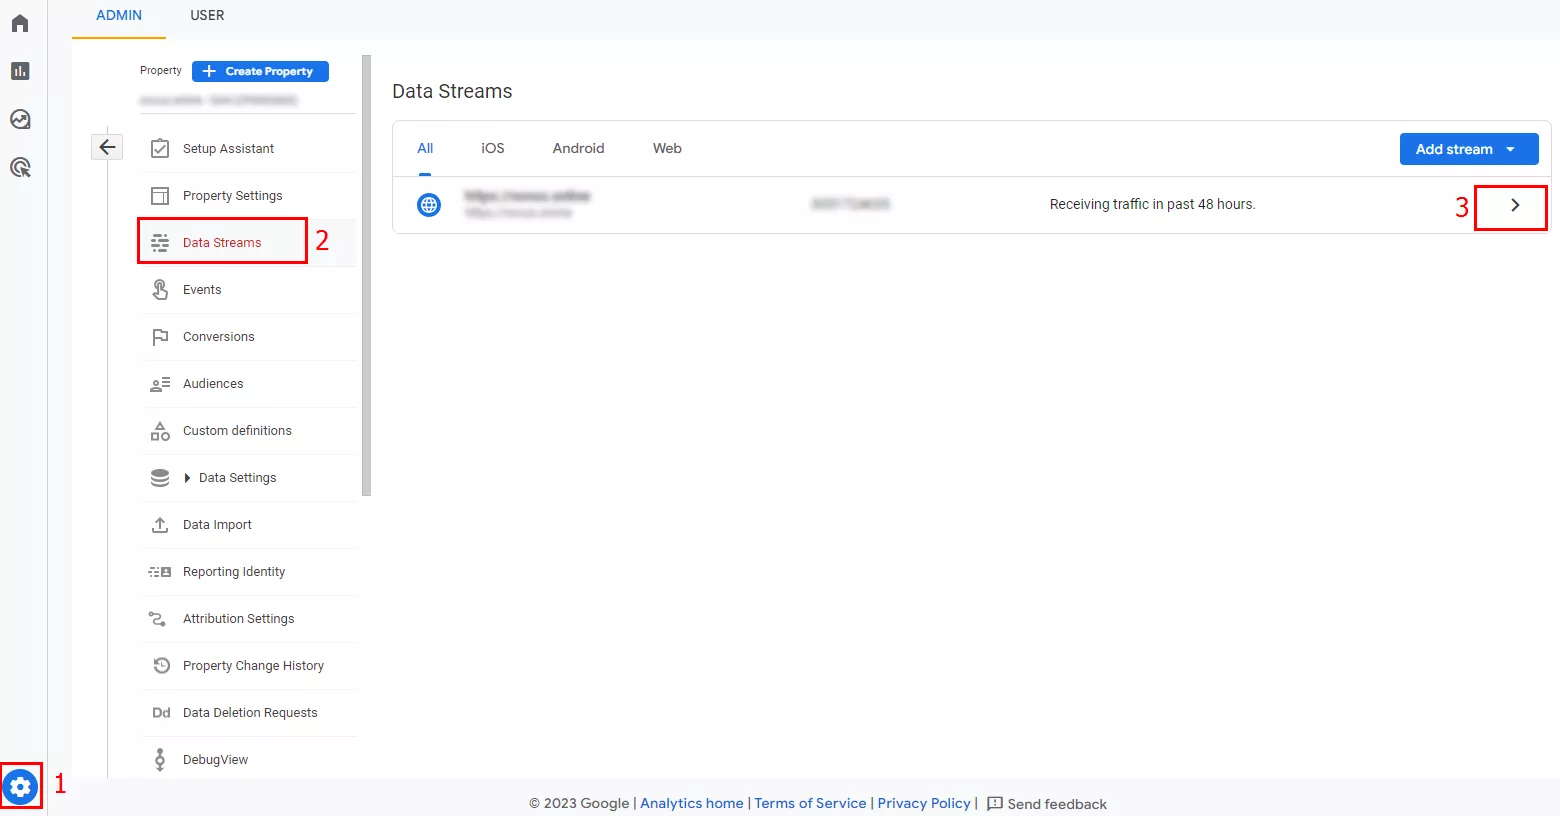
- This is the first step in setup. Navigate to “Administrator” (1) – “Resource” – “Data Streams” (2). Click the arrow to the right of the desired stream name (3).
- A window with stream information will open. At the bottom, select “Tag Settings.”
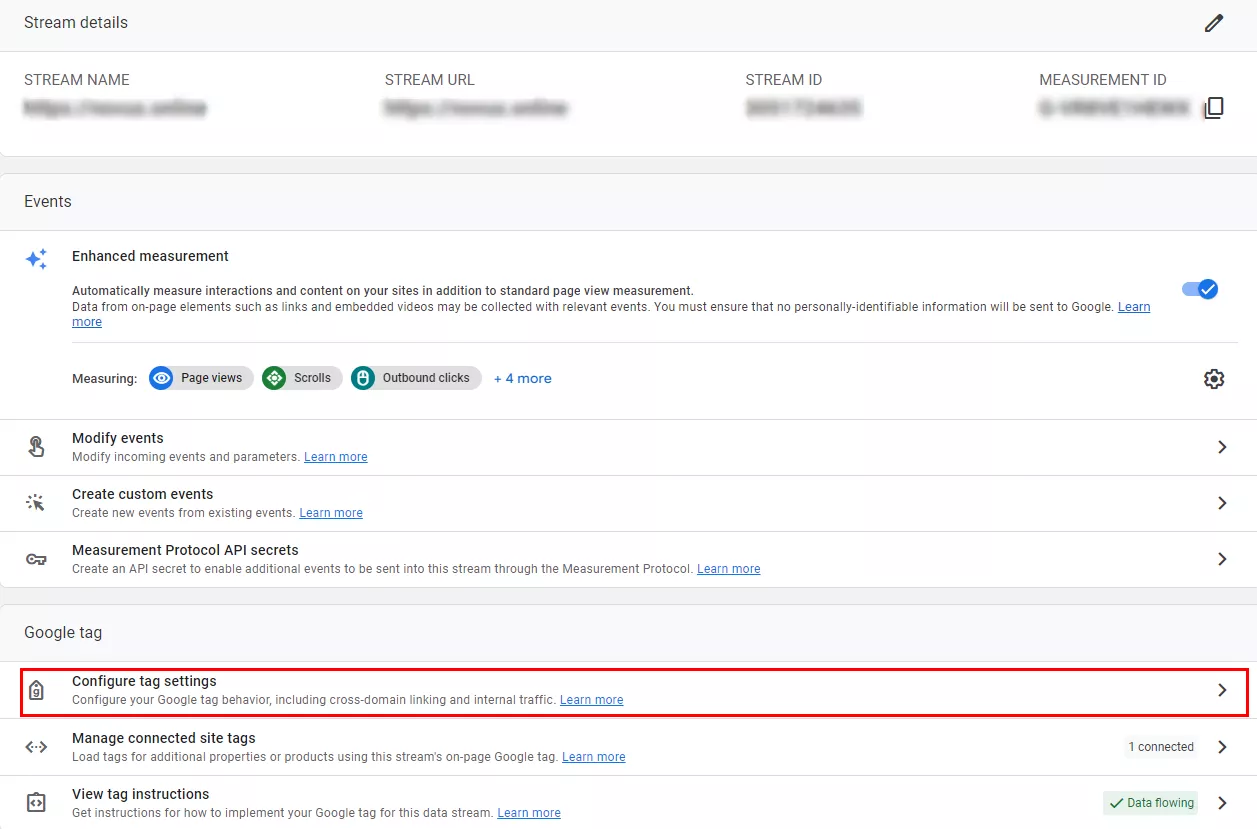
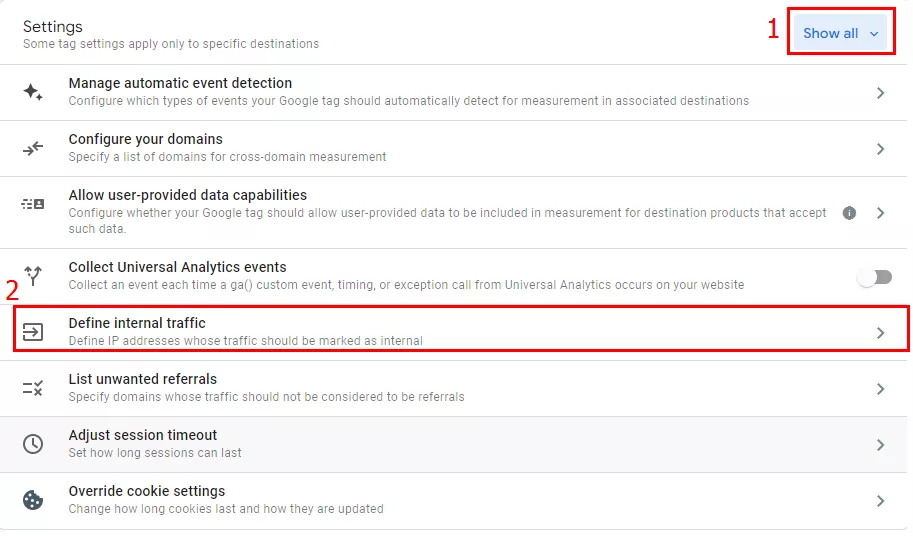
- To see the settings, select “Show all” (1). In the drop-down list that appears, click “Internal traffic definition” (2).
- The window that opens contains the configured rules for this action.
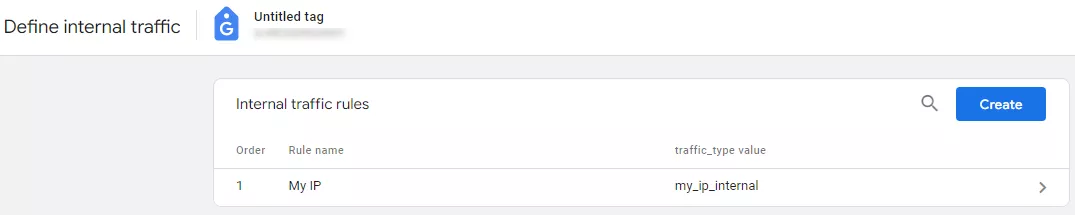
If you don’t have any rules configured yet, GA4 will notify you. To create a new rule, click “Create” (1). Conveniently, there’s also a help link there (2).

- In the window that opens, set the following rules.
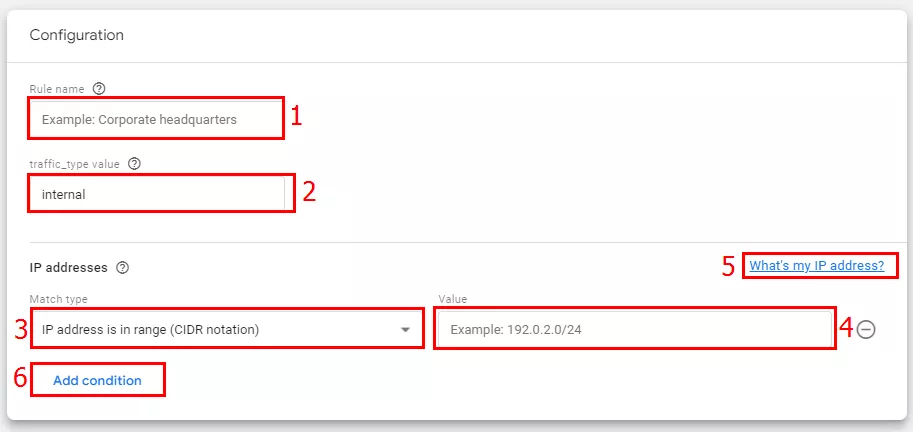
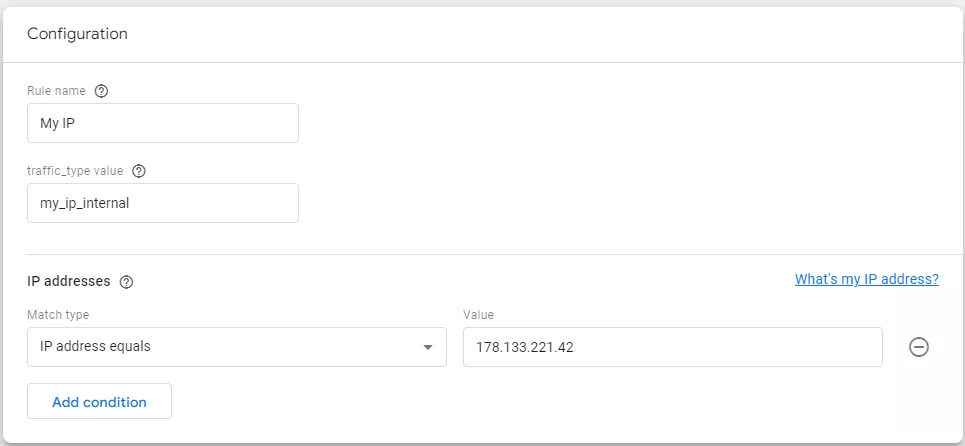
- Please provide the name of the rule (1).
- In the next field, enter a descriptive name for the traffic_type value (2) parameter. Important: Different names will be needed for different traffic sets.
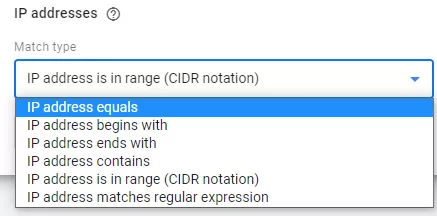
- From the drop-down menu (3), select the appropriate IP address matching type.
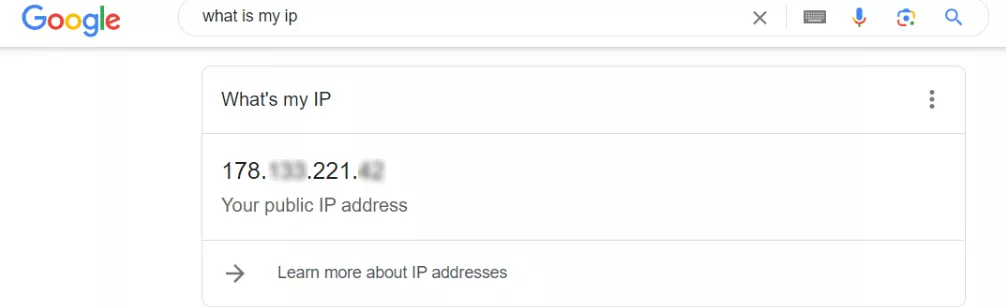
- In the “Value” field (4), enter the IP address from which you don’t want to include traffic in Google Analytics reports. You can exclude your IP address by clicking the “How do I find my IP address?” link (5) and entering it in the appropriate field.
If you need to exclude multiple addresses, use the “Add condition” button (6).
Configuration example when specifying an internal traffic rule.
Read more about Google Analytics 4 in the articles:
- How to Track Events with Google Analytics 4: A Complete Guide
- How to Link Google Analytics and Search Console: A Step-by-Step Guide
- How to create a Core Web Vitals report in Google Analytics 4 and Looker Studio. Site Speed Monitoring
Creating a data filter
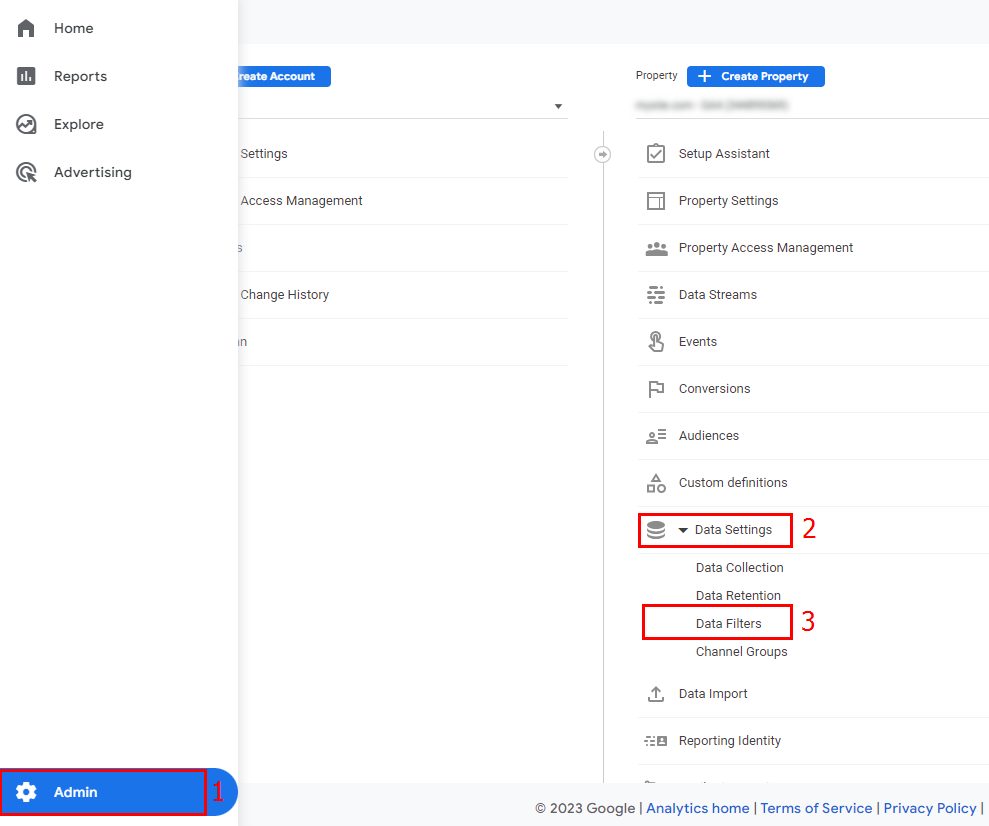
- Open the administration section (1). Next, click “Resource” – “Data Settings” (2) – “Data Filters” (3).
Please note: the internal traffic filter is added automatically in each GA4 counter during testing.

- To create a new filter, click the corresponding button.
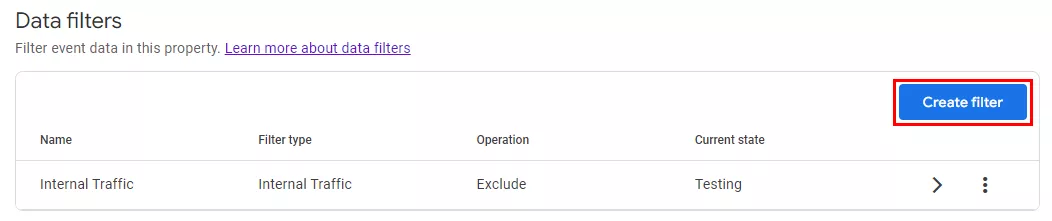
- Click on “Internal traffic” in the field that opens.

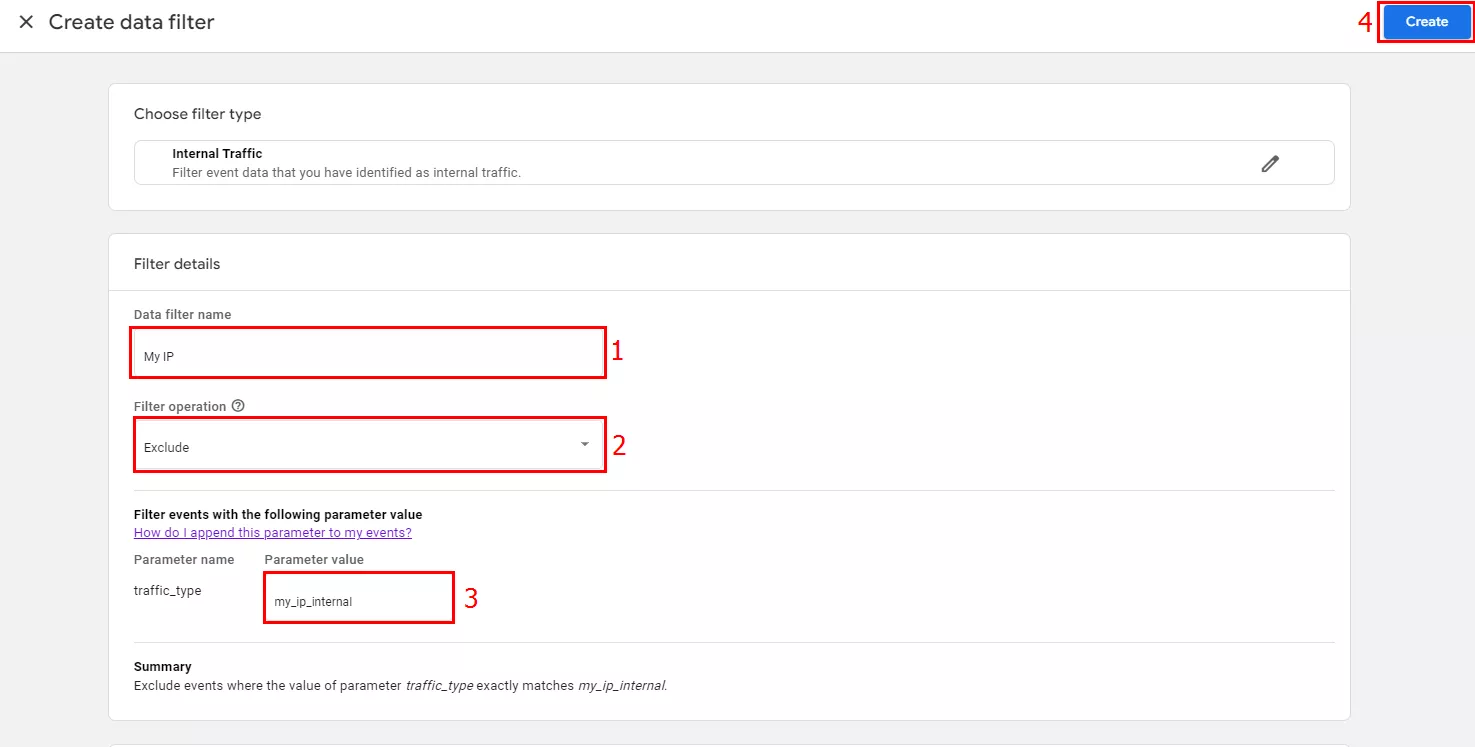
- In the filter settings, enter a name for it (1).
- In the “Operation” field, select “Exclude” (2) to prevent the system from processing data based on a specific filter. If you only want to analyze data from the filter, select “Include only.”
- In the traffic_type (3) item, specify the name entered during the internal traffic definition.
- After all actions, click “Create” (4).
How to set up a traffic filter for developers?
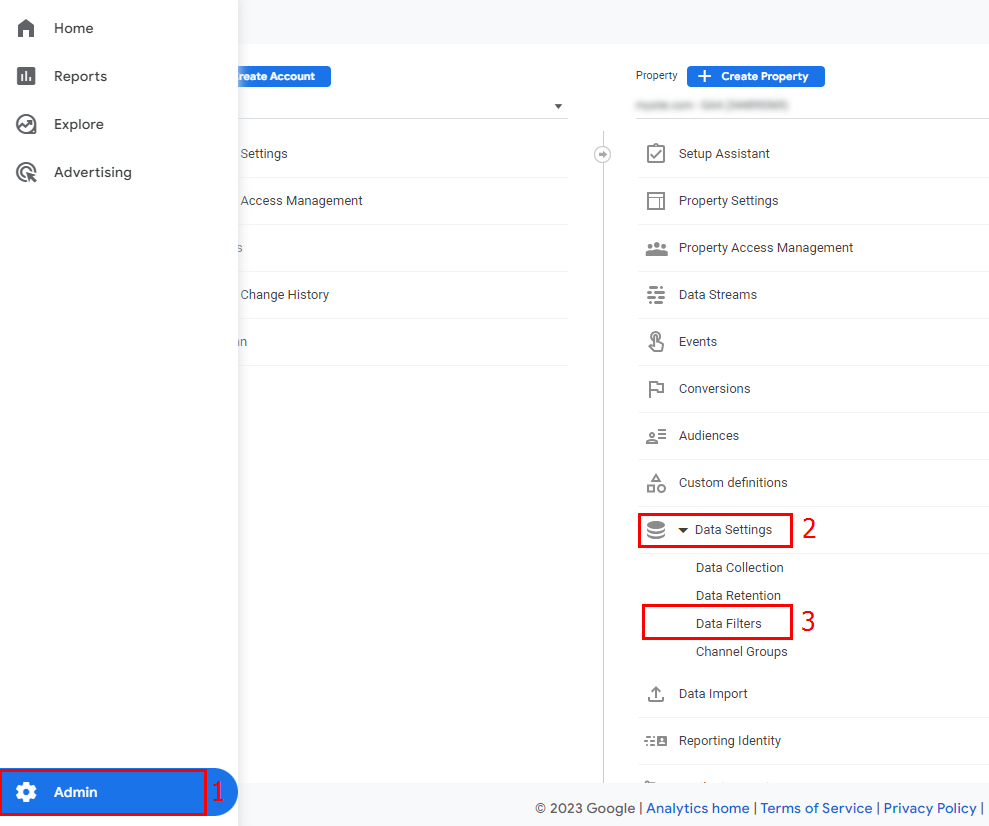
- Go to the admin section (1), select your resource, and open the settings drop-down list (2). Click “Data Filters” (3).
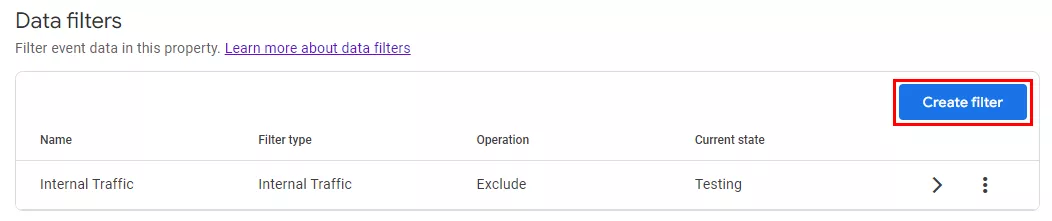
- Click “Create Filter”.
- In the window that appears, select the required type.
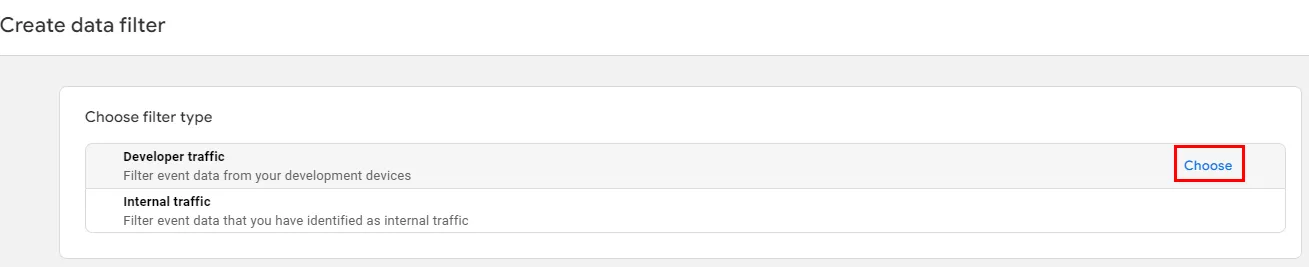
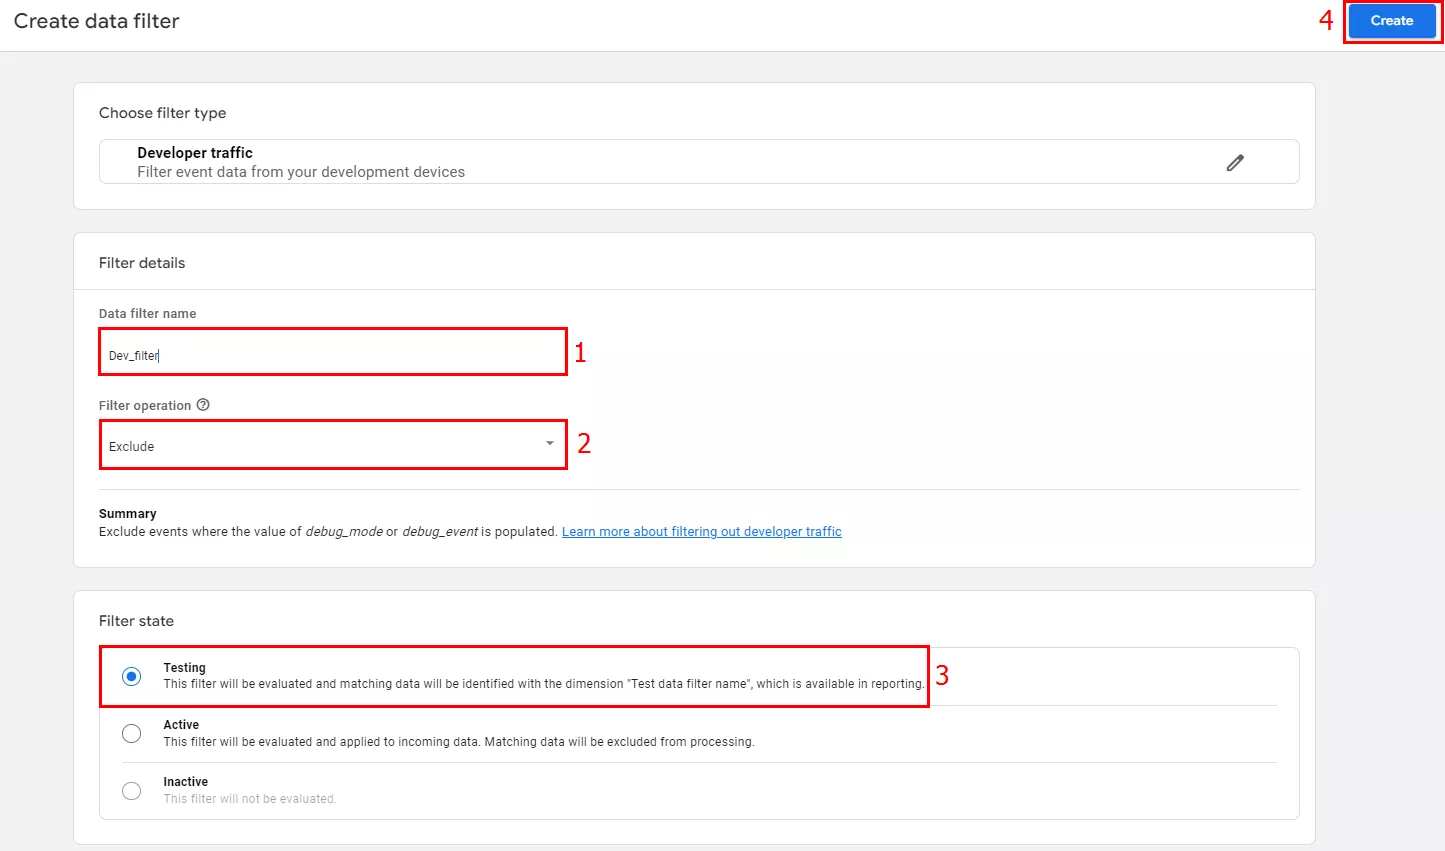
- A settings window will open. Enter a unique, descriptive name for the filter (1).
- In the Google Analytics 4 “Filter operation” window (the “Operation” field), select “Exclude” (2) from the drop-down list to prevent Analytics from processing data from this filter. Click “Include only” (2) if you want to analyze data only from this filter.
- Select the Test mode (3).
- After setting up the configuration, click “Create” (4).
Done, the filter is created, you will see the following notification on the screen.
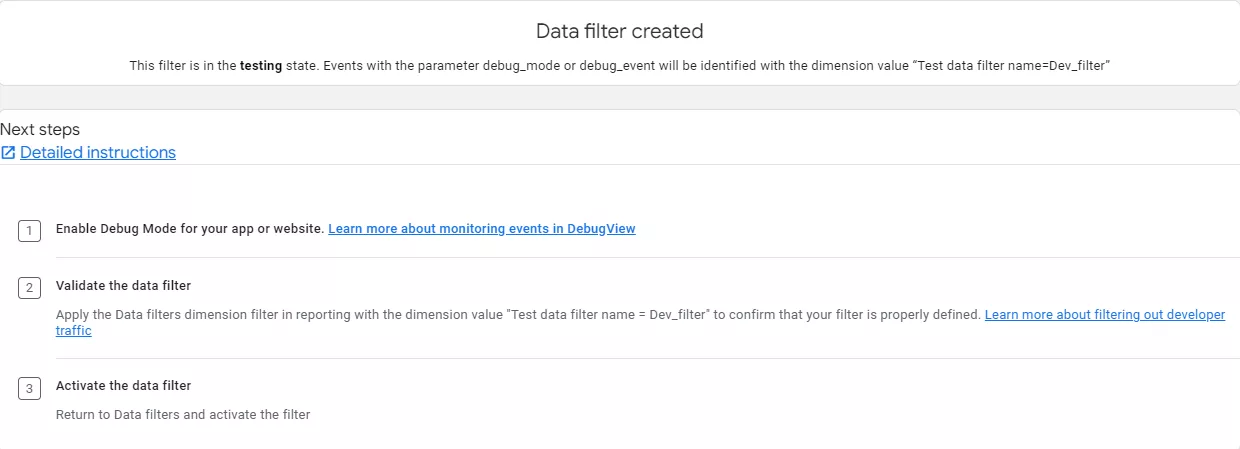
After this, actions in debug mode will not appear in reports and will not affect the data. However, if you need to view them, go to Administration (1), select your resource (2), and click “DebugView” (3).
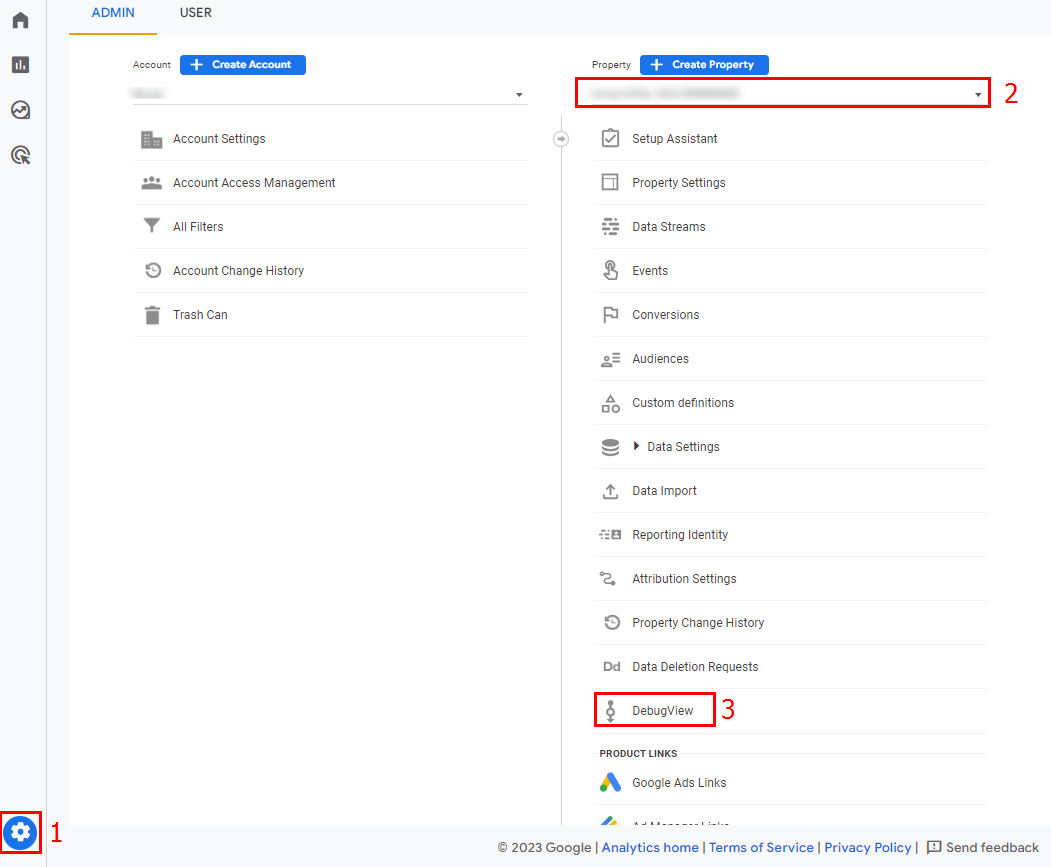
To activate debug mode on your gadget, use:
- preview mode in Google Tag Manager;
- GA Debugger extension for the Chrome browser.
Filter Limitations in GA4
- A maximum of 10 filters can be configured for one resource.
- The time between setting up and applying data filters can range from one to one and a half days.
- The maximum length for filter names is 40 characters. They must be unique to a single site. The first character must be a letter, followed by underscores, spaces, Unicode letters, and numbers.
- To create, modify, or delete a filter, you need site editor access.
- The effect of GA4 data filters is irreversible: you cannot view information that has already been filtered, even after disabling the filter.
- Applied filters do not change historical data: the information before applying the filter will remain the same.
Conclusions
- GA4 currently offers two types of data filters: “Internal Traffic” and “Developer Traffic.” Internal traffic is generated by website visits from copywriters, vendors, managers, SEO specialists, and others. Developer traffic comes from users configuring or monitoring the website in debug mode. This traffic impacts reporting metrics and should therefore be filtered.
- To create a filter, you must have site editor rights. Filters can be in one of three modes: testing, active, or inactive.
- To create an internal traffic filter, you need to identify internal traffic by IP address. To create a developer filter, you don’t need to identify traffic.
- You can check the filter’s operation in the “DebugView” report.
- You can create up to 10 filters per resource. Filters are irreversible, but they do not affect historical data.