
When creating a new website , a webmaster hopes it will consistently rank high for selected queries, attract thousands of daily visitors, and ultimately generate a consistently high income. However, for search engines to finally notice the resource, all efforts will need to be devoted to its optimization. For WordPress owners, this difficult task can be greatly simplified by the Yoast SEO plugin, which has been downloaded over 1,000,000 times.
Yoast himself is a familiar face to many webmasters who actively use WordPress. Having founded the Joost de Valk team, Yoast developed numerous extensions for this CMS, but it was the SEO extension that brought him his greatest fame.
How to Optimize WordPress SEO with a Plugin
The plugin installed in the system will add a whole package of settings to the standard editor, with which you can
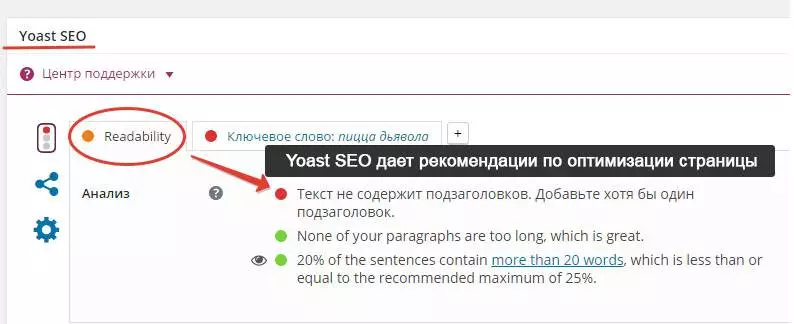
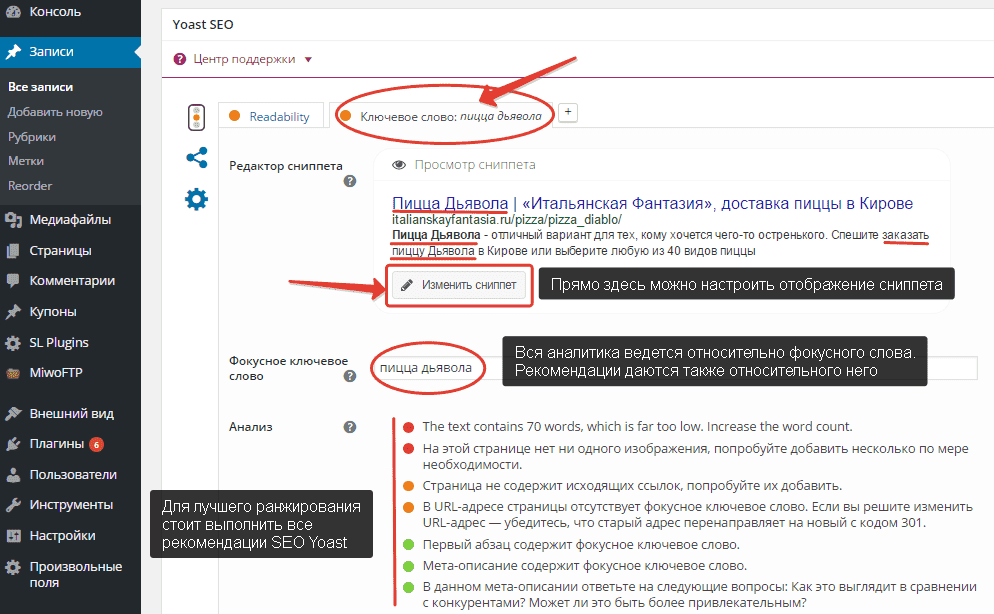
The webmaster should pay special attention to the “focus keyword.” Essentially, all WordPress SEO optimization for this page will revolve around the keywords entered. Yoast SEO immediately suggests where to add the Focus Keyword to improve the page’s subsequent search engine rankings. Once the webmaster confirms the focus keyword, this WordPress SEO plugin provides detailed analytics regarding the post’s optimization. By correcting all the “problem” areas, the webmaster can achieve better search engine rankings.
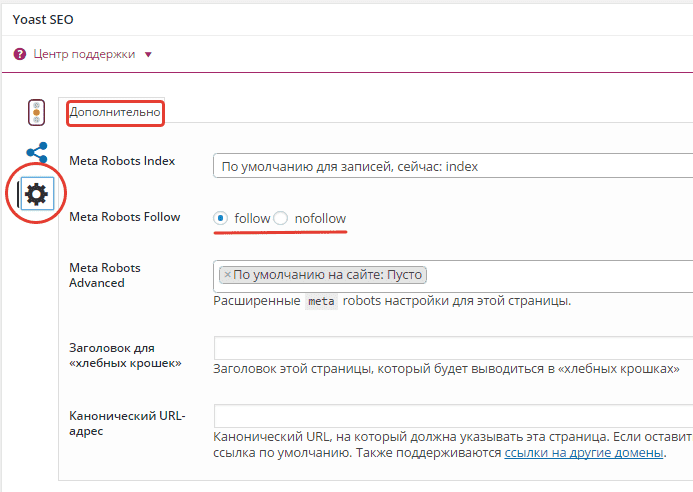
The third sidebar tab allows you to select additional page settings, including those that affect robots. Webmasters can disable indexing, customize the breadcrumbs header, or create a redirect. Thus, by actively using Yoast alone, you can address the full range of tasks required for professional WordPress SEO.
Don’t forget about social media . The second side tab allows you to create descriptions for Facebook. However, VK also handles them quite well.
How to Set Up the Yoast SEO WordPress Plugin
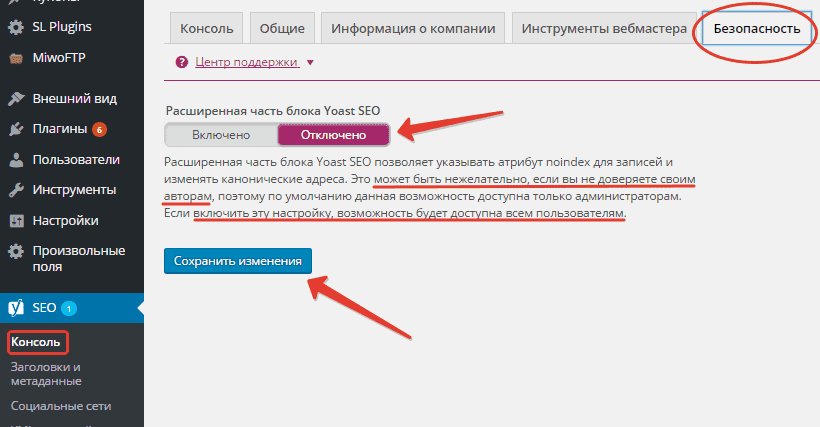
The initial setup of WordPress SEO by Yoast primarily involves security settings. For example, if the site has multiple authors whose loyalty the webmaster is unsure of, giving them access to all SEO settings (such as disabling pages from indexing) would be rash. This plugin allows you to disable search engine ranking controls, leaving only meta description settings. This can be done in the “Console” tab, “Security.” Incidentally, from this tab (the adjacent tab), you can also verify your site rights in various webmaster services.
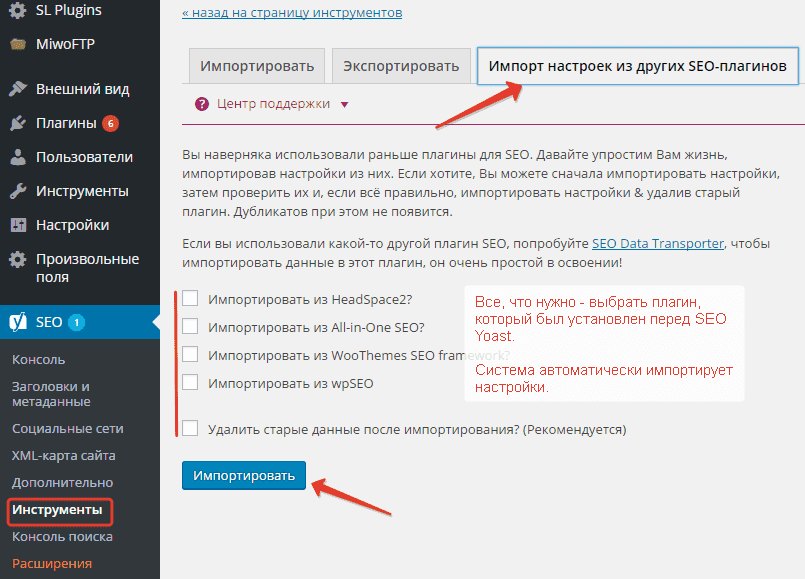
Some webmasters who used other optimization plugins before switching to Yoast SEO are concerned that the new plugin will disrupt the meta descriptions of existing pages. However, the developers have provided the ability to import old settings, such as those from popular plugins before SEO by Yoast, All in One SEO or HeadSpace2. This is very easy to do.
Using the “Tools” tab, go to the “Import settings from other SEO plugins” page, check the appropriate box, and click “Import.” Yoast SEO setup is complete; you can disable the old plugin and start exploring the new one. If you’re unsure, you can back up your entire site.
Setting up meta – title, description
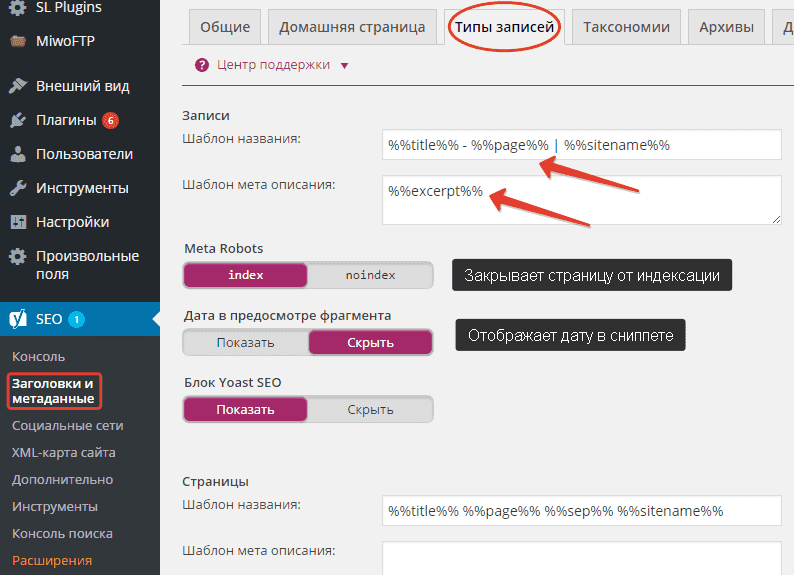
The webmaster will have to do the bulk of the work by optimizing titles and metadata. Yoast SEO offers extensive customization options for each individual post type and taxonomy. Settings are managed under the “Titles and Metadata” subsection, which, in turn, provides the webmaster with six more sections.
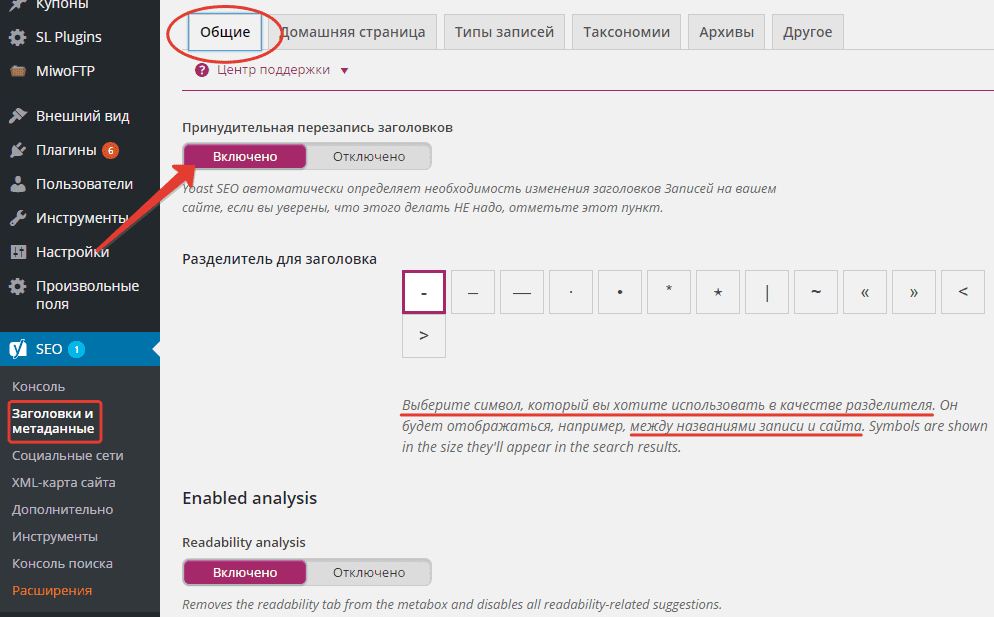
General. Here you can manage Yoast SEO’s permissions. By default, the plugin scans all headings and identifies those that need to be changed. If the webmaster doesn’t want to rewrite the headings of hundreds of old articles, this feature can be disabled. Here you can also select the post delimiter to display in headings and descriptions.
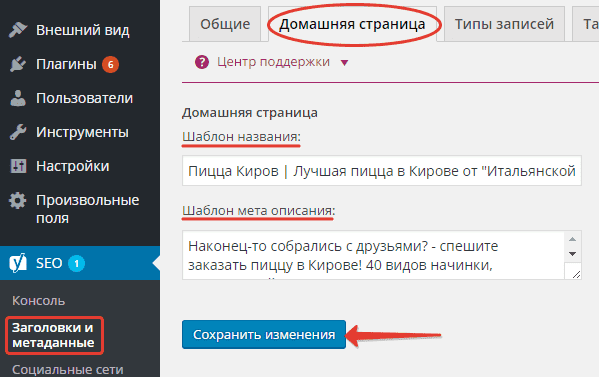
The “Home,” “Post Types,” and “Taxonomies” tabs are used to configure specific pages, posts, and categories. If your site has a “main” home page, which is where every visitor lands, then the Yoast SEO title and description will be set specifically for that page in the second tab.
IN
- %%title%% – generates the resource title;
- %%excerpt%% – generates an announcement;
- %%sitename%% – displays the name of the site;
- %%sep%% – enters a preset separator: “-“, “/”, “/”, “>>>”, etc.
Don’t enable noindex, otherwise your posts will be ignored by the robot and won’t appear in search results. Enable noindex for pages you don’t want indexed, such as tags, categories, or certain post types created with your WordPress theme. For news sites and blogs, the date display feature can be quite useful.
In “Archives”, you can set up templates for titles and descriptions for the search page, the 404 error page, and for archives by date and author.
How to Create Breadcrumbs in Yoast by SEO
Breadcrumbs are a small and often unnoticeable element that significantly improves a website’s usability and even has a positive impact on page linking. Owners of small blogs who have clearly divided their content into 4-5 subcategories can avoid this, but owners of multi-page websites will need to create breadcrumbs.
Yoast SEO has a dedicated section for this purpose, called “Breadcrumbs” (accessible through the “Advanced” tab). Webmasters who enable breadcrumbs can choose the style of the divider between the breadcrumbs, customize the text for the homepage and prefixes for various posts, and highlight the endpoint—in other words, customize both the presentation and design of this element.
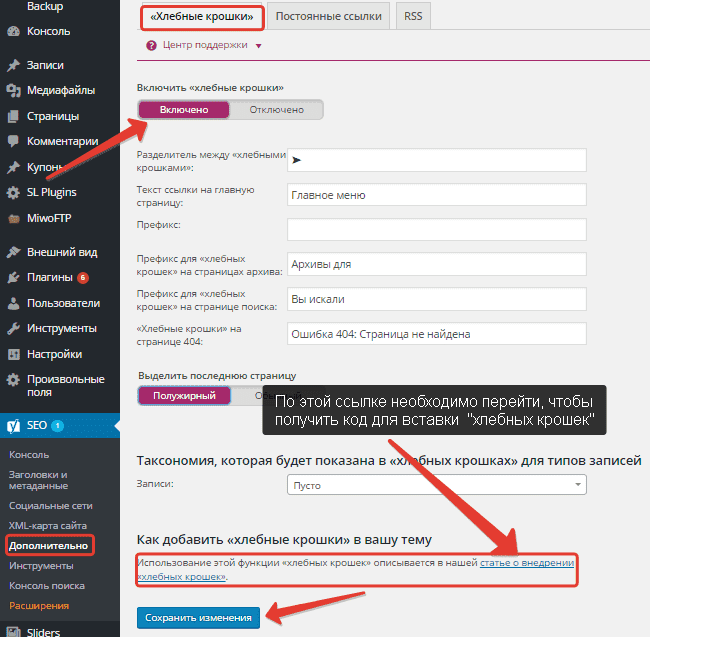
To make breadcrumbs appear in your theme, all you need to do is add a line of code to your template.
Paste this code where you want the breadcrumbs to appear in your page template:
[php]<?php if ( function_exists(\’yoast_breadcrumb\’)){ yoast_breadcrumb(
\’;
\’);
} ?>[/php]
Setting up a robots txt file in Yoast
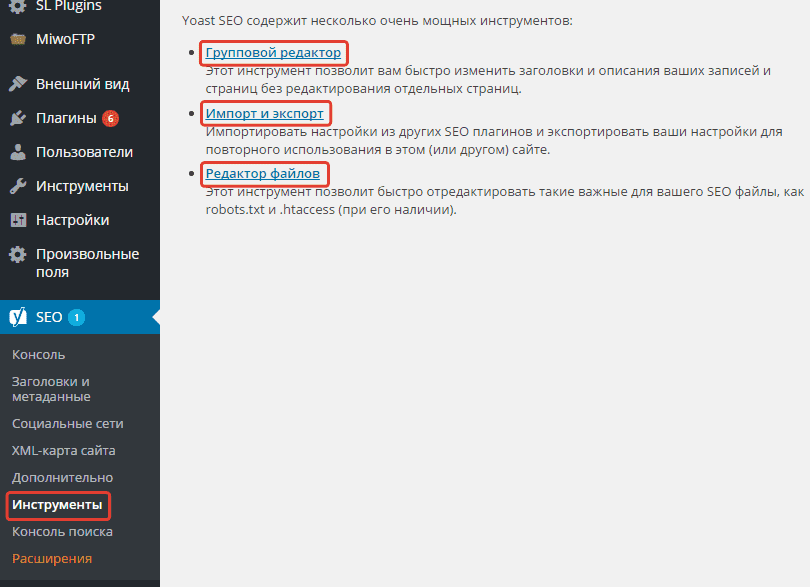
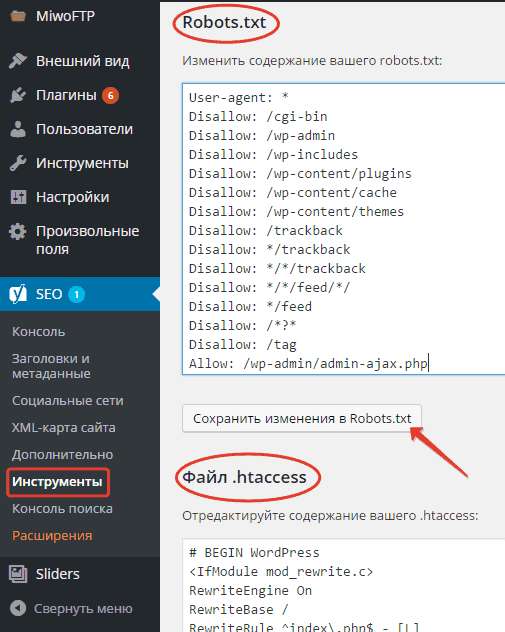
Not every webmaster wants to delve into the depths of FTP to make changes to the robots.txt file. This Yoast plugin allows you to access this crucial file directly from the WordPress admin panel. Simply click the “File Editor” link, hidden in the same place. <<“Tools” will display the contents of not only the robots.txt file but also the vital .htaccess file. You can make changes to both files directly on this page; just remember to click the “Save” button. Incidentally, if a website doesn’t yet have robots.txt installed, Yoast SEO will automatically generate a simple file if the webmaster so chooses. The website owner will only need to edit it manually.
Creating a sitemap in Yoast SEO XML
The developers have designed a single Yoast SEO plugin to perform the functions of at least three different plugins, each responsible for a different website optimization task. When creating a website from scratch, webmasters no longer have to worry about which plugin to install, for example, to create a sitemap, as Yoast SEO creates the sitemap automatically. However, if a website already has a dedicated plugin, such as Google XML Sitemaps, this feature can be disabled in Yoast to avoid conflicts.
Webmasters won’t even have to worry about how to create an XML sitemap in Yoast SEO: a fully functional and, most importantly, working sitemap is just one click away. Create it in the “XMS Sitemap” section.
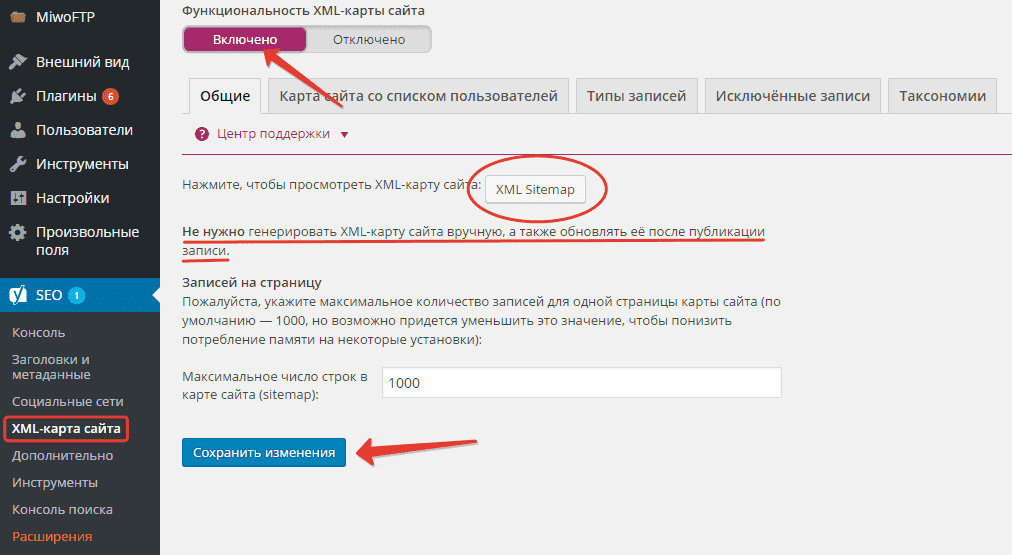
Enabling a sitemap unlocks more advanced settings: you can exclude media files, posts, or pages from the sitemap, or even remove entire categories, tags, or formats. This should be based on the site structure: every webmaster knows exactly what they don’t want to show to search engine crawlers.
Where can I download WordPress SEO by Yoast in Russian?
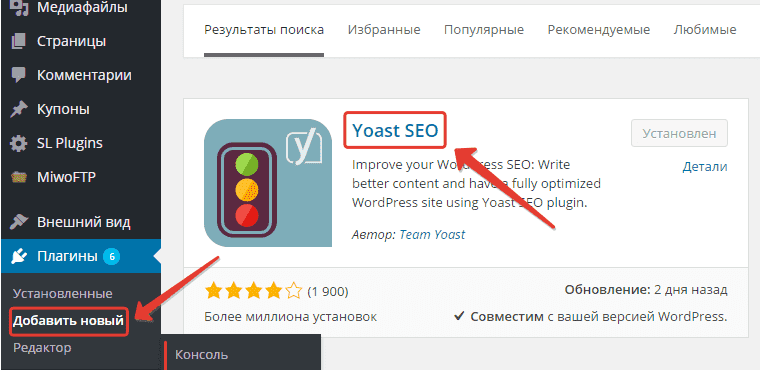
Webmasters will generally have no difficulty installing SEO by Yoast on WordPress: you can download this plugin in Russian directly from the official extension catalog of this CMS.
Source: EMBO Studio